
Smarter by Design.Simpler for Business
HTTP
What Is HTTP?
HTTP is the Authentication Providers type that sends the information the user writes in the login form to the organization's own authentication service (a REST API or an internal web service) with an HTTP request and accepts the login according to the response. The path, the method, the headers and the body of the request are defined in this profile; the address, the port and the TLS settings of the server are defined in an HTTP or HTTPS server profile on the Authentication Servers screen. Success is determined by the status code, the cookie, the redirect address or the JSONata expression of the response.
How does it work?
- A server profile with the HTTP or HTTPS protocol is defined on the Authentication Servers screen.
- HTTP is selected as the Provider Type on this screen; the path, the body and the success conditions of the request are entered.
- The profile is added to the access flow as an Authentication Provider step after the login form.
- The user information is placed into the request with the
%AGS_USER_INPUT(...)variables; if the response satisfies the success conditions the flow continues from the success transition, and if it does not, from the fail transition.
Operational Best Practices
- An HTTPS server profile. Since the passwords are carried to the service, the server profile must have the HTTPS protocol where possible.
- A strict success condition. If the status code alone is not sufficient, the response body must be checked with a JSONata expression as well; some services return 200 on a failed login too.
- The attributes from the response. The user information in the response of the service is mapped to the session with Custom User Attribute Mapping.
- The lockout. In this type, which verifies a password, Account Lockout Policies must be assigned.
How to Add?
A new HTTP provider is added through the TR7 web management interface with the following steps:
- The Configuration Menu is opened by clicking the TR7 logo at the bottom left.
- The AGS → Authentication → Authentication Providers → Add steps are followed.
- A unique and descriptive name is entered for the profile; HTTP is selected as the Provider Type.
- The Authentication Server, the request details and the success conditions are entered.
- The profile is added by clicking the
Addbutton.
Profile Add Form
When the AGS → Authentication → Authentication Providers → Add steps are followed and HTTP is selected in the Provider Type field, the form opens with the following fields.
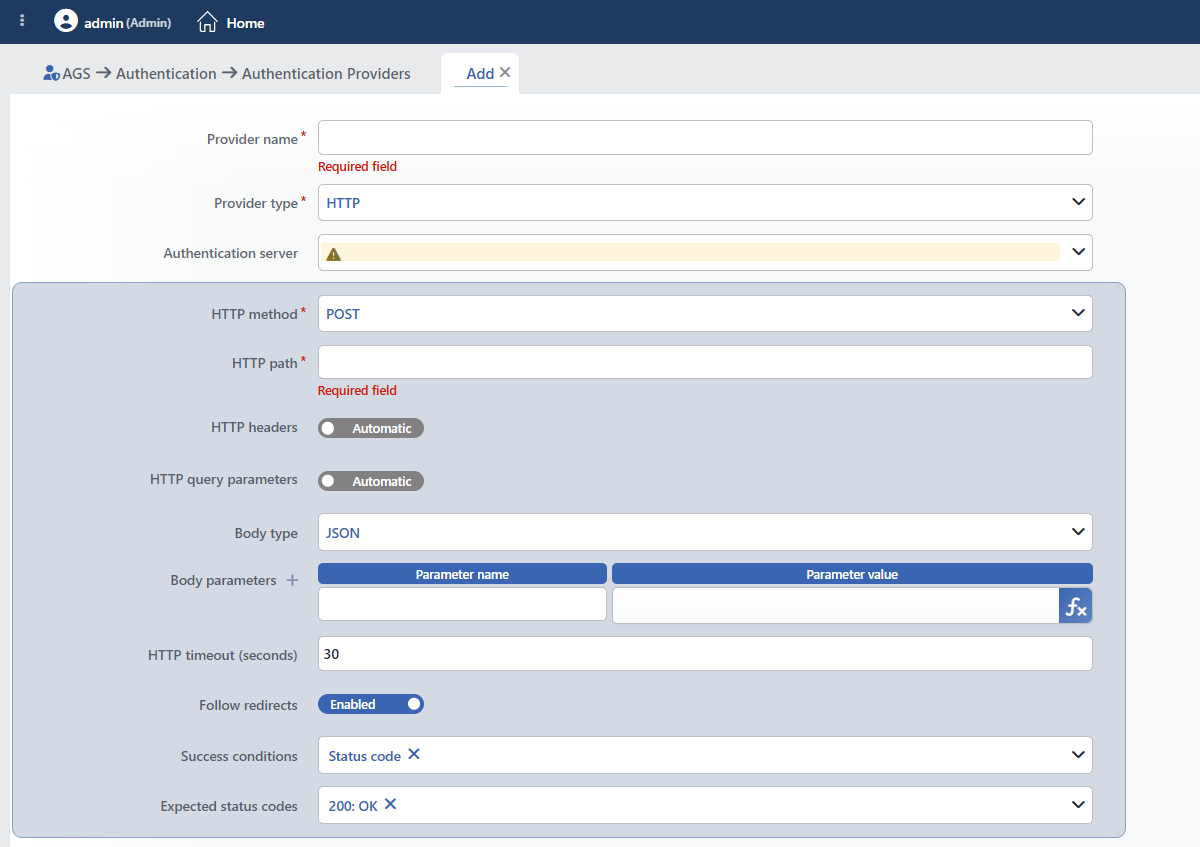 The Form While HTTP Is Selected
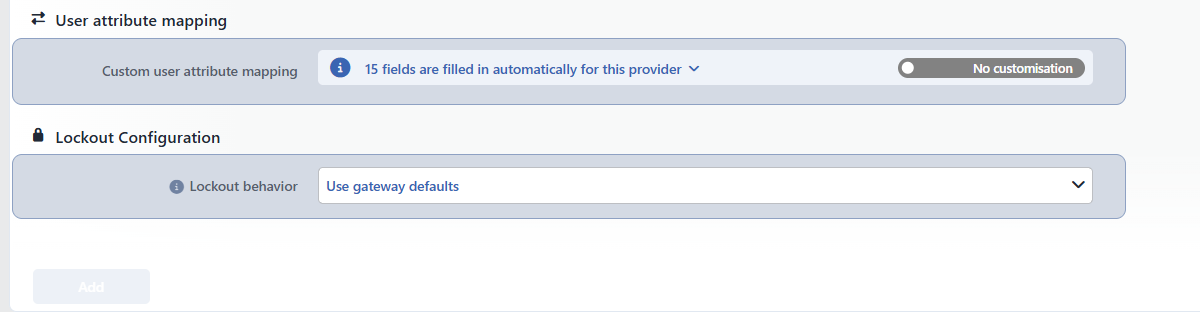 The Continuation of the HTTP Form
INFO
Provider Name Required
The name of the profile; it identifies the profile in the list, in the step selection in the flowchart, in the session list and in the logs. The name must be unique on the device; a second profile with the same name is not saved and the Name is used warning is displayed. When it is left empty, the Required field warning is displayed.
INFO
Provider Type Required
The provider type; HTTP is selected on this page. When the type is changed, only the fields of the new type are displayed and saved; the type is changed in the edit form as well.
INFO
Authentication Server
The server profiles on the Authentication Servers screen are listed; a profile with the HTTP or the HTTPS protocol must be selected. The selector does not filter by protocol, a profile outside these protocols can also be selected and the record is accepted. If there is a defined profile, the first profile in the list comes selected; if no profile is defined at all, the field opens empty and a warning icon is displayed in the field. The field is required in the schema, but the required mark and the Required field warning are not displayed in the form. With the + Add row at the top of the list that opens, a new profile is defined without leaving the page and comes selected in the field. The route table from which the request goes out comes from the Route Table setting of the server profile selected in this field; there is no separate route table field in the form in this type.
INFO
HTTP Method Required Default: POST
The HTTP method of the request to be sent to the service. There are 39 methods including the WebDAV methods in the drop-down list (GET, POST, PUT, PATCH, DELETE, HEAD, OPTIONS, PROPFIND, REPORT, SEARCH and others).
INFO
HTTP Path Required
The authentication path of the service (such as /api/login); it is appended to the address in the server profile. When it is left empty, the Required field warning is displayed.
INFO
HTTP Headers Default: Automatic
While the switch is in the Automatic position, no additional header is sent; when it is moved to the Choose position, the HTTP Header Name and HTTP Header Value table opens. Flow variables are used in the values.
INFO
HTTP Query Parameters Default: Automatic
While the switch is in the Automatic position, no additional query parameter is sent; when it is moved to the Choose position, the Parameter Name and Parameter Value table opens.
INFO
Body Type Default: JSON
The format of the request body is selected:
| Option | Meaning |
|---|---|
| None | No body is sent. |
| Multipart Form | The body is created in the multipart/form-data format from the Body Parameters table. |
| URL Encoded Form | The body is created in the application/x-www-form-urlencoded format from the Body Parameters table. |
| JSON | The body is created as a JSON object from the Body Parameters table. |
| Manual | The body is written manually in the Raw Body field. |
Body Parameters
The Parameter Name and Parameter Value table; the form opens with one empty row, new rows are added with the + icon next to the label and at least one row is present. The required mark is not displayed in the form; both fields of the row are required on saving and the Parameter Name values do not repeat. A smart variable is selected in the value field with the ƒx icon (e.g. username → %AGS_USER_INPUT(username)).
Raw Body Required (Manual)
The body text that is written manually; flow variables are used.
INFO
HTTP Timeout (seconds) Default: 30
The longest duration a response is awaited from the service; a value between 1 and 300 seconds is entered.
INFO
Follow Redirects Default: Enabled
While it is on, the redirects the service returns are followed and the success conditions are applied to the last response.
INFO
Success Conditions Default: Status code
The conditions to be sought in the response for the login to be considered successful; more than one is selected and each selection opens its own field:
| Option | Meaning |
|---|---|
| Status Code | The status code of the response must be in the Expected Status Codes list. |
| Cookie | The response must contain the cookie named in Expected Cookie Name. |
| Redirect URL | The response must redirect to the Expected Redirect URL address. |
| JSONata | The JSONata Success Expression expression must give a true result on the response. |
Expected Status Codes Default: 200: OK
Displayed while Status Code is selected; the status codes considered successful are selected in multiples.
Expected Cookie Name Required
Displayed while Cookie is selected; the name of the cookie that is expected to be present in the response.
Expected Redirect URL Required
Displayed while Redirect URL is selected; the address the response is expected to redirect to. The field accepts a smart variable with the ƒx icon.
JSONata Success Expression Required
Displayed while JSONata is selected. The expression is evaluated not on the response body but at the root of the response envelope; the body is accessed from the body field. The fields at the root are the following:
| Field | Meaning |
|---|---|
status | The HTTP status code of the last response after the redirects are followed (a number). |
initialStatus | The status code of the first response that starts the chain. |
finalUrl | The last address that is reached. |
headers | The response headers; under headers, the cookie headers are read from the set-cookie key. |
cookies | The name-value mapping of the cookies collected in all the steps; a single cookie is read from under cookies by its name. |
body | The response body; a parsed JSON object in API responses, raw text in applications that return HTML. |
redirects | The list of the redirect steps; each item contains url and statusCode. |
An example: status = 200 and body.success = true. When a field in the body is referred to as if it were at the root (e.g. status = "ok"), the expression never gives a true result.
User Attribute Mapping
INFO
Custom User Attribute Mapping Default: No customisation
How the fields in the provider response are mapped to the session attributes is managed. The information bar to the left of the field shows the number of fields mapped automatically for this type: 15 fields are filled in automatically for this provider. When the arrow icon on the bar is clicked, the 15 automatically mapped rows and the JSONata expression of each of them are listed.
When the switch on the right is moved to the Customised position, the AGS Attribute and Source Attribute table is displayed: the session attribute (with a suggestion list) is entered in the left column and the JSONata expression in the right column. The expression works on the whole of the request and response envelope; the user object is not at the root but under res.data. The fields at the root are res.data, res.status, res.finalUrl, res.headers, res.cookies, res.redirects, req.url, req.headers and req.queryParams (e.g. res.data.user.email). When the switch is turned on, the + Add link that adds a row appears on the right of the bar. A custom row that targets the same attribute as an automatic row overrides the automatic one (the replaced below badge) and the text of the information bar turns into the … fields are filled in automatically; you replace … of them form, which also says how many automatic rows are replaced. When a name outside the standard attributes of AGS is entered, this attribute is defined as a custom user field on the vService; names that start with _ are considered hidden fields and do not produce a custom user field.
Lockout Configuration
INFO
Lockout Behavior Default: Use gateway defaults
With which lockout policies the failed attempts on this provider are counted is selected:
| Option | Meaning |
|---|---|
| Use Gateway Defaults | The policies in the Default Lockout Policies list of the vService are used. |
| Replace Defaults | Only the policies selected in the Lockout Policies field are used. |
| Add to Defaults | In addition to the default policies of the vService, the ones selected in the Lockout Policies field are used as well. |
| No Lockout | Failed attempts are not counted on this provider, no lockout is performed. |
Lockout Policies
Displayed while Replace Defaults or Add to Defaults is selected; the built-in and defined policies on the Account Lockout Policies screen are selected.
INFO
Add
The profile is added by clicking the Add button; the tab closes and the profile is displayed in the list.
