
Smarter by Design.Simpler for Business
Multi-Factor Authentication (MFA)
What Is Multi-Factor Authentication (MFA)?
Multi-Factor Authentication (MFA) are the profiles that add a second verification step after the username/password verification in the AGS access flow: a one-time code sent to the e-mail of the user (Email OTP), a time-based code produced in the authenticator application (TOTP) or a code TR7 carries to an HTTP service (an SMS gateway, an e-mail service or a custom service) (HTTP OTP). The profile defines the length, the duration and the resend rules of the code, the TOTP algorithm and time window, the backup codes, the option of considering the device of the user trusted for a certain duration and, for HTTP OTP, the whole of the request to be sent.
The profile is added to the access flow of a vService with AGS enabled as an MFA step; the verification result is carried to the next step of the flow with the success or the fail transition. Three built-in profiles come with TR7 (TOTP Standard, TOTP Strict, Email OTP); these do not appear in the list of this screen, they are selected directly in the profile selectors in the flow editor.
3
MFA Method
Email OTP · TOTP · HTTP OTP
3
Built-in Profiles
TOTP Standard · TOTP Strict · Email OTP (they do not appear in the list, they are selected in the flow)
4–10
OTP Length
A numeric or alphanumeric code; 30 s – 60 min validity, the resend waiting duration
SHA1/256/512
TOTP Algorithm
6 or 8 digits, a 15–60 s period, a ±0–10 step time window, backup codes
HTTP
Custom OTP Channel
An HTTP request to SMS, e-mail or a custom service; the success condition is the status code, a cookie, a redirect or JSONata
Trust Device
Trusted Device
The "Trust this device" option on the MFA page; the device is considered trusted for the determined duration
How does it work?
- The MFA profile is defined on this screen: the MFA Method is selected and the OTP, TOTP or HTTP OTP fields are filled in according to the method.
- The profile is added to the access flow of the vService with AGS enabled as an MFA step after the authentication step; the user is directed to the
/mfapage. - In the Email OTP method the code is sent to the e-mail address of the user; for TOTP the user registers the authenticator application with the QR code (or with the manually entered secret key); for HTTP OTP the HTTP request in the profile is sent to the service with the code variables and the response is evaluated with Success Conditions.
- The verification result continues the flow from the success or the fail transition; if Trust Device is on, the Trust this device checkbox is shown on the MFA page and Trust Duration is the duration of being considered trusted.
Built-in Profiles
| Profile | MFA Method | Settings | Lockout |
|---|---|---|---|
| TOTP Standard | TOTP | Issuer %REQHEADER(host), SHA1, 6 digits, a 30 s period, window 1, the manual entry and the backup codes on, Trust Device 30 days | Default MFA Lockout |
| TOTP Strict | TOTP | SHA256, 8 digits, a 30 s period, window 0, the manual entry on, the backup codes off, Trust Device off | Default MFA Lockout |
| Email OTP | Email OTP | A 6-digit numeric code, 5 min validity, a 30 s resend waiting, Trust Device 7 days | Default MFA Lockout |
Since the built-in profiles are not in the list, they are not edited or deleted from this screen; their names are shown in the interface according to the language (TOTP Standart, TOTP Sıkı, E-posta OTP in the Turkish interface). For different settings a new profile is created on this screen.
Operational Best Practices
- The correct issuer for TOTP. TOTP Issuer Name appears as the issuer name next to the account in the authenticator application; the default
%REQHEADER(host)uses the domain name of the vService, and a fixed text such as the name of the organization is also given. - The window must not be kept wide. TOTP Window adds a tolerance of one period at each step; 1 is sufficient for clock drifts, 0 is the strictest setting.
- Email OTP requires an e-mail. It must be possible to obtain the e-mail address of the user from the session attributes (the provider mapping) or from the source selected with Email Source.
- The success condition for HTTP OTP. The response of the service must be checked not only with the status code but, if necessary, with a JSONata expression as well; the sending errors are written to the
send_errorcounter in the statistics. - The Trust Device duration. The trusted device duration must be selected compatibly with the session policy of the organization; it must be kept off on shared computers.
- The flows before deleting. When the profile is deleted, the flow step that uses it is left without a profile; the vServices that use it must be checked on the Used in tab in the preview.
How to Add?
A new Multi-Factor Authentication (MFA) profile is added through the TR7 web management interface with the following steps:
- The Configuration Menu is opened by clicking the TR7 logo at the bottom left.
- The AGS → Authentication → Multi-Factor Authentication (MFA) → Add steps are followed.
- A unique and descriptive name is entered for the profile.
- The MFA Method is selected and the fields specific to the method are filled in.
- The profile is added by clicking the
Addbutton.
TIP
Reaching the page via quick search
Instead of navigating the menu step by step, the related page is reached directly by using the search bar in the bottom left corner of the screen. The search bar opens with the Alt + T shortcut on Windows and Opt + T on macOS; typing the name of the feature being searched for is then sufficient.
The created profile is used in the profile selector of the MFA step in the access flow of the vServices with AGS enabled.
Multi-Factor Authentication (MFA) Listing Screen
The list of all Multi-Factor Authentication (MFA) profiles that are added on the TR7 device is reached by following the AGS → Authentication → Multi-Factor Authentication (MFA) path. Profile adding, editing and deleting operations are performed on this screen. The built-in profiles are not listed.
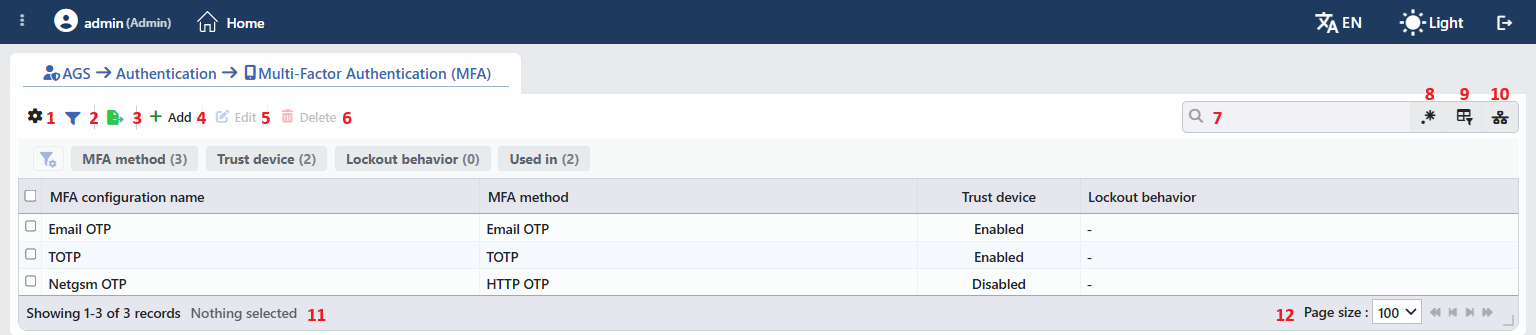 Multi-Factor Authentication (MFA) Profiles Listing Form
The table opens with the following columns by default:
| Column | Description |
|---|---|
| MFA Configuration Name | The name of the profile. |
| MFA Method | The verification method: Email OTP, TOTP or HTTP OTP. |
| Trust Device | The state of the trusted device option: Enabled or Disabled. |
| Lockout Behavior | The lockout behavior assigned to the profile; - if it is not assigned. |
There is no column that is hidden by default. The table is not sorted when it opens; when a column header is clicked, first a descending and then an ascending sort is applied, and on the third click the sort is removed.
The items in the toolbar are arranged from left to right in the following order; the last two items (Page Information and Page Size) are located in the information strip below the table.
Columns
Which columns are shown in the table is selected; all four of the columns come on. In the same panel the columns are reordered by dragging and the alignment is selected per column; the row height is fitted to the page with the Fit rows to the page button and the column layout is returned to the default with the Reset button. When the width badge next to a manually widened column is clicked, the column returns to the automatic width.
Filter
The Filter button is used to filter the profiles shown in the list according to certain criteria. There are four cards in the filter strip; the number next to the card name shows how many different values are found for that card in the profiles in the list:
| Card | What it filters |
|---|---|
| MFA Method | By the verification method. |
| Trust Device | By the state of the trusted device option (Enabled / Disabled). |
| Lockout Behavior | By the lockout behavior; if no behavior is assigned in any profile, the number of the card is displayed as 0. |
| Used in | The vServices that use the profiles and the Unused Entries value, which lists the profiles that are not used anywhere. |
Export
The table is exported as Excel, CSV or PDF by clicking the Export button. In the window that opens, the Filename, Format and Data Source, together with the Columns to be exported, are determined; the remaining fields are displayed according to the format: CSV Separator for CSV, Excel Sheet Name for Excel, and Page Orientation and Page Size for PDF.
Add
By clicking the Add button, the form for creating a new profile opens in the Add tab.
Edit
By clicking the Edit button, the edit form of the selected profile opens in the Edit tab. The button becomes enabled only when a single profile is selected.
The edit form is the same as the add form; all the fields including MFA Method are changed and the button at the bottom of the form carries the name Edit. When the method is changed, the fields of the previous method are removed from the form. The change is saved without asking for confirmation and the flows that use the profile run with the new settings.
Delete
When one or more profiles are selected and the Delete button is clicked, the related profiles are deleted. Before deleting, the "Are you sure?" confirmation is asked for.
WARNING
A profile that is in use can also be deleted and the confirmation window does not show the usage locations.
The flow step that uses the profile is left without a profile; the No provider profile selected warning appears on the Second Factor card on the AGS settings canvas of the vService and the flow must be edited and another profile must be selected. The delete operation does not touch the TOTP records of the users; if necessary they are reset from the TOTP tab of the vService. The delete operation is written to the user operation record.
Search
Used to search all information in the table.
RegExp Search
Used to search all the information in the table with a regular expression (RegExp). While the usage filter is active, this button is hidden.
Column Based Search
Used to perform a column-based search on the information in the table.
Usage Filter
Used to filter in the flow of which vServices the profiles are used. While the filter is active, a selector takes the place of the search box; when the icon is clicked again, the search box returns.
Page Information
Contains information about the total number of defined profiles and the number of profiles displayed in the list: Showing N-M of T records and the number of selected profiles (N selected, or Nothing selected when there is no selection).
Page Size
The maximum number of profiles to be displayed on the page is selected. On this screen the default is 100; the options are 5, 10, 20, 50, 100, 200, 500 and All.
Right-Click Menu
When a row is right-clicked, a menu with the profile's name in its title opens. Both operations in the menu apply only to the right-clicked profile; a selection made in the list does not affect the menu.
| Operation | What it does |
|---|---|
| Edit | Opens the editing form of the profile in the Edit tab; it is the same as the form opened by the Edit button in the toolbar. |
| Delete | Deletes the right-clicked profile; the same confirmation question as the deletion in the toolbar is displayed. |
Preview of the Selected Profile
When a row in the list is clicked, the preview of the profile opens on the right of the screen; when the selected row is clicked again, the panel closes. The header contains the phone icon, the name of the profile and the MFA subtitle, and the single operation is at the top right.
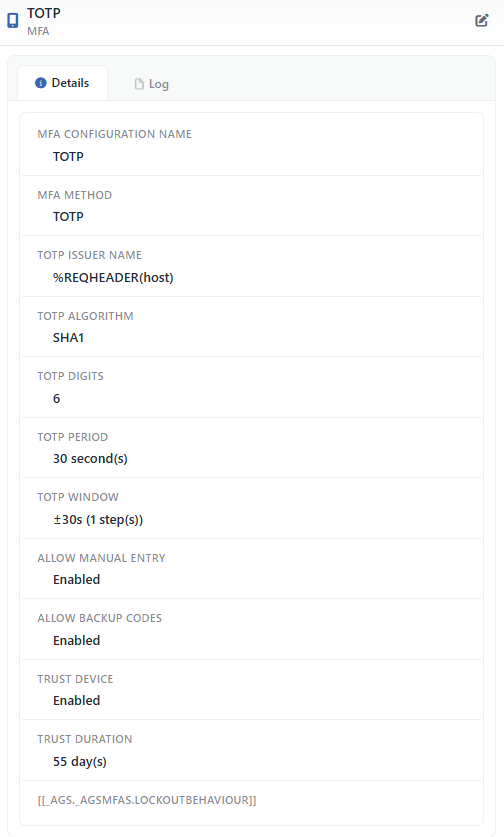 Preview of the Selected Profile
| Operation | What it does |
|---|---|
| Edit | Opens the editing form of the profile in the Edit tab. |
There are at most three tabs in the panel; Used in is displayed only if the profile is used in the flow of at least one vService:
Details
Lists the profile settings row by row according to the method (the table below).
Log
Lists the user operations on the profile (adding, editing, deleting) as a timeline.
Used in
Lists the vServices that use the profile in their flow. The badge next to the tab name shows the usage count.
The rows on the Details tab carry the same names as the form fields and only the ones belonging to the selected method are displayed:
| Row | Description | Visibility condition |
|---|---|---|
| MFA Configuration Name | The name of the profile. | Always |
| MFA Method | The verification method. | Always |
| Namespace | The route table from which the request goes out. | HTTP OTP |
| OTP Length | The number of characters of the code. | Email OTP, HTTP OTP |
| OTP Type | Numeric or Alphanumeric. | Email OTP, HTTP OTP |
| OTP Expiration | The validity duration of the code. | Email OTP, HTTP OTP |
| Allow OTP Resend | Enabled or Disabled. | Email OTP, HTTP OTP |
| Resend Cooldown | The resend waiting duration. | While the resend is on |
| TOTP Issuer Name | The issuer name (e.g. %REQHEADER(host)). | TOTP |
| TOTP Algorithm | The code production algorithm. | TOTP |
| TOTP Digits | The number of digits of the code. | TOTP |
| TOTP Period | The code change duration (e.g. 30 second(s)). | TOTP |
| TOTP Window | The tolerance; in the ±30s (1 step(s)) form (the seconds = the window × the period). | TOTP |
| Allow Manual Entry | Enabled or Disabled. | TOTP |
| Allow Backup Codes | Enabled or Disabled. | TOTP |
| Channel | The sending channel. | HTTP OTP |
| Phone Source | The source of the phone number; Automatic if it is not selected. | HTTP OTP, the SMS channel |
| Email Source | The source of the e-mail address; Automatic if it is not selected. | Email OTP or the Email channel of HTTP OTP |
| HTTP URL | The address of the service. | HTTP OTP |
| HTTP Method | The HTTP method. | HTTP OTP |
| HTTP Query Parameters | The query parameters. | HTTP OTP, if they are defined |
| HTTP Headers | The request headers. | HTTP OTP, if they are defined |
| Body Type | The body format. | HTTP OTP |
| Body Parameters | The body parameters. | HTTP OTP, a JSON or a form body |
| Raw Body | The manually written body. | HTTP OTP, a Manual body |
| HTTP Timeout (seconds) | The response waiting duration. | HTTP OTP |
| Follow Redirects | Enabled or Disabled. | HTTP OTP |
| Success Conditions | The selected success conditions. | HTTP OTP |
| Expected Status Codes | The expected status codes. | If the Status Code condition is selected |
| Expected Cookie Name | The expected cookie name. | If the Cookie condition is selected |
| Expected Redirect URL | The expected redirect address. | If the Redirect URL condition is selected |
| JSONata Success Expression | The expression that works on the response. | If the JSONata condition is selected |
| Trust Device | Enabled or Disabled. | Always |
| Trust Duration | The duration of being considered trusted (e.g. 55 day(s)). | While Trust Device is on |
| [[_AGS._AGSMFAS.LOCKOUTBEHAVIOUR]] | The lockout behavior assigned to the profile. The label of the row is displayed as the untranslated raw key; in the profiles created from the interface the value is empty. | Always |
| Lockout Policies | The names of the lockout policies assigned to the profile. | While the lockout behavior is Replace Defaults or Add to Defaults and the list is not empty |
Profile Add Form
A new Multi-Factor Authentication (MFA) profile is added on the TR7 device by following the AGS → Authentication → Multi-Factor Authentication (MFA) → Add steps. The form opens with Email OTP selected; when the MFA Method is changed, only the fields of the selected method are displayed. Below, first the fields that are common to all the methods and then the own fields of each method are explained.
Common Fields
INFO
MFA Configuration Name Required
The name of the profile; it identifies the profile in the profile selection in the flow editor and in the logs. The name must be unique on the device; a second profile with the same name is not saved and the Name is used warning is displayed. When it is left empty, the Required field warning is displayed.
INFO
MFA Method Required Default: Email OTP
How the second factor is verified is selected:
| Option | Meaning |
|---|---|
| Email OTP | The one-time code is sent to the e-mail address of the user with the e-mail settings of TR7. The details: Email OTP. |
| TOTP | The user enters the time-based code produced in the authenticator application (e.g. Google Authenticator, Microsoft Authenticator); no external service is required. The details: TOTP. |
| HTTP OTP | The one-time code is carried to an SMS gateway, an e-mail service or a custom service with the HTTP request defined in the profile. The details: HTTP OTP. |
INFO
Trust Device Default: Disabled
While it is on, the Trust this device checkbox is shown on the MFA page; the user who checks the box is not asked for MFA again from the same device for the Trust Duration.
Trust Duration Default: 30 days
Displayed only while Trust Device is on; the duration for which the device is considered trusted is entered as a value and a unit (days or hours).
Email OTP
In the Email OTP method the access engine produces a one-time code and sends it to the e-mail address of the user using the system e-mail settings of TR7; the user enters the code on the MFA page. The e-mail address of the user is taken from the user field in the session or from the source selected with Email Source. It does not require an external service definition.
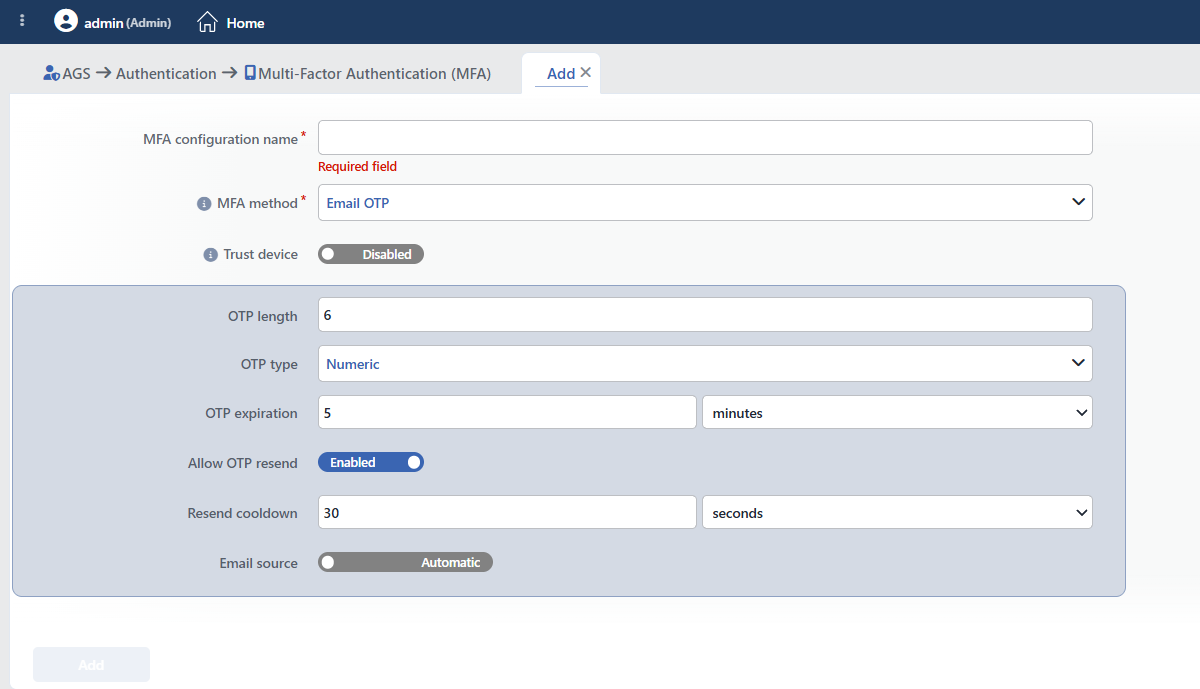 The Form While Email OTP Is Selected
INFO
OTP Length Default: 6
The number of characters of the code; an integer between 4 and 10 is entered.
INFO
OTP Type Default: Numeric
Which characters the code consists of is selected:
| Option | Meaning |
|---|---|
| Numeric | The code consists only of digits; it is easy to enter on mobile devices. |
| Alphanumeric | The code consists of letters and digits; it offers more possibilities at the same length. |
INFO
OTP Expiration Default: 5 minutes
The validity duration of the sent code; a value and a unit (seconds or minutes) are entered, and a duration between 30 seconds and 60 minutes is accepted. A code that has expired is not accepted.
INFO
Allow OTP Resend Default: Enabled
While it is on, when the code does not arrive the user requests a new code from the MFA page.
Resend Cooldown Default: 30 seconds
Displayed only while Allow OTP Resend is on; the duration that has to be waited between two code requests. The unit list contains only seconds; a duration between 5 and 600 seconds is accepted.
INFO
Email Source Default: Automatic
The source of the e-mail address to which the code is sent:
| Option | Meaning |
|---|---|
| Automatic | The address is taken automatically from the E-mail field of the user in the session. |
| Choose | The address is taken from the entered Smart Variables variable or from a fixed value. |
TOTP
In the TOTP (Time-based One-Time Password) method the code is produced at certain intervals in the authenticator application on the phone of the user. On the first login the user registers the application with the QR code shown on the MFA page (or with the manually entered secret key); on the following logins they write the code in the application. The code production and verification are performed on the device, no external service is required. The TOTP records of the users are monitored on the TOTP tab of the vService.
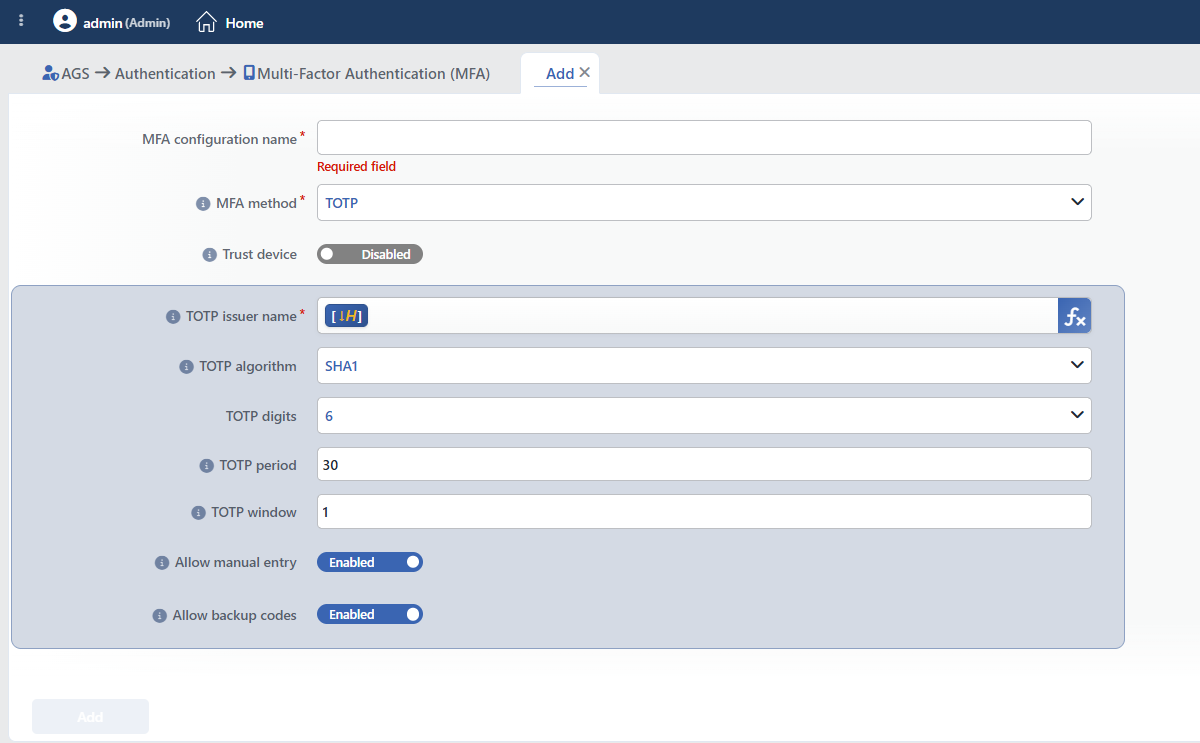 The Form While TOTP Is Selected
INFO
TOTP Issuer Name Required Default: %REQHEADER(host)
The issuer name that appears next to the account in the authenticator application. Smart Variables variables are used; the default value is the Host header in the request, that is, the domain name of the vService. A fixed text such as the name of the organization is also entered.
INFO
TOTP Algorithm Default: SHA1
The algorithm used in the code production is selected:
| Option | Meaning |
|---|---|
| SHA1 | The algorithm that all the common authenticator applications support. |
| SHA256 | A stronger algorithm; the application that is used has to support it. |
| SHA512 | The strongest algorithm; the application that is used has to support it. |
INFO
TOTP Digits Default: 6
The number of digits of the code is selected:
| Option | Meaning |
|---|---|
| 6 | The default code length of the common applications. |
| 8 | A longer code that is harder to guess. |
INFO
TOTP Period Default: 30
How many seconds the code changes in; a value between 15 and 60 is entered.
INFO
TOTP Window Default: 1
The tolerance granted for the drift between the device clock of the user and the TR7 clock; a number of steps between 0 and 10 is entered. Each step is one period (1 = ±30 s, 2 = ±60 s); 0 accepts only the current code.
INFO
Allow Manual Entry Default: Enabled
While it is on, the secret key is shown as text during the registration to the user who cannot scan the QR code and is entered into the application manually.
INFO
Allow Backup Codes Default: Enabled
While it is on, the user produces one-time backup codes for the cases in which they cannot access their phone.
HTTP OTP
In the HTTP OTP method the access engine produces a one-time code; TR7 carries this code to an SMS gateway, an e-mail service or the organization's own service with the HTTP request defined in the profile. The address, the method, the headers and the body of the request are defined entirely in the profile; the response of the service is evaluated with Success Conditions. The code and the message are placed into the request with the OTP variables below.
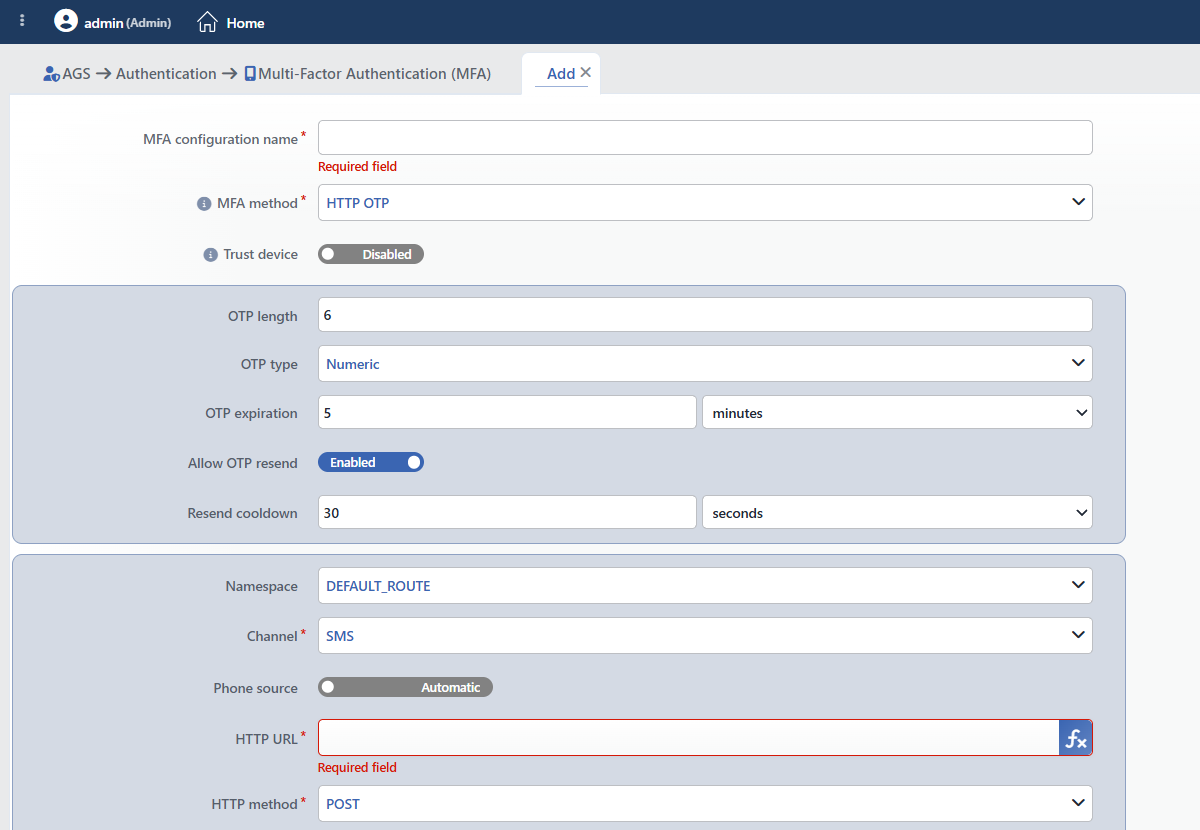 The Form While HTTP OTP Is Selected
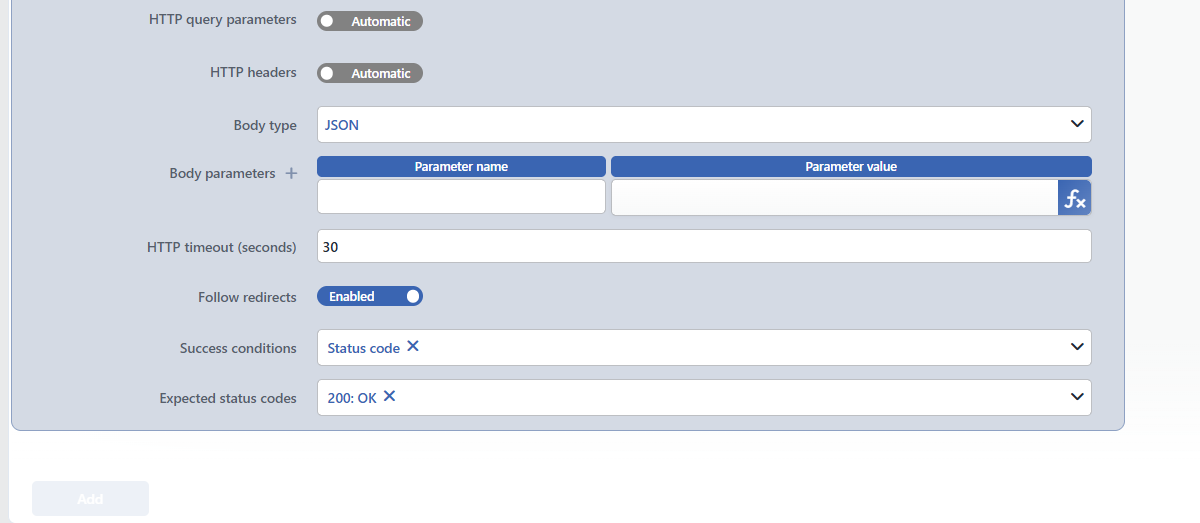 The Continuation of the HTTP OTP Form
Smart Variables variables are used in the HTTP URL, the query, header and body values, Raw Body, Expected Redirect URL and the Phone Source and Email Source fields. Four OTP variables specific to these fields are offered:
| Variable | Meaning |
|---|---|
%AGS_OTP_CODE | The produced code. |
%AGS_OTP_MESSAGE | The ready message text that contains the code. |
%AGS_OTP_MESSAGE_DETAILED | The detailed message text that contains the code and additional information. |
%AGS_OTP_RECIPIENT | The recipient (the phone number or the e-mail address). |
INFO
OTP Length Default: 6
The number of characters of the code; an integer between 4 and 10 is entered.
INFO
OTP Type Default: Numeric
Which characters the code consists of is selected:
| Option | Meaning |
|---|---|
| Numeric | The code consists only of digits; it is the most common choice for sending over SMS. |
| Alphanumeric | The code consists of letters and digits. |
INFO
OTP Expiration Default: 5 minutes
The validity duration of the sent code; a value and a unit (seconds or minutes) are entered, and a duration between 30 seconds and 60 minutes is accepted.
INFO
Allow OTP Resend Default: Enabled
While it is on, when the code does not arrive the user requests a new code from the MFA page.
Resend Cooldown Default: 30 seconds
Displayed only while Allow OTP Resend is on; the duration that has to be waited between two code requests. The unit list contains only seconds; a duration between 5 and 600 seconds is accepted.
INFO
Namespace Default: the default route table
The Route Tables record from which the HTTP request goes out; a route table that has access to the service must be selected. The field comes filled with the default route table of the device; the name of this table varies by device (e.g. DEFAULT or DEFAULT_ROUTE).
INFO
Channel Required Default: SMS
Over which channel the code is carried is selected; the selection determines the source of the recipient and the channel family it is counted in in the statistics:
| Option | Meaning |
|---|---|
| SMS | The code is sent to the phone number with an SMS gateway; the Phone Source field is displayed. |
| The code is sent to the e-mail address with an e-mail service; the Email Source field is displayed. | |
| Custom | The code is carried to the organization's own service; the recipient source field is not displayed. |
Phone Source Default: Automatic
The source of the phone number in the SMS channel:
| Option | Meaning |
|---|---|
| Automatic | The number is taken automatically from the Phone field of the user in the session. |
| Choose | The number is taken from the entered smart variable or from a fixed value. |
Email Source Default: Automatic
The source of the e-mail address in the Email channel:
| Option | Meaning |
|---|---|
| Automatic | The address is taken automatically from the E-mail field of the user in the session. |
| Choose | The address is taken from the entered smart variable or from a fixed value. |
INFO
HTTP URL Required
The service address to which the request is sent; smart variables and the OTP variables are used. When it is left empty, the Required field warning is displayed.
INFO
HTTP Method Required Default: POST
The HTTP method of the request; it is selected from the extended HTTP method list, which also contains the WebDAV methods. The SMS gateways mostly expect POST or GET.
INFO
HTTP Query Parameters Default: Automatic
While the switch is in the Automatic position, no additional query parameter is sent; when it is moved to the Choose position, the table opens and Parameter Name and Parameter Value are entered on each row. Smart variables and the OTP variables are used in the value fields.
INFO
HTTP Headers Default: Automatic
While the switch is in the Automatic position, no additional header is sent; when it is moved to the Choose position, the table opens and HTTP Header Name and HTTP Header Value are entered on each row (e.g. Authorization for the service API key).
INFO
Body Type Default: JSON
The format of the request body is selected:
| Option | Meaning |
|---|---|
| None | No body is sent; the information is carried in the address or in the query parameters. |
| Multipart Form | The body is created in the multipart/form-data format from the Body Parameters table. |
| URL Encoded Form | The body is created in the application/x-www-form-urlencoded format from the Body Parameters table. |
| JSON | The body is created as a JSON object from the Body Parameters table. |
| Manual | The body is written manually in the Raw Body field. |
Body Parameters Required (JSON and form)
Displayed in the JSON, Multipart Form and URL Encoded Form types; a row is added with the + icon next to the label and Parameter Name and Parameter Value are entered on each row. At least one row is present; smart variables and the OTP variables are used in the value fields.
Raw Body Required (Manual)
Displayed in the Manual type; the body text is written manually and smart variables and the OTP variables are used.
INFO
HTTP Timeout (seconds) Default: 30
The longest duration a response is awaited from the service; a value between 1 and 300 seconds is entered. When the duration expires, the sending is considered failed.
INFO
Follow Redirects Default: Enabled
While it is on, the redirects the service returns are followed and the success conditions are applied to the last response.
INFO
Success Conditions Default: Status code
The conditions to be sought in the response for the sending to be considered successful; more than one is selected and each selection opens its own field:
| Option | Meaning |
|---|---|
| Status Code | The HTTP status code of the response must be in the Expected Status Codes list. |
| Cookie | The response must contain the cookie named in Expected Cookie Name. |
| Redirect URL | The response must redirect to the Expected Redirect URL address. |
| JSONata | The JSONata Success Expression expression must give a true result on the response. |
Expected Status Codes Default: 200: OK
Displayed while Status Code is selected; the status codes considered successful are selected in multiples.
Expected Cookie Name
Displayed while Cookie is selected; the name of the cookie that is expected to be present in the response.
Expected Redirect URL
Displayed while Redirect URL is selected; the address the response is expected to redirect to.
JSONata Success Expression
Displayed while JSONata is selected; the expression that works on the response body of the service and gives a true result on success (e.g. the check of the status field in the response JSON).
INFO
Add
The profile is added by clicking the Add button; the tab closes and the profile is displayed in the list.
Management of the TOTP Records
The TOTP records of the users are monitored not on this screen but on the TOTP tab on the screen of the related vService with AGS enabled; the secret key and the backup codes themselves are not shown, only the number of the remaining backup codes is listed. The tab lists the User ID, Username, Email, Enrolled At and Backup Codes columns (in a cluster setup additionally the Source column, which shows the device the record is on) with filter cards; the record of the selected users is deleted with the Reset TOTP button (with the Are you sure? confirmation) and the user is expected to register their application again. For the details the TOTP page is consulted.
Operating Mechanism
INFO
- Distribution. The profiles are transferred to the access engines of the vServices with AGS enabled; after a change the configuration is applied again.
- The flow. The MFA step runs after the authentication step; the user enters the code on the
/mfapage and the result returns to the flow with the success or the fail transitions. - The lockout. Only the own lockout policies of the profile are bound to the MFA step; the built-in profiles carry the Default MFA Lockout policy and in the profiles created from the interface no policy is defined. The Default Lockout Policies list of the vService does not flow into this step and the Lockout Behavior option in the providers is not evaluated in the MFA step (see Account Lockout Policies).
- The statistics. The OTP counters are monitored on a channel family basis (TOTP, e-mail OTP, SMS OTP, custom OTP and the total) on the Live Stats tab of the vService; in TOTP there are only the display and verification counters, and the Email channel of HTTP OTP is counted in the e-mail OTP family.
- Cluster. The profiles are synchronized between the devices with the LB configuration.
- Logs. Adding, editing and deleting are monitored on the User Logs screen as the MFA object.
Scope and Limits
INFO
- License. The screen depends on the AGS license; for the details the Products & Licensing page must be consulted.
- Permission. The AGS screens depend on the Load Balancer permission area; for a user who does not have the permission the You don't have access to this page card is displayed instead of the page.
- The name is unique. A second profile carrying the same name is not saved. The check is performed only among the profiles listed on this screen; the names of the built-in profiles do not enter the check.
- The built-in profiles are not listed, they are not edited or deleted from this screen.
- The lockout settings are not in the form. The lockout behavior and the policies of the profile are set with the REST API; in the profiles created from the interface no lockout policy is defined.
- HTTP OTP does not use a server record. The request address is in the own HTTP URL field of the profile; it has no relation with the Authentication Servers records.
- Deleting does not perform a reference check; a profile in use is deleted as well.
Usage Locations
| Usage location | Field | Purpose |
|---|---|---|
| A vService with AGS enabled → Flowchart (edit mode) | The MFA step, the MFA Profile selector | The second factor verification after the authentication; the built-in profiles are selected here as well |
| A vService with AGS enabled → the TOTP tab | The user records | The monitoring of the TOTP records and their reset with Reset TOTP |
| A vService with AGS enabled → Live Stats | The OTP channel dashboard | The OTP counters on a channel family basis |
| Notification Profiles | Failed MFA Threshold (per min) | The production of an alarm when the threshold of failed MFA attempts per minute is exceeded |
| Smart Variables | %AGS_MFA_FAILS | The use of the number of the failed MFA attempts of the session in the conditions and the actions |
