
Smarter by Design.Simpler for Business
Trusted Proxies
What Is the Trusted Proxies Profile?
Trusted Proxies is an HTTP vService profile that makes it possible for the real client IP address to be determined correctly in the scenarios where there is a proxy or a CDN (Cloudflare, Akamai, a corporate upstream load balancer, etc.) in front of TR7.
In such an architecture, TR7 receives the connection not directly from the client but from the proxy in front; therefore it normally sees the address of the proxy as the client IP. The real visitor address, on the other hand, is carried by the proxy in a forwarded header (X-Forwarded-For or a custom header such as CF-Connecting-IP). The Trusted Proxies profile gives TR7 two pieces of information: in which header the real client address is carried and from which proxy networks this header can be trusted when it arrives.
When the connection comes from one of the defined trusted networks, TR7 replaces the client address it works with with the address in the header. From this point on, all the components that use the client address (the access log, the geographic location, IP Reputation / blacklist, rate limiting / DDoS protection and the IP-based conditions) see the real visitor instead of the proxy.
How does it work?
- The source address of the incoming connection (the address of the proxy in front) is recorded.
- Whether this address is within the defined trusted networks (Trusted Networks) is checked.
- Only if there is a match, the real client address is read from the selected header (the first/last entry of
X-Forwarded-Foror a custom header) and the client IP is replaced with this value. - If there is no match, the header is ignored; the address from which the connection came is used as the client IP.
The Importance of the Trusted Proxies Profile
If a Trusted Proxies profile is not defined while there is a proxy/CDN in front of TR7, all the mechanisms that use the client address see the address of the proxy in front. This situation leads to serious problems: the access logs and the reports show a single address (the proxy), the geographic location is calculated incorrectly, the IP Reputation and blacklist checks become ineffective, rate limiting and DDoS protection evaluate all the users as a single IP, and the IP-based conditions work incorrectly.
The Trusted Proxies profile solves this problem by recovering the real visitor address safely (only from the trusted proxy networks). In this way, the security and monitoring layers work over the correct client.
Correct Logs
Monitoring & Reporting
The access log and the reports show the real visitor address
Effective Security
IP-based checking
IP Reputation, blacklist and DDoS protection over the real IP
Correct Location
Geographic resolution
Geo is calculated with the visitor’s IP instead of the proxy
Fair Limit
Rate limiting
The rate limit is applied on a user basis, not on a single proxy IP
The Default Trusted Proxies Profile Behavior
Unlike the profiles such as Cache or Timeout, there is no ready (default) profile for Trusted Proxies. This feature is completely optional and requires a profile to be assigned explicitly on a vService basis.
| Situation | Behavior |
|---|---|
| No profile assigned (default) | The forwarded headers (X-Forwarded-For, etc.) are ignored; the address from which the connection comes directly is used as the client IP. |
| A profile assigned | On the connections coming from a trusted network, the real client address is resolved from the header and the client IP is replaced with it. |
In order for the real client address to be resolved, a profile must definitely be defined and assigned to the related vService. If TR7 is directly open to the internet (if there is no trusted proxy in front of it), this profile must not be used.
Operational Best Practices
- The trusted networks are kept narrow. The trusted networks must be limited only to the real IP ranges published by the proxy/CDN. The ranges that cover all the addresses (
0.0.0.0/0,::/0) are applied: in this case every address on the internet is considered trusted and anyone who can reach the service directly appears as the IP they write into the header. When a network with a/0or/1prefix is entered, the form shows a warning but does not block the save. - It is used only when really behind a proxy. If TR7 is directly open to the internet, this profile must not be enabled; otherwise the clients can report a fake IP by imitating the header.
- The correct header is selected. The header suitable for the related CDN is used:
CF-Connecting-IPfor Cloudflare,True-Client-IPfor Akamai,X-Forwarded-Forin general proxy chains. If XFF is used, the first or the most trusted (last) entry is selected according to the structure of the chain. - More than one source is defined for more than one CDN/proxy. In the same profile, a separate source (header + trusted networks) can be defined for every proxy; the sources are evaluated in order and the first matching one is applied.
- The "Used in" information is checked. The profile changes instantly affect the client IP resolution of all the connected vServices.
Supported vService Types
HTTP
L7 TCP
Network
How to Add?
A new Trusted Proxies Profile is added through the TR7 web management interface with the steps below:
- The Configuration Menu is opened by clicking the TR7 logo at the bottom left.
- The Load Balancer → Profiles → Trusted Proxies → Add steps are followed.
- A unique and descriptive name is entered for the profile.
- The necessary values are configured.
- The profile is added by clicking the
Addbutton.
TIP
Reaching the page via quick search
Instead of navigating the menu step by step, the related page is reached directly by using the search bar in the bottom left corner of the screen. The search bar opens with the Alt + T shortcut on Windows and Opt + T on macOS; typing the name of the feature being searched for is then sufficient.
The created profile can be used on one or more vServices.
The Scope of the Resolution
INFO
The Components That Use the Resolved Address
The address resolution is performed at the very beginning of the request processing. For this reason, all of the following components see the real client address: the conditions, the WAF, the bot scoring and CAPTCHA chain, Traffic Protection, the quarantine and rate limiting counters, the IP reputation and country checks, and also all the log records.
The IP Log Masking action also runs after this resolution; therefore the masked address is not the address of the proxy but of the resolved real client.
If the Add X-Forwarded-For Header option in the vService settings is on, the header forwarded to the Backend Service also carries the resolved real address.
The connection source before the resolution (the address of the proxy in front), on the other hand, can be used in the logs, the reports and the conditions with the %PROXY_SRC smart variable; this variable is filled only when a Trusted Proxies profile is assigned.
The header coming from an untrusted source is not deleted
If the connection comes from outside the defined trusted networks, the address in the header is not used; however, the header itself is not removed and is forwarded to the Backend Service as it is. On the application side, this header must not be trusted directly.
Profiles Listing Screen
By following the Load Balancer → Profiles → Trusted Proxies path, the list of all the Trusted Proxies Profiles added on the TR7 device is reached. Profile adding, editing and deleting operations are performed through this screen.
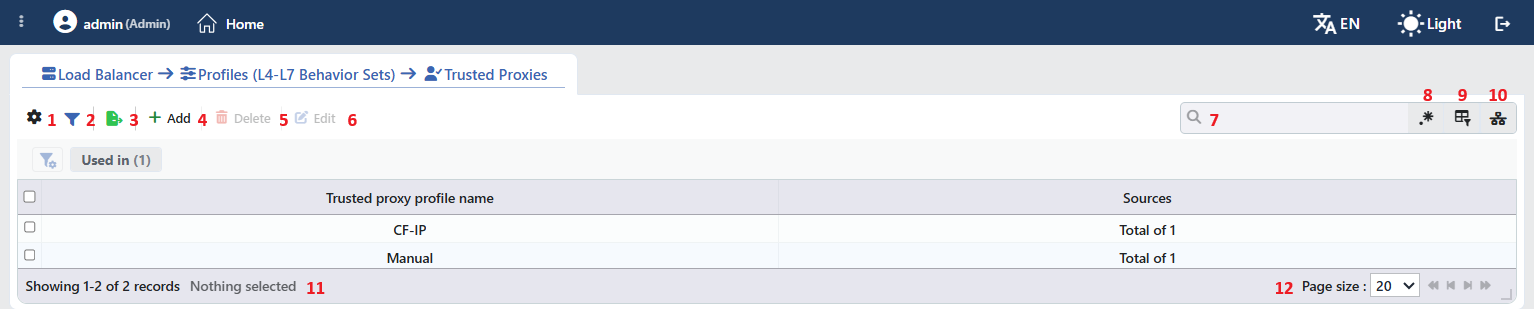 Trusted Proxies Profiles Listing Form
The table opens with the following columns by default:
| Column | Description |
|---|---|
| Trusted Proxy Profile Name | The name of the profile. |
| Sources | The number of sources in the profile, in the Total of N form; when the cell is hovered over, every source is listed comma separated in the <its type>: <header name> (<trusted networks>) form. |
There is no column hidden by default; these two columns are in the column selector. The table is not sorted when it opens; when a column header is clicked, descending sorting is applied first, then ascending, and on the third click the sorting is removed.
The items in the toolbar are arranged from left to right in the following order; the last two items (Page Information and Page Size) are located in the information strip below the table.
Columns
Which columns will be shown in the table is selected; both columns are on by default. In the same panel, the columns are reordered by dragging and the alignment is selected per column; with the Fit rows to the page button the row height is fitted to the page, and with the Reset button the column layout is returned to the default. The layout is stored on a user basis.
Filter
The Filter button is used to filter the profiles shown in the list according to certain criteria; the button shows the number of active filters with a badge. There is a single card in the strip: Used in. The card lists the names of the vServices on which the profile is used; for the profiles that are not used on any vService, the Unused Entries option is available. The selections are displayed as closable labels under the card strip, right above the table.
Export
The table is exported as Excel, CSV or PDF by clicking the Export button. In the window that opens, the Filename, Format and Data Source, together with the Columns to be exported, are determined; the remaining fields are displayed according to the format: CSV Separator for CSV, Excel Sheet Name for Excel, and Page Orientation and Page Size for PDF.
Add
By clicking the Add button, the form for creating a new profile opens in the Add tab.
Delete
When one or more profiles are selected and the Delete button is clicked, the related profiles are deleted.
WARNING
A profile that is in use can also be deleted and the confirmation window does not show the usage places. On the vServices that use the deleted profile, the address resolution is silently disabled; all the clients start to appear with the address of the intermediate server again. Before deleting, the Used in tab on the preview panel must be checked.
Edit
By clicking the Edit button, the edit form of the selected profile opens in the Edit tab. The button becomes enabled only when a single profile is selected.
Search
Used to search all information in the table.
RegExp Search
Used to search all information in the table with a regular expression (RegExp). This button is hidden while column-based search or the usage filter is active.
Column Based Search
Used to perform a column-based search on the information in the table.
Usage Filter
Used to filter which vServices the profiles are bound to; the profiles used on the selected vService are listed, and there is an Unused Entries option for those not used on any vService. While the filter is active, the selector takes the place of the search box; when the icon is clicked again, the search box returns.
Page Information
Contains information about the total number of defined profiles and the number of profiles displayed in the list: Showing N-M of T records and the number of selected profiles (N selected, or Nothing selected when there is no selection). If a selection has been made in the filter strip, the number of applied filters and the shown/total row information are added to the same line.
Page Size
The maximum number of profiles to be displayed on the page is selected. The default is 20; the options are 5, 10, 20, 50, 100, 200, 500 and All.
Right-Click Menu
When a row is right-clicked, a menu with the profile's name in its title opens. Both operations in the menu apply only to the right-clicked profile; a selection made in the list does not affect the menu.
| Operation | What it does |
|---|---|
| Edit | Opens the editing form of the profile in the Edit tab; it is the same as the form opened by the Edit button in the toolbar. |
| Delete | Deletes the right-clicked profile; the same confirmation question as the deletion in the toolbar is displayed. |
Preview of the Selected Profile
When a row in the list is clicked, the preview of the profile opens on the right of the screen; when the selected row is clicked again, the panel closes. In the title there are the profile icon, the name of the profile and the Trusted proxy profile subtitle, and at the top right there is a single operation.
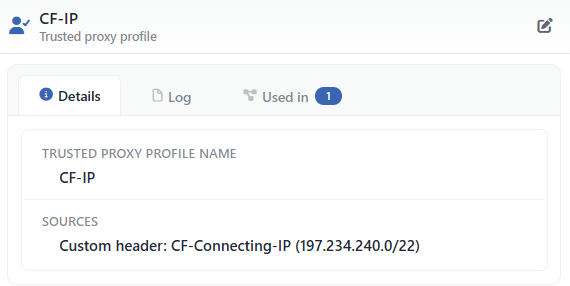 Preview of the Selected Profile
| Operation | What it does |
|---|---|
| Edit | Opens the editing form of the profile in the Edit tab. |
The panel has three tabs; the last one is displayed only if there is a vService that uses the profile:
Details
Lists the settings of the profile line by line (the table below).
Log
Lists the user operations on the profile (adding, editing, deleting) as a timeline.
Used in
Lists the vServices on which the profile is used. The badge next to the tab name shows the number of usages; if there is no vService that uses the profile, the tab is not displayed at all.
The rows in the Details tab are as follows, in order:
| Row | Description | Visibility condition |
|---|---|---|
| Trusted Proxy Profile Name | The name of the profile. | Always |
| Sources | Every source on a separate line in the <its type>: <header name> (<trusted networks>) form (e.g. Custom header: CF-Connecting-IP (197.234.240.0/22)); if there is no source, -. | Always |
The "Used in" tab must be checked
The Used in tab shows on which vServices the profile is active. Since updates to the profile settings in a live environment will immediately affect all bound services, evaluating the possible service impacts before a change is critically important.
Profile Add Form
A new Trusted Proxies Profile is added on the TR7 device by following the Load Balancer → Profiles → Trusted Proxies → Add steps.
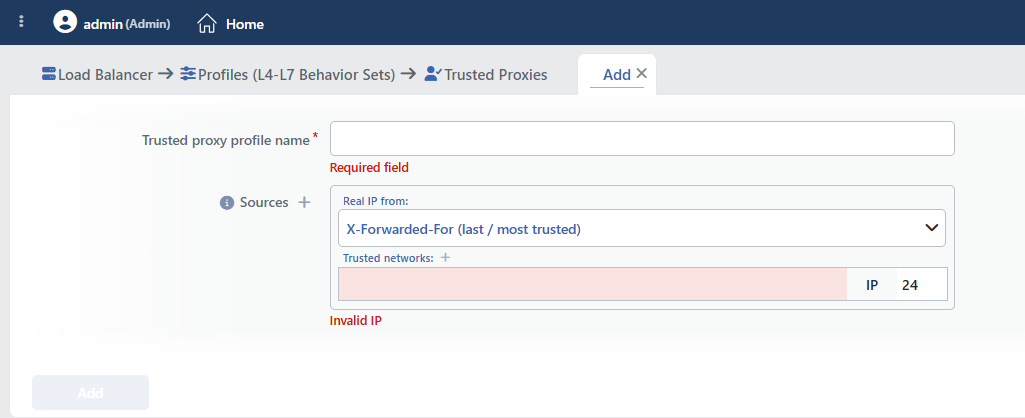 The Profile Add Form
INFO
Trusted Proxy Profile Name Required
A unique name is entered for the profile to be created; it must be unique across the system.
INFO
Sources Required
It defines the trusted proxy sources covered by the profile. Every source states how a proxy/CDN forwards the real client address and from which networks it can be trusted. At least one source must be defined; a single profile with more than one source can cover more than one proxy/CDN (e.g. Cloudflare + Akamai). The form opens with one empty source row; a new source is added with the (+) next to the field label.
Every source consists of three pieces of information:
Real IP from
Determines from which header the real client address will be read. The default is X-Forwarded-For (last / most trusted).
| Option | Description |
|---|---|
| X-Forwarded-For (last / most trusted) | The rightmost (most trusted) entry in the X-Forwarded-For header is used. |
| X-Forwarded-For (first) | The first (leftmost) entry in the X-Forwarded-For header is used. |
| Custom Header | It is read from a custom header (e.g. CF-Connecting-IP, True-Client-IP). |
Header Name
It is visible only when Custom Header is selected; the name of the header to be read is entered (e.g. CF-Connecting-IP). Only the letters, digits and the - and _ characters are allowed (at most 64 characters).
Trusted Networks
The header is trusted only on the connections coming from these networks. The published IP ranges of the proxy/CDN are entered in CIDR form. At least one network must be defined; the field cannot be left empty, otherwise the header becomes imitable. IPv4 and IPv6 are supported (/32 or /128 for a single address).
The field comes with the network mask box preloaded with the value 24; for IPv6 ranges this value must be corrected manually. Defining at least one network is required for every source; a new network row is added with the (+) next to the field label.
When any network is entered with a /0 or /1 prefix, the following warning is displayed on the source card: "A trusted network of /0 or /1 means every address on the internet is trusted. Anyone who can reach this service directly can then put any IP in the header and be treated as that IP: blacklists, IP reputation, country rules, threat protection and reports all follow the forged address. Enter the address ranges the proxy publishes instead (e.g. Cloudflare's list), or make sure this service is reachable only through the proxy." The warning does not block the save.
How to Add to a vService?
A Trusted Proxies Profile is assigned to a vService by following the steps below.
1
Step 1 Go to the vServices screen
The Load Balancer → Load Balancer vService List path is followed in the TR7 web interface.
2
Step 2 Open the editing screen of the vService
The vService to which the profile will be added is right-clicked and Edit is selected; or the vService is clicked and the Edit icon is clicked in the window that opens on the right.
3
Step 3 Enable the Trusted proxy feature
On the Details panel on the right of the editing screen of the vService, the feature is put into effect by marking the Trusted proxy option. When it is marked, the first of the saved profiles is selected automatically.
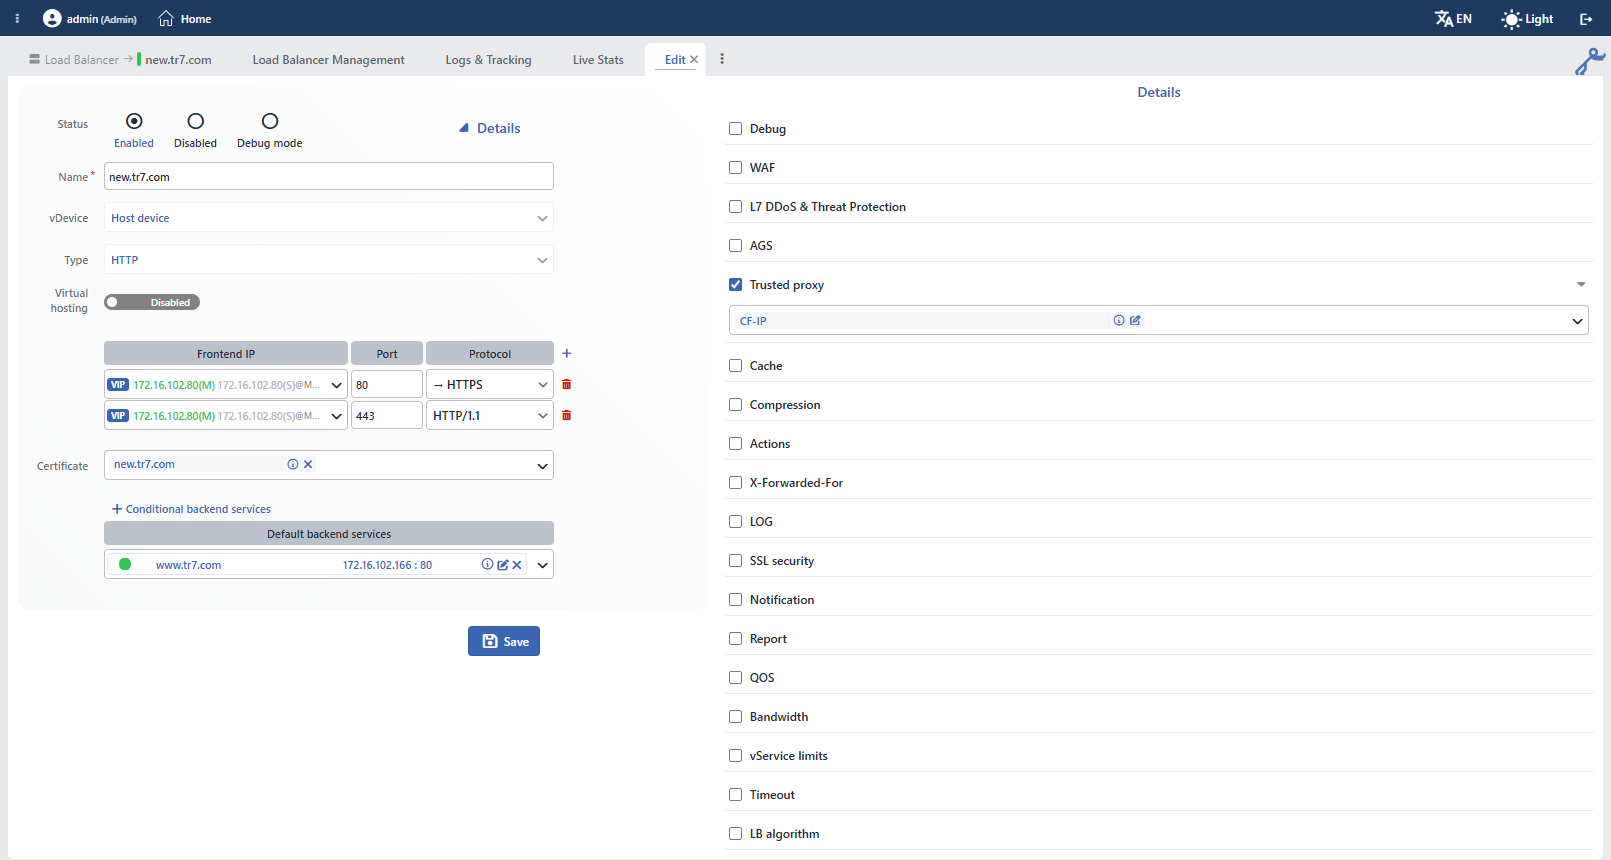 The Trusted Proxy Selection on the vService Editing Screen
WARNING
If no Trusted Proxies profile is defined on the device, the selection remains empty; in this case the feature does not take effect after saving and when the form is opened again, the option appears unmarked.
4
Step 4 Select a profile or add a new one
In order to use a different profile, the arrow sign next to the row is clicked and a selection is made from the list in the expanding section. If desired, a new profile can also be added through the vService editing screen by clicking the Add button.
5
Step 5 Save
The changes are saved by clicking the Save button; while the configuration is being applied to the vService, the "vService is being edited" notification is displayed.
