
Smarter by Design.Simpler for Business
Backup & Restore
What Is Backup & Restore?
Backup & Restore is the screen on which the configuration backups of the TR7 device are created, listed and restored. The screen consists of two tabs: File List (the backup files) and Backup Settings (the backup plan and the retention policy).
The backups are produced in four ways: the scheduled automatic backup according to the selected plan; the change-triggered backup taken when the configuration changes settle (the critical changes are caught within approximately 2 minutes); the safety backup taken right before the risky operations (restoring, a management access change, deleting a vDevice); and the user backup taken manually from this screen. All the backups taken are listed chronologically and tracked.
On every backup record, which user took the backup, the file size, the vDevice and vService names defined on the device and the last action information are displayed. The backups can be stored by downloading them off the device and, when needed, by reverting to a backup (Apply Backup File), the device can be matched to the configuration in that backup.
Plan Based
Automatic backup
The Classic · Smart · Strict · Custom plans
Restore
Restore
Reverting to a backup with Apply Backup File
Download / Upload
Portability
Downloading the backup and uploading with From File
Full Configuration
Backup scope
The network, vService, WAF, GTM, settings and users
Automatic backup and external storage
TR7 takes an automatic backup according to the selected backup plan (the default plan is Classic: every day at 00:00); a backup can also be taken manually from this screen at any time. All the backups created can be forwarded automatically to an external destination (E-mail / FTP / SCP) with File Forwarding.
Scope of the backup
A backup contains the entire configuration of the device: the network and firewall settings, the vDevices, the vServices / Backend Services / backends, the certificates, the WAF rules, the GTM configuration, the IP reputation lists, the general settings (DNS / NTP / Localization / e-mail / LDAP / TACACS…) and the device users. The passwords and the secret keys (the SMTP password, the LDAP query user password, the TACACS secret and accounting password, the health check passwords, the ACME DNS provider secrets) are stored encrypted in the backup.
What Is It For?
Regular backup provides being prepared against possible setting/data losses by keeping a secure copy of the configuration. Thanks to this:
- Disaster recovery (DR): after a device failure, a faulty configuration or a data loss, the device can be reverted to a known working state,
- Off-site (off-device) copy: the backups are protected against device loss by being stored off the device with e-mail / FTP / SCP,
- A safe point before a change: a rollback point is created by taking a manual backup before a risky configuration change,
- Compliance: the regular and off-device backup requirements are met.
How to Add?
A new backup file is added over the TR7 web management interface with the steps below:
- The Configuration Menu is opened by clicking the TR7 logo at the bottom left.
- The steps Settings → Backup & Restore → Add are followed.
- System (Current) (a new backup) or From File (a file upload) is selected as the Backup Source; for the details of the fields, the Add Backup File Tab section can be looked at.
- If System (Current) is selected, a descriptive name is given to the backup (when it is left empty, the name is given automatically); on the From File selection the name field is not displayed.
- By clicking the
Submitbutton, the backup file is created or uploaded.
TIP
Reaching the page via quick search
Instead of navigating the menu step by step, the related page is reached directly by using the search bar in the bottom left corner of the screen. The search bar opens with the Alt + T shortcut on Windows and Opt + T on macOS; typing the name of the feature being searched for is then sufficient.
Backup & Restore Listing Screen
By following the path Settings → Backup & Restore, the list of all the backup files added on the TR7 device is reached. Over this screen the operations of adding, deleting and downloading a backup and matching the device to a backup (restoring) are performed.
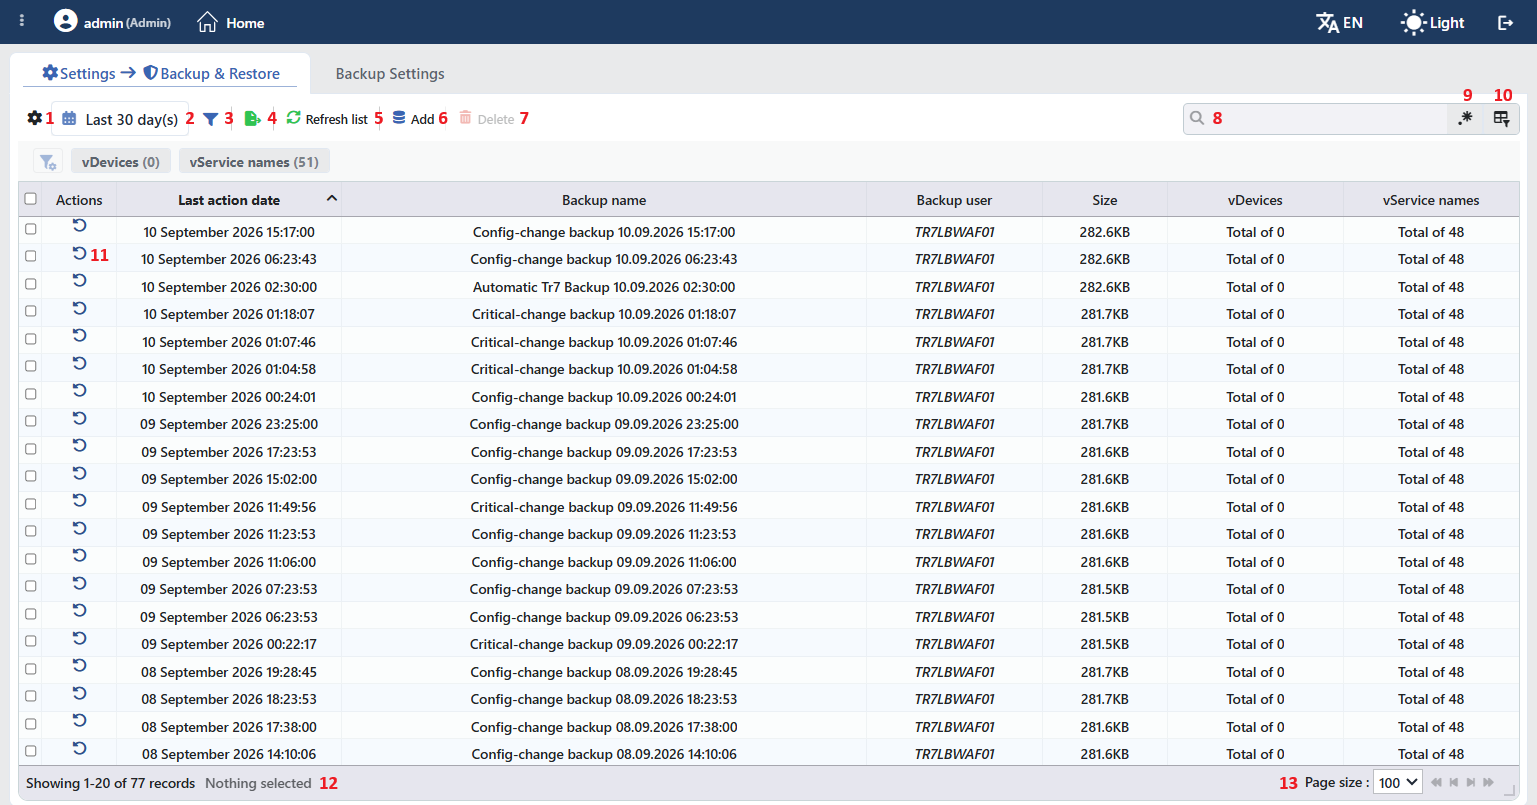 The Backup & Restore Listing Screen
The table opens with the following columns by default:
| Column | Description |
|---|---|
| Actions | A restore icon per row; it matches the device to the selected backup. |
| Last Action Date | The date of the last operation performed on the backup. The table is sorted by this column by default. |
| Backup Name | The name of the backup. On the automatic backups the name is produced according to the event that triggered the backup (e.g. Config-change backup …, Critical-change backup …, Automatic Tr7 Backup …). |
| Backup User | The user who created the backup. On the backups the device takes itself, the Server Name value of the device is written in italics. |
| Size | The size of the backup file. |
| vDevices | The number of vDevices the backup covers, in the Total of N format. |
| vService Names | The number of vServices the backup covers, in the Total of N format. |
There is no column hidden by default.
The items in the toolbar are arranged from left to right in the following order; the last two items (Page Information and Page Size) are located in the information strip below the table.
Columns
Which columns will be shown in the table is selected; all seven columns are on by default. In the same panel the columns are reordered by dragging, the alignment is selected per column, a manually set column width is returned to automatic sizing by clicking, and with the Reset button the column layout is returned to the default. The layout is stored per user.
Time Range
The time range for which the backup files will be displayed is selected. By default the last 30 days are listed; the selection is saved to the user account.
Filter
The Filter button is used to filter the backup files shown in the list according to certain criteria. The filter panel has two facets: vDevices and vService names; both are multiple-selection and filter according to the vDevice and vService names that the backup contains. The filtering view can be customized: which filters will be shown can be selected, the position (order) of the filters can be changed and the view can be arranged as needed.
Export
By clicking the Export button, the table is exported as Excel, CSV or PDF according to the desired data columns.
Refresh List
By clicking the Refresh List button, the backup files belonging to the selected time range are listed again.
Add
By clicking the Add button, the form for creating or uploading a new backup file is opened.
Delete
When one or more backup files are selected and the Delete button is clicked, the related files are deleted from the TR7 device after the confirmation question. The automatic backups taken within the last 1 week are protected against deletion; the user backups are not subject to this protection.
Search
Used to search all information in the table.
RegExp Search
Used to search all information in the table with a regular expression (RegExp).
Column Based Search
Used to perform a column-based search on the information in the table.
Apply Backup File
By clicking the Apply Backup File icon of a backup file, the TR7 device is matched to the configuration in that backup (restoring). The restored configuration is applied to the system automatically; furthermore, a restart is not required.
Page Information
Information about the total number of backup files in the list and the number of records displayed takes place. When a file is selected from the left side in order to delete it, the number of selected files is also shown here.
Page Size
The maximum number of backup files to be displayed on the page is selected. The arrow icons are used to navigate between the pages.
Preview of the Selected Backup File
When a row in the list is clicked, the preview belonging to that file opens on the right of the screen; when the selected row is clicked again, the panel closes. In the title there are the name of the backup and its creation date.
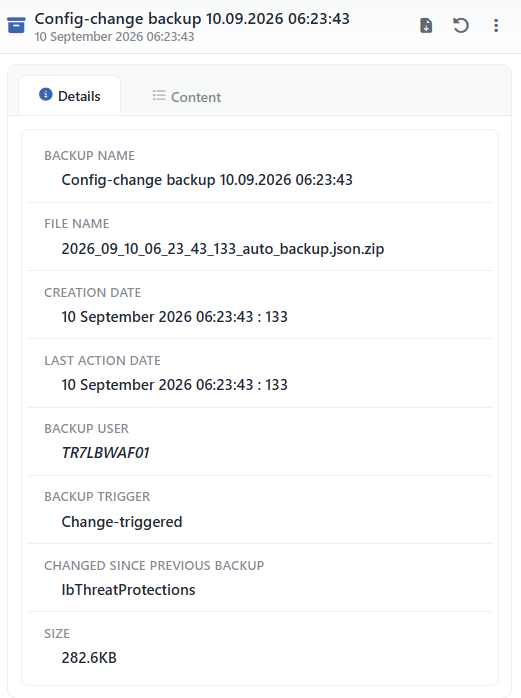 Preview of the Selected Backup File
On the right of the title, two operations are directly visible and two are under the menu. The same operations are also reached from the menu that opens by right-clicking the row.
| Operation | What it does |
|---|---|
| Download Backup File | Downloads the backup file as a zip. |
| Apply Backup File | Matches (restores) the device to the configuration in the selected backup. |
| Export WAF Rules | Exports the WAF rules in the selected backup. In the window that opens, a vService and a Host group are selected; when All is selected, all the rules are downloaded as a single zip, and on a single selection the related rule set is downloaded as JSON. |
| Delete | Deletes the selected backup. On the protected automatic backups this entry stays passive. |
The panel has two tabs:
Details
Lists the definition of the backup row by row (the table below).
Content
Shows the vDevices and vService Names lists that the backup covers with count badges.
The rows in the Details tab are as follows, in order:
| Row | Description | Visibility condition |
|---|---|---|
| Backup Name | The name of the backup. | Always |
| File Name | The file name on the disk (e.g. 2026_09_10_06_23_43_133_auto_backup.json.zip). | Always |
| Creation Date | The creation date of the backup, with its milliseconds. | Always |
| Last Action Date | The date of the last operation on the backup. | Always |
| Backup User | The user who created the backup; on the backups the device takes itself, the Server Name value is written. | Always |
| Backup Trigger | Why the backup was taken: Scheduled · Change-Triggered · Safety Snapshot · User · Uploaded. | On the backups that carry this information |
| Changed Since Previous Backup | The configuration fields changed since the previous backup; a field changed more than once is written in the field ×N format. | On the backups that carry this information |
| Size | The size of the backup file. | Always |
The Backup Trigger and Changed Since Previous Backup rows are hidden on the old backups.
Add Backup File Tab
By following the steps Settings → Backup & Restore → Add, a new backup file is created or a backup is uploaded from outside.
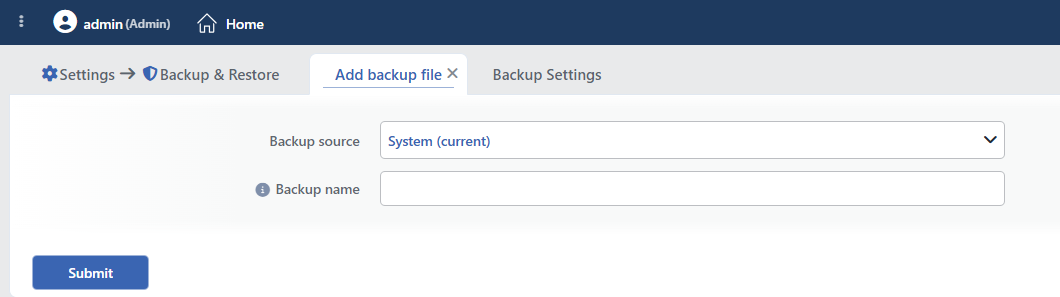 The Add Backup File Tab
INFO
Backup Source
How the backup will be created is selected:
| Option | Description |
|---|---|
| System (Current) | Creates a new backup file from the current configuration of the device. |
| From File | Uploads a previously downloaded backup file to the device (at most 25 MB). |
INFO
Backup Name Backup Source = System (Current)
A descriptive name is given to the backup file to be created; when it is left empty, the name is given automatically by the system. On the From File selection this field is not displayed.
INFO
Submit
By clicking the Submit button, the new backup file is created instantly (or the selected file is uploaded).
Backup Settings
By following the Settings → Backup & Restore → Backup Settings tab, the backup plan and the retention policy are displayed. The screen is read-only and the current settings are listed as rows; the rows specific to the Custom plan are displayed only while that plan is selected, and the Daily Backup Time row is displayed on the plans other than Strict.
By clicking the Edit button, a closable Edit editing tab is opened. On the form an information card that summarizes the behavior of the selected plan is displayed; the card is updated as the plan changes. The changes are saved with the Edit button at the bottom of the form; on this screen the name of the save button is not Save but Edit.
 The Backup Settings Tab
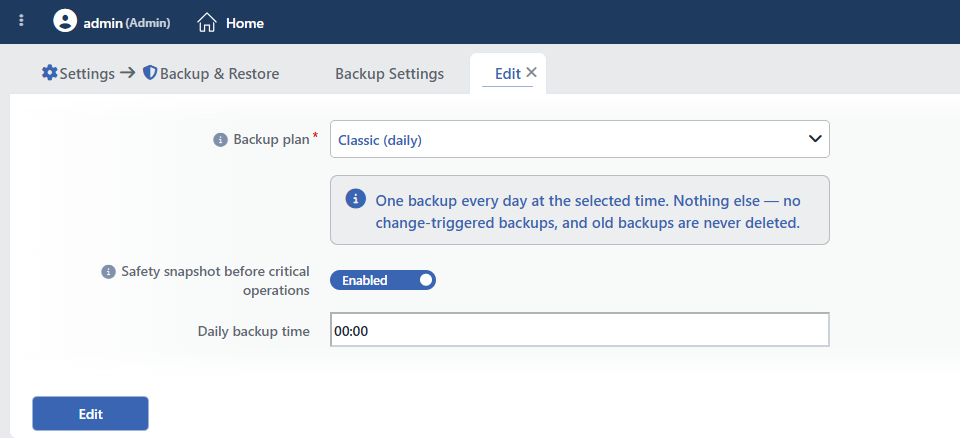 The Edit Tab
INFO
Backup Plan Default: Classic (Daily)
The plan that determines the automatic backup behavior is selected:
| Plan | Behavior |
|---|---|
| Classic (Daily) | One backup every day at the selected time. It does nothing else: there is no change-triggered backup and the old backups are never deleted. |
| Smart (Recommended) | A daily backup + an additional backup shortly after the configuration changes settle (the critical changes are caught in ~2 minutes). The old automatic backups are thinned out: daily for 30 days, then weekly for 12 weeks, then monthly for 12 months. The user backups are never touched. |
| Strict | An hourly check that backs up only if there is a change + fast change capture (5 minutes of silence; the critical changes ~2 minutes). The old automatic backups are thinned out: daily for 30 days, then weekly for 26 weeks, then monthly for 24 months. The user backups are never touched. |
| Custom | The scheduling, the settling windows and the retention are set manually. A retention tier left empty means that those backups are kept indefinitely. |
On the change-triggered plans (Smart/Strict/Custom), unnecessary backups are not produced in the periods that pass silently; the scheduled run is skipped if there has been no change since the last backup (Classic takes a backup under every condition).
INFO
Safety Snapshot Before Critical Operations Default: On
While it is on, an automatic safety backup is taken right before the critical operations such as restoring, a management access (Management Access) change and deleting a vDevice. If a backup has already been taken within the last 5 minutes or if there is no change at all, the safety backup is skipped.
INFO
Daily Backup Time Default: 00:00
The time of the daily scheduled backup is entered (in the HH:mm format, free). On the Strict plan this field is not displayed because the scheduling is based on the hourly check.
Advanced
The fields below are displayed in the editing form under a separate Advanced heading and only while Backup Plan = Custom is selected.
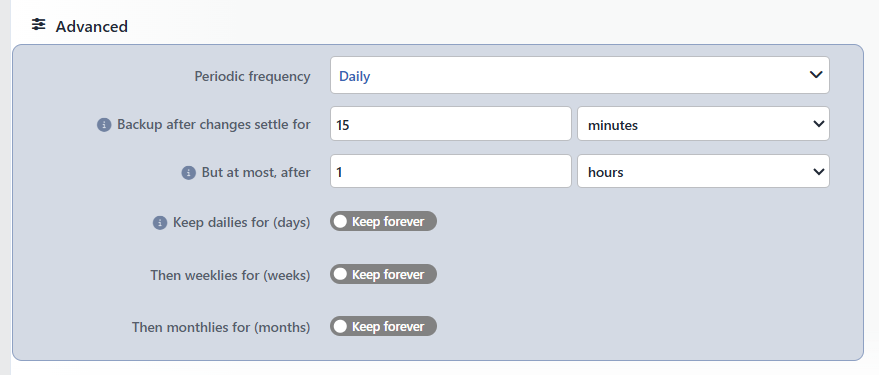 The Advanced Section
INFO
Periodic Frequency
The frequency of the scheduled backup is selected: Daily · Every 12 Hours · Every 6 Hours · Hourly.
INFO
Backup After Changes Settle For Default: 15 minutes
It is the waiting window of the change-triggered backup. After the configuration changes, silence is awaited for this duration; when the silence is achieved, the backup is taken.
INFO
But at Most, After Default: 1 hour
It is the upper limit of the waiting window. If the changes continue without interruption and the silence cannot be achieved, the backup is taken at the end of this duration at the latest.
The critical changes do not wait for either window; they are backed up within approximately 2 minutes.
INFO
Keep Dailies For (Days) Default: Keep forever
It determines how many days the daily automatic backups will be kept; the backups beyond this duration are thinned out to weekly. The field is opened with an on/off switch; while it is off, Keep forever is written on the switch and the daily backups are kept indefinitely. When it is opened, its suggested value is 30.
The common rules for the three tiers
The thinning out is applied only to the automatic backups. The user backups and the uploaded files are never deleted; the backups within the last 1 week are not touched either.
INFO
Then Weeklies For (Weeks) Default: Keep forever
It determines how many weeks the backups coming down from the daily tier will be kept weekly. It is an on/off switch in the same way; while it is off, Keep forever is written. When it is opened, its suggested value is 12.
INFO
Then Monthlies For (Months) Default: Keep forever
It determines how many months the backups coming down from the weekly tier will be kept monthly. It is an on/off switch in the same way; while it is off, Keep forever is written. When it is opened, its suggested value is 12.
Cluster Behavior
Backup Settings (the plan and the retention policy) is synchronized automatically in a two-device cluster. The backup files, on the other hand, are device-local; every device keeps its own backups and the files are not copied between the devices. Since the backup settings are included in the scope of the backup, restoring a backup also restores the backup plan.
Sending the Backup to an External Destination
There are two ways to store the backups off the device:
Automatic (File Forwarding). When a backup is created (scheduled, change-triggered, a safety backup or manually with Add), the defined File Forwarding profiles are triggered automatically and send the backup file to the destination with E-mail / FTP / SCP; with the Backup Types selection in the profile it can be narrowed down so that only the automatic and/or the user backups are forwarded. On the e-mail delivery, the trigger of the backup and the summary of the changed fields also take place in the e-mail. For this it is sufficient to create a profile under Settings → General Settings → File Forwarding and enter the forwarding type and the destination information; afterwards every backup produced is forwarded to this destination automatically.
Manual download. By clicking on a backup in the list screen, the .zip file is downloaded from the preview with Download Backup File and moved to a desired location.
TIP
The File Forwarding profiles also cover all the automatic backups produced by the plan; in this way the off-device backup is continued without manual intervention.
Restore
In order to revert to a backup, one of two paths is followed according to whether the backup is present on the device:
From a backup on the device. The Apply Backup File icon of the related backup is clicked in the list screen; the device is matched to the configuration in that backup.
From an external backup. First the downloaded .zip backup is uploaded to the device with Add → From File; then it is applied from the list with Apply Backup File.
In both cases the selected configuration (including the device users) overwrites the current configuration and is applied to production automatically; furthermore a restart is not required.
WARNING
Restoring overwrites the current configuration. While Safety Snapshot Before Critical Operations is on (the default), an automatic safety backup of the current state is taken right before the restore and, if necessary, it is possible to revert from this backup. If this setting has been turned off, before applying it must be made sure that a separate backup of the current state exists.
