
Smarter by Design.Simpler for Business
Blocking Page
What Is Blocking Page?
Blocking Page determines the response returned on the client side to the request WAF blocks: the content of the response, its content type and its HTTP status code are managed from here. The content can come from two sources: the manual content written directly on this screen or a reusable content profile. Additionally, different pages can be defined depending on a condition: for example a response with a JSON body can be shown to the API paths and an HTML page to the other requests.
By default the response is the built-in HTML page titled Your Access To This Page Has Been Blocked!; on the page there are the time of the request, the request identity (Request ID) and the client IP address, and the status code is 418.
Who sees the blocking page
The page is returned only in the Blocking mode: the requests that exceed the blocking threshold and the Whitelist & Blacklist matches see the same page. In the Monitor and Learning modes, since the request is not blocked, the page is not returned. The quarantine and access-denied pages are separate content profiles, and the CAPTCHA page is the own content of the CAPTCHA configuration; all of them are independent of this setting. The blocking actions in the Traffic Protection step of the vService are also evaluated before the WAF blocking page.
The scope
The Blocking Page settings are valid across the vService and are common in all the host groups.
The Blocking Page Card on WAF Management
The Blocking Page card in the Inspection & Blocking section of the WAF Management screen summarizes the returned response in a single sentence: in the manual content A blocked client gets the inline content (text/html) with status 418 (what is in the parentheses is the selected content type), in the content profile in the form A blocked client gets the … page with status … with the profile name. If conditional pages are defined, every one of them is listed above the default sentence in the order of evaluation, with its condition and the line → the … page is shown (…); below, the footnote Conditions are tried in order — first match wins is seen. Since the blocking page always exists, this card never goes dim.
When the pencil icon at the top right of the card is clicked, the edit screen opens.
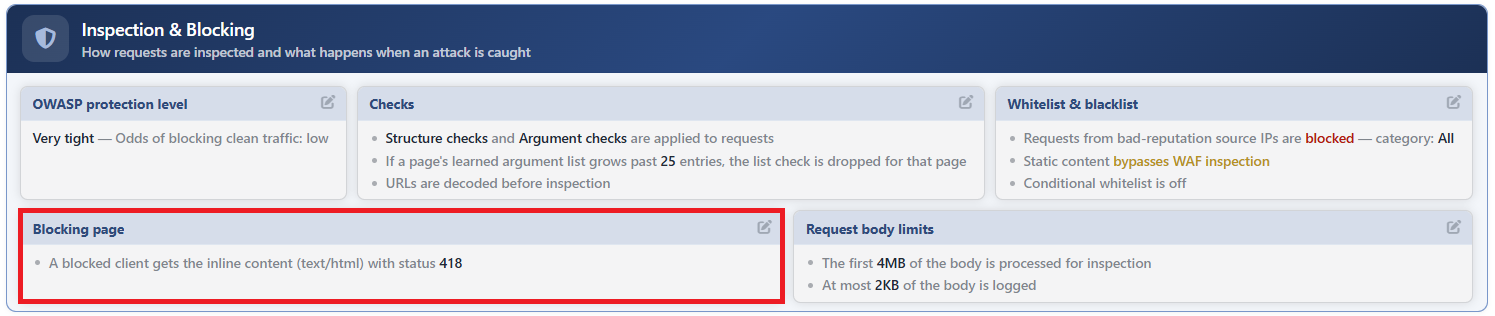 WAF Management - The Blocking Page Card
The Blocking Page Edit Screen
- The WAF Management tab is opened.
- The pencil icon at the top right of the Blocking Page card in the Inspection & Blocking section is clicked; the editing window titled Blocking Page opens.
- The following fields are edited and confirmed with the
Editbutton.
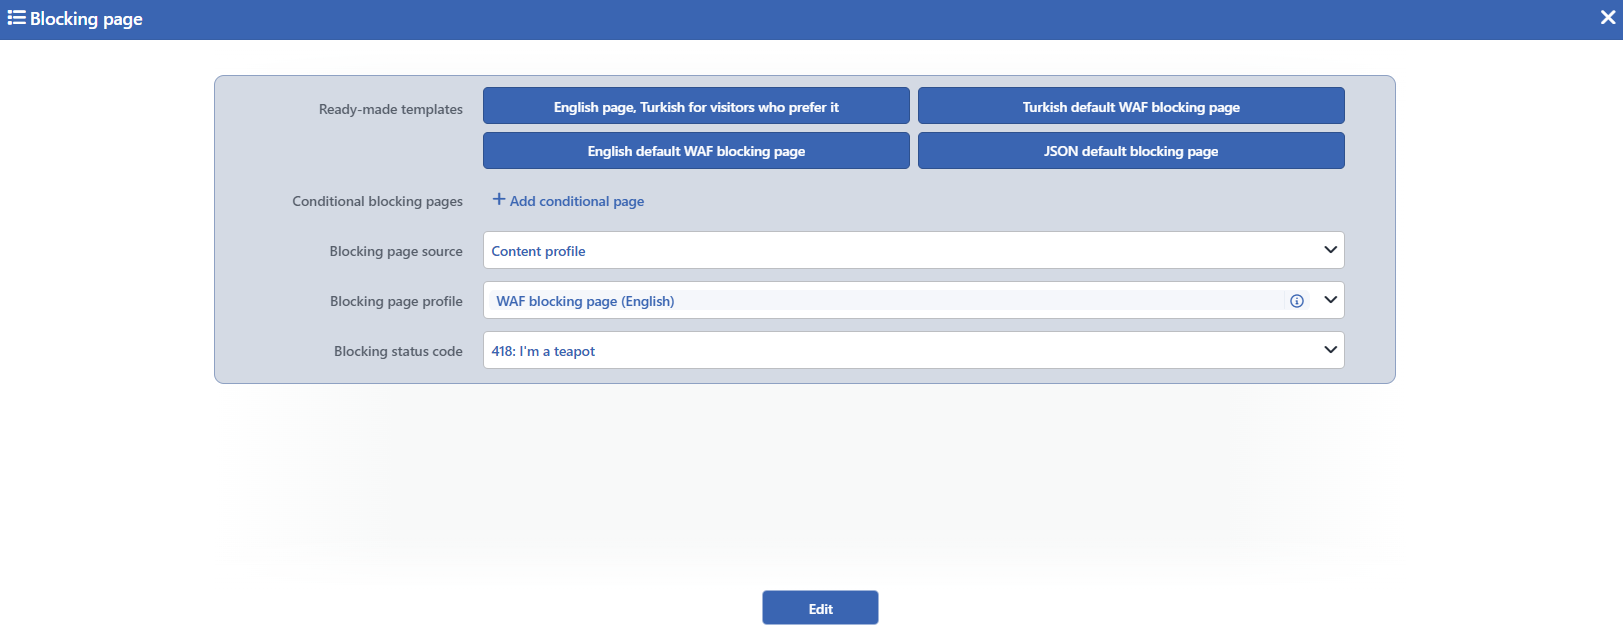 The Blocking Page Edit Screen
INFO
Ready-Made Templates
At the very top of the form the ready template suggestions are listed; when a suggestion is clicked, the confirmation question Apply "…"? is asked and when it is confirmed, the blocking page source in the form is replaced with the setup of the template. Every template removes the existing conditional pages; the bilingual template sets up its own conditional page in their place. When the form has conditional pages, the number of pages to be removed is also stated under the confirmation question: This replaces the current blocking page settings, including the N conditional page(s) below.
| Template | The setting it sets up |
|---|---|
| English page, Turkish for visitors who prefer it | It selects the built-in English blocking page profile as the default page; it adds a conditional page that shows the built-in Turkish page to the visitors who prefer Turkish. |
| Turkish default WAF blocking page | It turns the source into a content profile and selects the built-in Turkish blocking page. |
| English default WAF blocking page | It turns the source into a content profile and selects the built-in English blocking page. |
| JSON Default Blocking Page | It turns the source into manual content; it sets up a response with a JSON body of the application/json type that carries the attack information (it is suitable for the API vServices). |
The templates do not change the status code; the Blocking Status Code selected at that moment is preserved.
INFO
Conditional Blocking Pages
The blocking pages depending on a condition are defined; a new entry is added with the Add Conditional Page button. Every entry carries three fields: Condition (only the HTTP Conditions belonging to the request side can be selected), Page Profile (required; it is selected from the saved content profiles, a new profile can be created in place and it can be previewed with the info icon next to it) and Status Code (the Use default status code option uses the default code, and if wanted, a code specific to the entry is selected). The conditions are tried in the order of definition and the first match wins; if no condition matches, the default page is returned. An entry whose condition is left empty is not applied.
INFO
Blocking Page Source
The content source of the default blocking page is selected; according to the selection only the relevant ones of the fields below are seen:
| Option | Meaning |
|---|---|
| Manual Content | The content is written directly into the Blocking Page editor that appears in the form; the content type is selected from the Blocking Page Content Type field. |
| Content Profile | The content comes from a saved content profile; the profile is selected from the Blocking Page Profile field that appears in the form and the content type is read from the profile. |
Blocking Page Profile
With this field that appears in the form while the source is Content Profile, the content profile to be used as the blocking response is selected. By default the built-in WAF blocking page profile (WAF blocking page (English)) comes selected; a new profile can be created in place and the selected profile can be previewed with the info icon next to it. The content type is read from the profile.
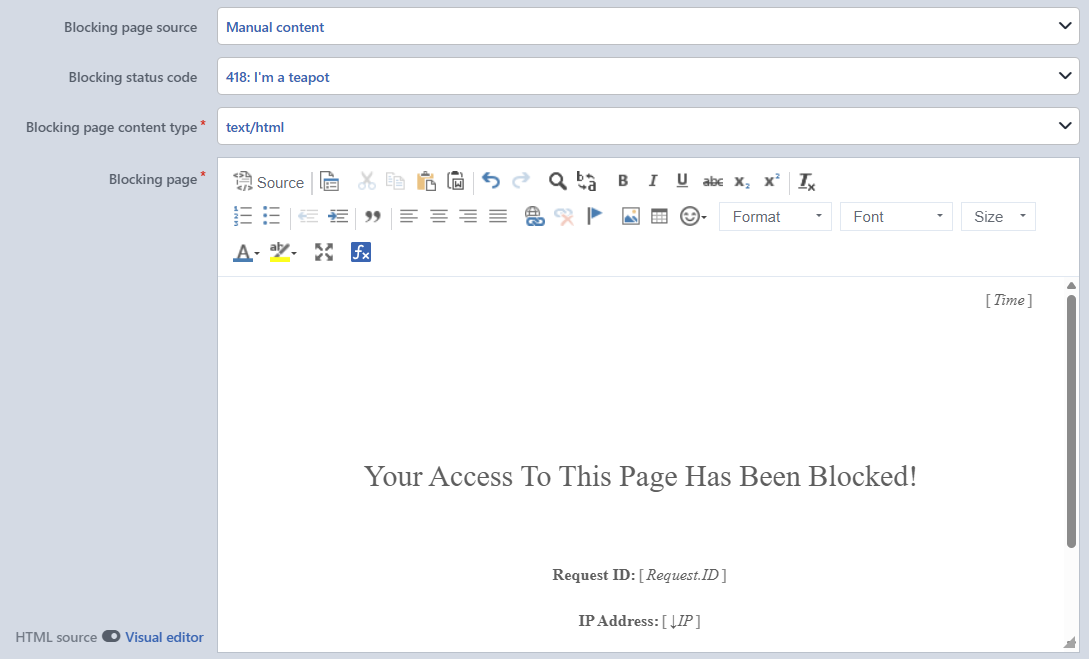 The Blocking Page Edit Screen
Blocking Page Content Type
With this field that appears in the form while the source is Manual Content, the content type of the response is selected: text/html, text/plain, text/css, application/json, application/xml, application/x-ns-proxy-autoconfig. The character set (charset=utf-8) is added to the response by itself.
Blocking Page
Into this field that appears in the form while the source is Manual Content, the body of the blocking response is written; the field cannot be left empty (a required field). While the content type is text/html, the field opens as a fully equipped rich text editor in which it is possible to pass between writing raw HTML and visual editing with the HTML Source / Visual Editor switch in its lower corner. The toolbar of the visual editor offers the following capabilities:
- The source and the clipboard: the HTML source view with the Source button; cut/copy/paste, pasting from Word preserving the format, undo/redo, find and replace.
- Text formatting: bold, italic, underlined, struck through, subscript/superscript and format clearing; the Format, Font and Size selectors; the text color and the highlight color.
- Layout: numbered and bulleted lists, increasing/decreasing the indent, a quotation block, left/center/right/justified alignment.
- Content elements: adding/removing a link, adding an image, a table and an emoji; full screen editing.
- Variables: a variable is added to the content with the fx button; in the visual editor the variables are seen as badges such as [ Time ], [ Request.ID ], [ ↓IP ] and are filled from the request while the response is being returned (the request time, the request identity, the client IP).
In the other content types the field opens as a plain text box; the variables can be used in these types as well with their raw syntax.
INFO
Blocking Status Code Default: 418
The HTTP status code of the blocking response is selected from a list; a free number cannot be entered and the codes are displayed in the list with their explanations (for example 418: I'm a teapot). The field is seen in both sources and on the screen it takes place right below the source selection (in the profile source below the Blocking Page Profile field), before the Blocking Page Content Type and Blocking Page fields that appear in the manual source. The codes that cannot carry a body (1xx, 204, 304) do not take place in the list. Its default value is 418; the conditional pages that do not define their own code use this code as well. The codes that can be selected:
| Class | Codes |
|---|---|
| 2xx | 200, 201, 202, 203, 205, 206, 207, 208, 226 |
| 3xx | 300, 301, 302, 303, 305, 306, 307, 308 |
| 4xx | 400, 401, 402, 403, 404, 405, 406, 407, 408, 409, 410, 411, 412, 413, 414, 415, 416, 417, 418, 419, 420, 421, 422, 423, 424, 425, 426, 428, 429, 430, 431, 440, 444, 449, 450, 451, 460, 463, 494, 495, 496, 497, 498, 499 |
| 5xx | 500, 501, 502, 503, 504, 505, 506, 507, 508, 509, 510, 511, 520, 521, 522, 523, 524, 525, 526, 529, 530, 598, 599 |
INFO
Edit
The changes in the form are saved by clicking the Edit button; the button becomes enabled when no error remains in the form. There is no additional confirmation window or deployment (deploy) step; the WAF configuration is automatically produced again and applied.
The % character in the content
In the blocking page content the % character is reserved for the smart variable syntax; a use of % that is not a variable (for example CSS values such as width:50%) may break the production of the response. This restriction is valid both for the manual content and for the custom content profiles; instead of the styles that contain a percentage, absolute units such as px should be used.
