
Smarter by Design.Simpler for Business
Health Checks
What Is the Health Checks Profile?
Health Checks is a configuration profile used to periodically check the reachability and the health status of the Backend Services connected to the vServices running on TR7.
In the TR7 architecture, health checking is designed as a profile-based structure. In this way, the health check parameters are defined centrally and applied by being assigned to the related Backend Services. Health Checks Profiles work at the Backend Service level and support various protocol types.
When a Health Checks profile is not assigned, no automatic health check is performed for the related Backend Service and the service status must be managed manually. When a profile is assigned, TR7 checks the health status of the Backend Service at the determined periods and, when it detects an error, automatically directs the traffic to the healthy services.
TR7 performs the health checks over a separate daemon. Thanks to this structure, the health checks work independently of the main traffic operations and provide high-performance, reliable monitoring.
The benefits it provides
- The Backend Services that give an error are automatically taken out of traffic.
- The need for manual intervention disappears.
- Service interruptions are managed without being reflected to the users.
- When the Backend Service becomes healthy again, it is automatically included in the traffic.
- Customized health checks can be performed for different protocol and application types.
The Importance of the Health Checks Profile
In load balancer and application delivery architectures, health checking is not only a mechanism that checks the reachability of the services; it is a critical component that has a direct effect on the stability of the system, the user experience and service continuity.
The Backend Services do not always respond as expected. Server failures, network interruptions, application errors or excessive load situations can cause the services to become temporarily or permanently unreachable. When these situations are not managed properly, the user requests continue to be directed to the failed services and the service quality drops seriously.
The health check mechanisms periodically check the status of every Backend Service and automatically disable the related service when an error is detected. In this way, the user traffic is directed only to the healthy services and uninterrupted service is provided.
The fact that the health checks can be defined on a profile basis and at the Backend Service level on TR7 makes it possible for different Backend Service types to be monitored with different check methods. Simple TCP connection checks and complex HTTP content verifications can be managed on the same system, independently of each other.
Automatic
Failover
A faulty Backend Service is automatically taken out of traffic
Monitoring
Periodic check
The service status is checked continuously with an independent daemon
Continuity
High availability
Interruptions are managed without being reflected to the user
16 Types
TCP → Scenario
Multi-protocol checking at the application level
For this reason, Health Checks Profiles are not only a technical monitoring tool; they are one of the basic building blocks of serving the services running on TR7 with high availability and reliability.
The Default Health Checks Profile Behavior
When a Health Checks profile is not assigned to a Backend Service on TR7, no automatic health check is performed for the related service. In this case, the service is marked as health checking disabled (passive); it is not taken out of traffic because of its health status and the traffic routing is performed according to the other configured parameters.
When a Health Checks profile is assigned, TR7 starts the health checks with the default parameters. These default values offer a balanced starting point for general use scenarios:
| Parameter | Value | Description |
|---|---|---|
| Expect Negative Result | Off | It states that no special situation in which the response should be accepted as failed is defined. |
| Period | 1 second | It states at what intervals the health check requests will be sent. |
| Timeout | 1 second | It states at most how long a health check request will wait for a response. |
| Required Successes | 3 | It is the number of successful responses that must be received consecutively for the service to be accepted as healthy. |
| Required Failures | 2 | It is the number of failed responses that must be received consecutively for the service to be accepted as unhealthy. |
These default values provide fast error detection and a low false positive rate for most standard Backend Services and have been designed with system security and stability in mind; however, they do not guarantee the optimal values for every environment. When operations with a high response time, critical services, low bandwidth connections or special application requirements are in question, configuring the profiles specifically for the application is recommended.
The Supported Health Check Types (Protocols)
TR7 offers a comprehensive health checking infrastructure that supports different protocol and application types. Every check type performs checks specific to the related protocol and correctly reflects the real health status of the Backend Service.
| Check Type | Description | Area of Use |
|---|---|---|
| TCP | Checks whether a TCP connection can be established; with scenario support, data sending/waiting can be performed. | General purpose services, databases |
| TCPS | Establishes a TCP connection over TLS; in addition to the TCP scenario, it can perform certificate verification. | Encrypted TCP services |
| UDP | Checks whether data can be sent and a response received over UDP (Hex, Base64 or text). | DNS, game servers, media services |
| Ping (ICMP) | Checks the network reachability with an ICMP Echo Request/Reply. | Basic network connection check |
| HTTP | Sends an HTTP request, checks the status code and the content. | Web applications, REST APIs |
| HTTPS | Sends an HTTP request over SSL/TLS, can perform certificate verification. | Secure web applications |
| DNS | Sends a DNS query and checks whether a response can be received. | DNS servers |
| FTP | Performs a connection and authentication check to the FTP server. | File servers |
| FTPS | Performs an FTP connection and authentication check over SSL/TLS. | Secure file servers |
| LDAP | Performs a connection and optional authentication check to the LDAP server. | Directory services |
| LDAPS | Performs an LDAP connection check over SSL/TLS. | Secure directory services |
| SMTP | Connects to the SMTP server, greets with EHLO; optionally uses STARTTLS. | E-mail servers |
| SMTPS | Establishes an SMTP connection over TLS. | Secure e-mail servers |
| Oracle | Connects to the Oracle database and can run SQL queries. | Oracle databases |
| Expression (JSONata) | Sends no network request; evaluates a JSONata expression against the facts of the device running the check and the local time. | Health conditions tied to the cluster device or to the time |
| Scenario | Combines more than one health check with AND/OR logic. | Complex check scenarios |
Effects and Behavior
The parameters defined within the scope of the Health Checks Profiles determine how TR7 will evaluate the health status of the Backend Services and how it will perform the traffic routing.
The state diagram below shows the health status transitions of a Backend Service:
INFO
Health Status Transitions
While evaluating the health status of a Backend Service, TR7 uses the Required Successes and Required Failures values. For a service to be accepted as healthy, it requires Required Successes consecutive successful checks, and to be accepted as unhealthy, Required Failures consecutive failed checks. The evaluation is made over the last check results; a service that has not yet been marked healthy (that is in the unknown state) can also pass directly to the unhealthy state with Required Failures consecutive failed checks. This approach prevents temporary network interruptions or instant load increases from disabling the services unnecessarily.
INFO
Timeout Behavior
If a response cannot be received within the determined timeout period during the health check, the related check is considered failed. The timeout value must be configured according to the expected response time of the Backend Service.
INFO
Period Behavior
The Period value determines the time between consecutive health checks. Low period values provide faster error detection but put an additional load on the Backend Services; high period values, on the other hand, lengthen the error detection time.
INFO
Traffic Routing
When a Backend Service is marked as unhealthy, TR7 automatically directs the traffic to the other healthy services. When the service becomes healthy again, it is included in the traffic distribution again.
Recommended Values and Tuning Guide
The correct configuration of the health check parameters is critically important in terms of both fast error detection and a low false positive rate. The default values are suitable for general use; however, they must be adjusted according to the application type and the Backend Service behavior.
TIP
Services That Respond Fast (Web, API)
Standard web applications and API services usually respond within milliseconds. In such services:
- The Period value can be kept low (1–2 seconds).
- The Timeout value can be configured in the range of 1–5 seconds.
- Fast error detection can be provided by keeping Required failures low.
TIP
Services That Respond Slowly (Database, Reporting)
Database queries or reporting services can require longer response times. In these scenarios:
- The Timeout value must be increased according to the expected response time of the Backend Service.
- Temporary delays can be tolerated by increasing the Required failures value.
- The Period value must be kept at reasonable levels.
TIP
Critical Services
In the critical services that need to work without interruption:
- Fast monitoring must be provided by keeping the Period value low.
- It must be made sure that the service is really healthy by increasing the Required successes value.
- Verification at the application level must be performed with content checking (Expected Content Query) in the HTTP/HTTPS checks.
TIP
Environments Under Load
In the environments under high traffic:
- The Period value must not be kept too low (it increases the Backend Service load).
- The Timeout value must be adjusted according to the normal response times under load.
- Temporary load increases can be tolerated by increasing the Required failures value.
The check target and the source address are not defined in the profile
The address to which the health check will go is the address of the Backend Service to which the profile is assigned. If a different address or port needs to be used, this is stated in the Use Different IP for Health Check field in the Backend Service definition; the source address from which the check traffic will go out is also selected there.
Only in the sub-checks of the Scenario type, a separate HC Address field is offered in the check window.
INFO
The Frequency of Writing the Check Logs
The check logs are kept while the Enable HC Logs option in the Backend Service settings is on (on by default). Not every check is logged separately. A record is written when the status changes, when the error reason changes or when the details of the check result (for example the returned HTTP status code or the DNS response) change; in addition, there is at least one record in every five-minute slice. This behavior limits the log volume in checks with frequent intervals.
Operational Best Practices
- Checking at the application level is used. When possible, HTTP/HTTPS checks are preferred instead of simple TCP/Ping; HTTP checks verify the real health status of the application, while TCP only verifies the reachability of the port.
- Content checking is added. In the HTTP/HTTPS checks, not only the status code but also the expected content must be checked; this detects the situations in which the application returns an error page.
- A health check endpoint is created. A special endpoint (
/health,/status) is defined in the Backend Service applications; this endpoint checks the dependencies of the application (database, cache, external services). - The Timeout value is adjusted carefully. The Timeout must be higher than the response time of the Backend Service under normal conditions; values that are too low cause healthy services to be marked as faulty.
- The health check logs are kept enabled. While the Backend Service is being edited, the Enable HC Logs option must be kept active; these logs provide critical information for troubleshooting and performance analysis.
- No change is made without the "Used in" information being checked. A profile must not be updated without knowing on which Backend Services it is used in the live environment; the change instantly affects all the connected services.
- Scenario checks are used for complex checks. When more than one condition needs to be met at the same time (e.g. both HTTP and a database connection), the Scenario check type must be used.
How to Add?
A new Health Checks profile is added through the TR7 web management interface with the steps below:
- The Configuration Menu is opened by clicking the TR7 logo at the bottom left.
- The Load Balancer → Profiles → Health Checks → Add steps are followed.
- A unique and descriptive name is entered for the profile.
- The check type (Check type) and the values suitable for the application are configured.
- The profile is added by clicking the
Addbutton.
TIP
Reaching the page via quick search
Instead of navigating the menu step by step, the related page is reached directly by using the search bar in the bottom left corner of the screen. The search bar opens with the Alt + T shortcut on Windows and Opt + T on macOS; typing the name of the feature being searched for is then sufficient.
The created profile can be used for one or more Backend Services.
Profiles Listing Screen
By following the Load Balancer → Profiles → Health Checks path, the list of all the Health Checks Profiles added on the TR7 device is reached. Profile adding, editing and deleting operations are performed through this screen.
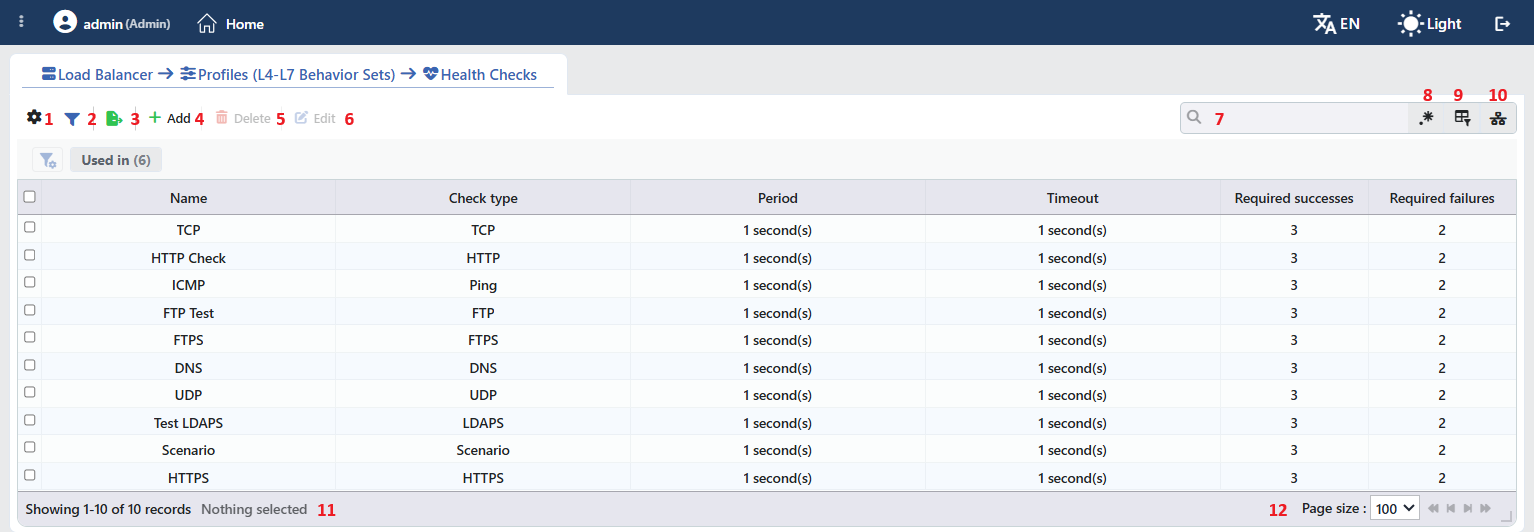 Health Checks Profiles Listing Form
The table opens with the following columns by default:
| Column | Description |
|---|---|
| Name | The name of the profile. |
| Check Type | The check type (e.g. TCP, HTTP, Ping, DNS, Scenario). |
| Period | The repetition interval of the check, in the N second(s) form. |
| Timeout | The response waiting period of the check, in the N second(s) form. |
| Required Successes | The number of successful checks required for the server to be considered healthy. |
| Required Failures | The number of failed checks required for the server to be considered unhealthy. |
There is no column hidden by default; these six columns are in the column selector. The table is not sorted when it opens; when a column header is clicked, descending sorting is applied first, then ascending, and on the third click the sorting is removed.
The items in the toolbar are arranged from left to right in the following order; the last two items (Page Information and Page Size) are located in the information strip below the table.
Columns
Which columns will be shown in the table is selected; all six columns are on by default. In the same panel, the columns are reordered by dragging and the alignment is selected per column; with the Fit rows to the page button the row height is fitted to the page, and with the Reset button the column layout is returned to the default. The layout is stored on a user basis.
Filter
The Filter button is used to filter the profiles shown in the list according to certain criteria; the button shows the number of active filters with a badge. There is a single card in the strip: Used in. The card lists the usage places of the profile; for the profiles that are not used anywhere, the Unused Entries option is available. The selections are displayed as closable labels under the card strip, right above the table.
Export
The table is exported as Excel, CSV or PDF by clicking the Export button. In the window that opens, the Filename, Format and Data Source, together with the Columns to be exported, are determined; the remaining fields are displayed according to the format: CSV Separator for CSV, Excel Sheet Name for Excel, and Page Orientation and Page Size for PDF.
Add
By clicking the Add button, the form for creating a new profile opens in the Add tab.
Delete
When one or more profiles are selected and the Delete button is clicked, the related profiles are deleted.
WARNING
A profile assigned to a Backend Service or a group can also be deleted and no warning is given. The Backend Services that use the deleted profile remain without checking and their health status is not monitored. The profile can also be used for gateway monitoring purposes in the static routing definitions (only the selection on the default route is effective); this use does not appear on the Used in tab. Before deleting, the Used in tab on the preview panel must be checked.
Edit
By clicking the Edit button, the edit form of the selected profile opens in the Edit tab. The button becomes enabled only when a single profile is selected.
Search
Used to search all information in the table.
RegExp Search
Used to search all information in the table with a regular expression (RegExp). This button is hidden while column-based search or the usage filter is active.
Column Based Search
Used to perform a column-based search on the information in the table.
Usage Filter
It is used to filter the profiles according to their usage places; the profiles in the selected usage place are listed, and for those that are not used anywhere the Unused Entries option is available. While the filter is active, the selector takes the place of the search box; when the icon is clicked again, the search box comes back.
Page Information
Contains information about the total number of defined profiles and the number of profiles displayed in the list: Showing N-M of T records and the number of selected profiles (N selected, or Nothing selected when there is no selection). If a selection has been made in the filter strip, the number of applied filters and the shown/total row information are added to the same line.
Page Size
The maximum number of profiles to be displayed on the page is selected. The default is 100; the options are 5, 10, 20, 50, 100, 200, 500 and All.
Right-Click Menu
When a row is right-clicked, a menu with the profile's name in its title opens. Both operations in the menu apply only to the right-clicked profile; a selection made in the list does not affect the menu.
| Operation | What it does |
|---|---|
| Edit | Opens the editing form of the profile in the Edit tab; it is the same as the form opened by the Edit button in the toolbar. |
| Delete | Deletes the right-clicked profile; the same confirmation question as the deletion in the toolbar is displayed. |
Preview of the Selected Profile
When a row in the list is clicked, the preview of the profile opens on the right of the screen; when the selected row is clicked again, the panel closes. In the title there are the profile icon, the name of the profile and the Health check profile subtitle, and at the top right there is a single operation.
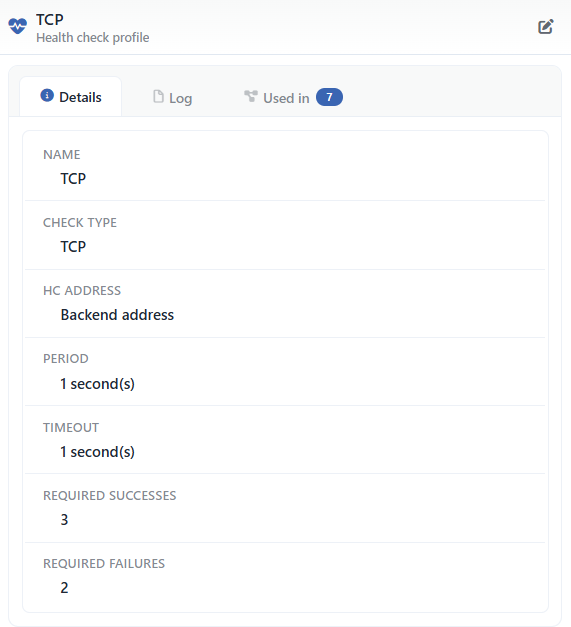 Preview of the Selected Profile
| Operation | What it does |
|---|---|
| Edit | Opens the editing form of the profile in the Edit tab. |
There are three tabs in the panel; the last one is displayed only if the profile is used somewhere:
Details
Lists the settings of the profile line by line (the table below).
Log
Lists the user operations on the profile (adding, editing, deleting) as a timeline.
Used in
Lists the Backend Services on which the profile is used and the vServices in which they are located. The badge next to the tab name shows the number of usages; if the profile is not used anywhere, the tab is not displayed at all.
The rows on the Details tab are as follows in order; the rows specific to the check type are located between HC Address and Period and are sorted by type groups in the table:
| Row | Description | Visibility condition |
|---|---|---|
| Name | The name of the profile. | Always |
| Check Type | The check type. | Always |
| HC Address | The check address in the IP : port form; if no separate address is defined, Backend Address. | Other than Expression (JSONata) |
| Scenario | The scenario condition, as a condition tree. | In the Scenario type, if a condition is defined |
| Verification CA Profile | The name of the CA record that verifies the server certificate; if none is selected, From the Backend. | In the types that use TLS (HTTPS, TCPS, SMTPS, FTPS, LDAPS, SMTP with STARTTLS on), if Verify Server Certificate is on |
| Client Certificate to Present (mTLS) | The name of the client certificate presented; if none is selected, From the Backend. | In the types that use TLS (HTTPS, TCPS, SMTPS, FTPS, LDAPS, SMTP with STARTTLS on) |
| Method | The HTTP method. | HTTP, HTTPS |
| HTTP Version | HTTP/1.1 or HTTP/2. | HTTP, HTTPS |
| Expected Status Codes | The expected status codes, comma separated; if undefined, -. | HTTP, HTTPS |
| Path + Query | The request path and the query string. | HTTP, HTTPS |
| Virtual Domain (Host/SNI) | The Host header and the SNI value; if undefined, -. | HTTP, HTTPS |
| HTTP Headers | Every header on a separate line in the name: value form. | HTTP, HTTPS; if a header is defined |
| HTTP Body | The first 200 characters of the request body. | HTTP, HTTPS; if a body is defined |
| Content Check Mode | JSONata Expression. | HTTP, HTTPS; if the mode is other than Basic (String Match) |
| Expected Content Query | The text searched for in the response body. | HTTP, HTTPS; if a value is defined and the mode is not JSONata |
| JSONata Query | The JSONata expression that evaluates the response. | HTTP, HTTPS; if the mode is JSONata |
| Verify Server Certificate | Yes or No. | HTTPS |
| Virtual Domain (Host/SNI) | The SNI value; if undefined, -. | TCPS |
| Verify Server Certificate | Yes or No. | TCPS |
| TCP Scenario | Every step on a separate line in the order. step: value form (e.g. 1. Send Text: …). | TCP, TCPS; if a step is defined |
| UDP Scenario | Every step on a separate line in the order. step: value form. | UDP; if a step is defined |
| EHLO Hostname | The name used in the EHLO command; if undefined, tr7-hc. | SMTP, SMTPS |
| Use STARTTLS | Yes or No. | SMTP |
| Verify Server Certificate | Yes or No. | SMTPS or SMTP with STARTTLS on |
| Virtual Domain (Host/SNI) | The SNI value; if undefined, -. | SMTPS or SMTP with STARTTLS on |
| DNS Query | The queried name. | DNS |
| DNS Record Type | The record type; if Reverse DNS (PTR) is on, PTR, if undefined, A. | DNS |
| Answer Check Mode | Text Match (Contains) or Regex Match. | DNS; if the mode is other than None |
| Expected Answer Text | The text searched for in the answer. | DNS; if the mode is Text Match (Contains) |
| Expected Answer Regex | The regular expression against which the answer is compared. | DNS; if the mode is Regex Match |
| FTP User | The FTP user name. | FTP, FTPS |
| FTP Action | The FTP operation performed in the check. | FTP, FTPS |
| FTP Path | The listed directory; if undefined, -. | FTP, FTPS |
| LDAP Authentication | If authentication is on, the LDAP user name, if not, -. | LDAP, LDAPS |
| User | The Oracle user name. | Oracle |
| Connection String | The Oracle connection string. | Oracle |
| Oracle Scenario | Every step on a separate line in the order. step: value form. | Oracle; if a step is defined |
| Period | The check interval, in the N second(s) form. | If a value is defined |
| Expect Negative Result | Enabled. | If the option is on |
| Timeout | The response waiting period, in the N second(s) form. | If a value is defined |
| Required Successes | The number of successful checks required to be considered healthy. | If a value is defined |
| Required Failures | The number of failed checks required to be considered unhealthy. | If a value is defined |
The "Used in" tab must be checked
The Used in tab shows on which Backend Services and in the Backend Services inside which vServices the profile is active. Since the updates to be made in the profile settings in the live environment will instantly affect all the connected services, evaluating the possible service effects before the change is critically important.
The Profile Add Form: The Common Fields
A new Health Checks profile is added on the TR7 device by following the Load Balancer → Profiles → Health Checks → Add steps.
Some of the form fields are common to all the check types; these fields are explained once below. The fields specific to the selected check type, on the other hand, are displayed between Timeout and Required Successes, in their own framed section; when the type is changed, the content of this section is completely refreshed.
INFO
Name Required
A unique name is entered for the profile to be created. When a name that is in use is entered, the form gives a Name is used warning and the record is not completed.
INFO
Check Type Default: HTTP
With which protocol/method the health check will be performed is selected. According to the selection, the fields specific to the type are added to the form.
The types in the list, in order: TCP, TCPS, UDP, Ping, HTTP, HTTPS, DNS, FTP, FTPS, LDAP, LDAPS, SMTP, SMTPS, Oracle, Expression (JSONata), Scenario.
WARNING
The check type cannot be changed after saving; if a different type is needed, a new profile must be defined.
INFO
Expect Negative Result
When it is activated, the success condition of the health check is reversed. For example, when a connection cannot be established, the check is considered successful. It is used in special security or test scenarios. (It is present in all the types except the Scenario type.)
INFO
Period Default: 1 sec
At what intervals in seconds the Backend Services will be checked is determined. The form accepts the range of 0.5 – 3600 seconds.
WARNING
The values of 120 seconds and above are not accepted by the check service and are silently lowered to 1 second. For this reason, the value must be kept below 120 seconds. (The limit is valid for the Backend Service checks; in the gateway monitoring use, the entered value is applied as it is.)
INFO
Timeout Default: 1 sec
The maximum waiting period in seconds for it to be considered failed during the health check is determined. If a response cannot be received within this period, the check is accepted as failed. The form accepts the range of 0.01 – 3600 seconds.
WARNING
The values of 120 seconds and above are not accepted by the check service and are silently lowered to 1 second. (In the gateway monitoring use, this limit is not applied.)
INFO
Required Successes Default: 3
The number of consecutive successful checks required for a Backend Service to be accepted as healthy. A value between 1 – 10 can be entered.
INFO
Required Failures Default: 2
The number of consecutive failed checks required for a Backend Service to be accepted as unhealthy. A value between 1 – 10 can be entered.
The Fields Specific to the Check Type
The add form of every check type and only the fields specific to that type are explained below. These fields are located between Timeout and Required Successes in the form; the common fields (Name, Check type, Expect negative result, Period, Timeout, Required successes, Required failures) are present in every type as well.
TCP
The TCP check checks whether a TCP connection can be established to the Backend Service.
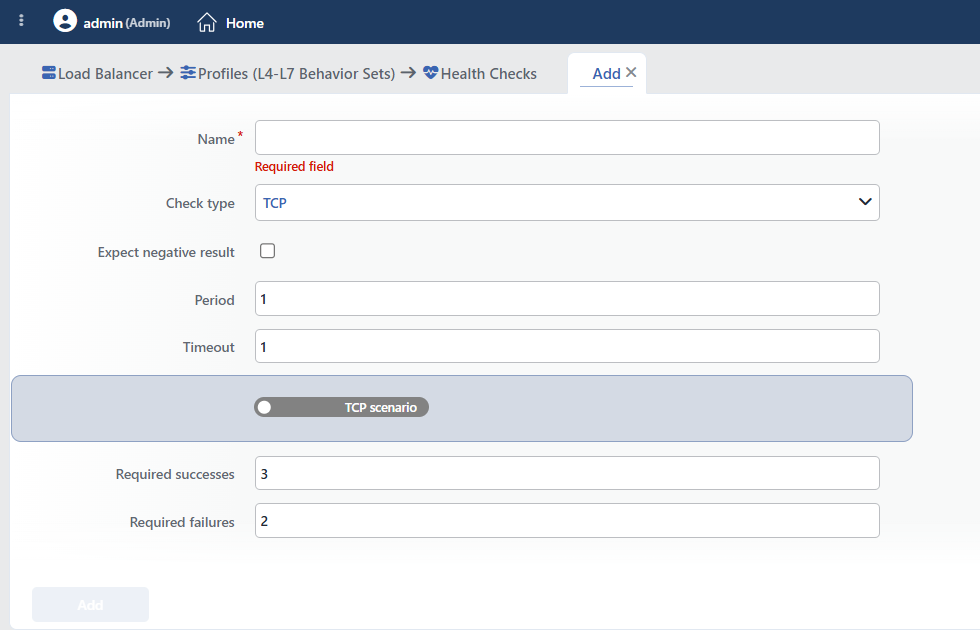 TCP Health Checks Profile Add Form
INFO
TCP Scenario
It is used to perform a scenario-based TCP health check. After the TCP connection is established, data sending and response waiting operations can be defined.
The field is enabled with an on/off switch. Every step is added as a separate card and the steps are executed in the order in which they are defined. In every card, first the TCP Action selection is made (the field label contains the card order: TCP Action (1), TCP Action (2) …); according to the selection, the fields of the card change.
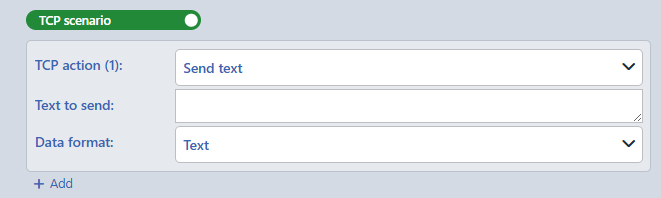 TCP Scenario Options
Send Text: The specified data is sent over the connection (protocol-specific commands or a raw HTTP request). There are two fields in this step:
- Text to Send: The data to be sent is entered.
- Data Format: Determines how the data will be interpreted: Text (plain text, default), Hexadecimal (Hex) or Base64. In binary protocols, the data is entered as Hex or Base64.
Expect Text: Whether the expected text occurs in the response returning from the server is checked; the text to be searched for is entered in the Text to Expect field.
Expect Regex: The response is compared with a regular expression; the expression is entered in the Regex to Expect field.
Wait(ms): The period to be waited before passing to the next step is entered in milliseconds (Wait Time(ms), at least 1).
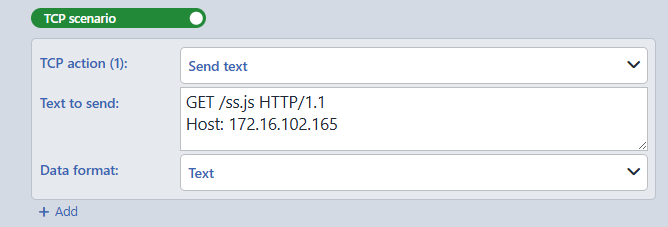 The Send Text Selection
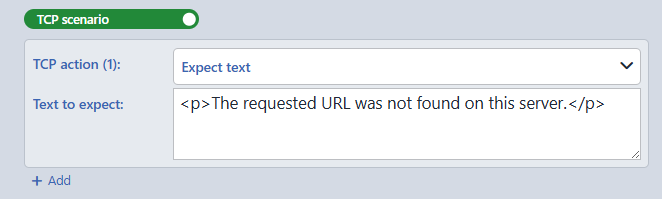 The Expect Text Selection
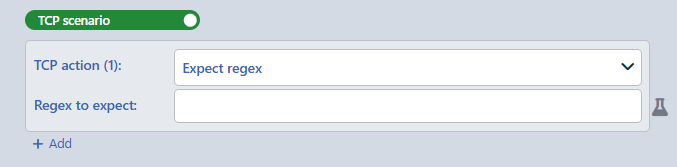 The Expect Regex Selection
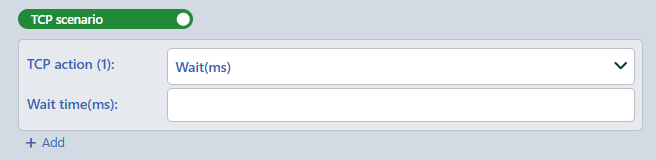 The Wait(ms) Selection
A two-step scenario example is below: in the first step a raw HTTP request is sent, and in the second step the expected text is searched for in the returning response.
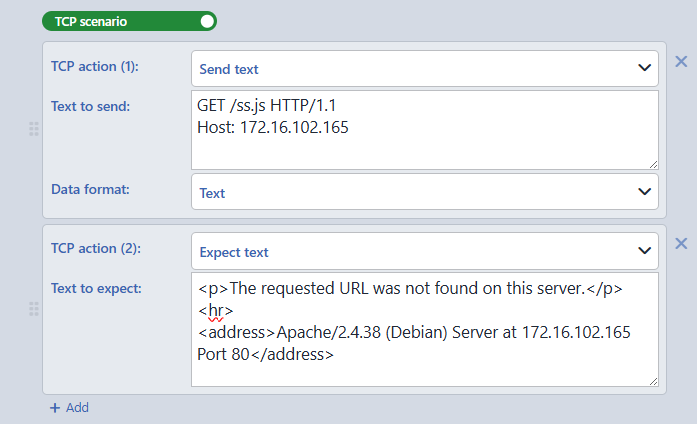 A Two-Step TCP Scenario Example
TCPS
The TCPS check is the encrypted equivalent of the TCP check: the connection is established over TLS, then the same scenario steps as the TCP check are executed.
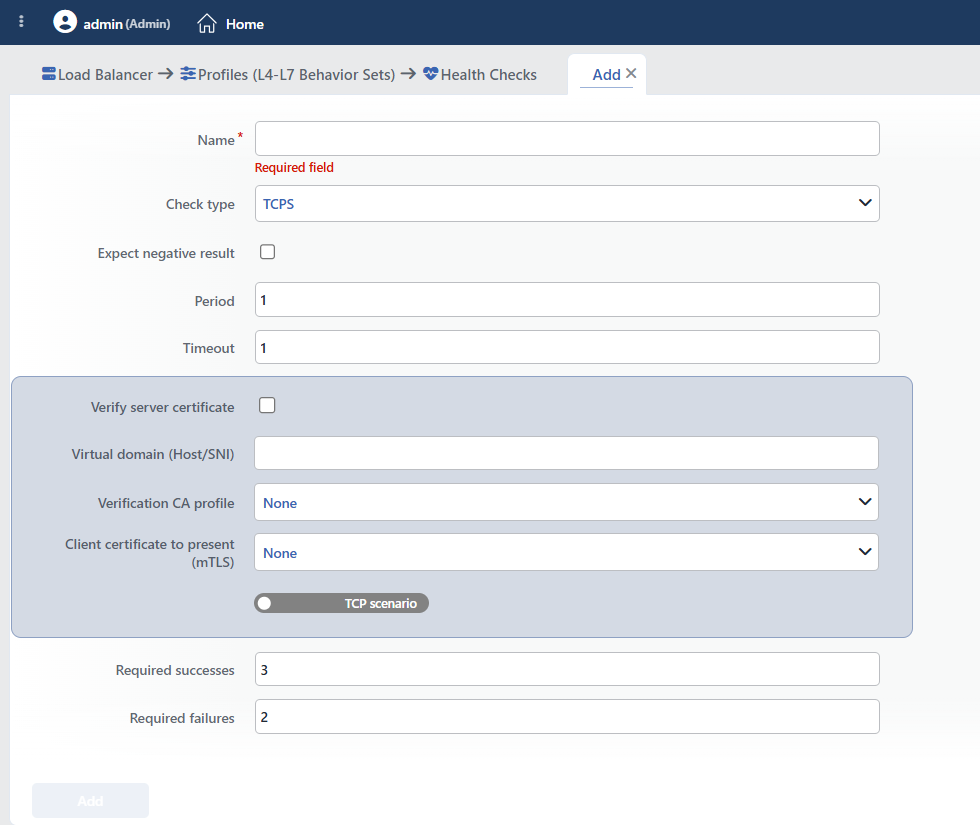 TCPS Health Checks Profile Add Form
INFO
Verify Server Certificate Default: Off
When it is activated, the certificate presented by the other server is verified; if the verification fails, the check is considered failed. In the environments where a self-signed certificate is used, it can be left off.
INFO
Virtual Domain (Host/SNI)
It is the domain name that will be announced to the server while the encrypted connection is being established. It makes it possible for the correct certificate to be selected on the services that present more than one certificate on the same address.
INFO
Verification CA Profile Default: None
The certificate authority profile against which the server certificate will be verified is selected; the selection is applied only while Verify Server Certificate is on. When it is left as None, the verification CA defined for the data traffic of the Backend Service to which the profile is assigned is used (if SSL Service is on and certificate verification is required on the Backend Service); in the profile preview this situation is displayed as From the Backend.
INFO
Client Certificate to Present (mTLS) Default: None
On the services that require mutual authentication, the client certificate to be presented during the check connection is selected. When it is left as None, the Backend Service’s own client certificate is used.
INFO
TCP Scenario
It is exactly the same as the TCP Scenario field in the TCP type: the steps are added as cards and the Send Text (Text to send + Data format), Expect Text, Expect Regex and Wait(ms) options are used in the same way.
UDP
The UDP check checks whether data can be sent and a response received over the UDP protocol.
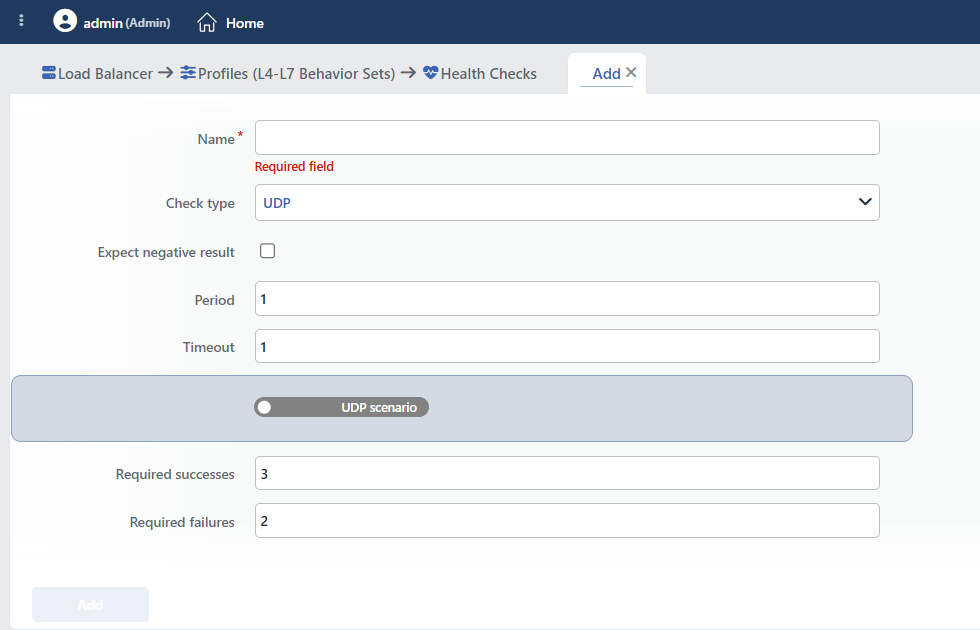 UDP Health Checks Profile Add Form
INFO
UDP Scenario
It is used to perform a scenario-based UDP health check. The field is enabled with an on/off switch; every step is added as a separate card and in the card first the UDP Action selection is made (the field label contains the card order).
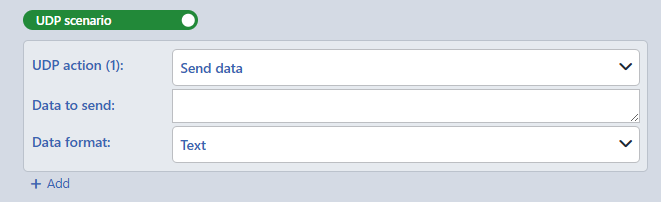 UDP Scenario Options
Send Data: The specified data is sent. There are two fields in this step:
- Data to Send: The data to be sent is entered.
- Data Format: Determines how the data will be interpreted: Text (default), Hexadecimal (Hex) or Base64.
Wait(ms): The period to be waited before passing to the next step is entered in milliseconds (Wait Time (ms), at least 1).
Expect Text: Whether the expected text occurs in the returning response is checked; the text to be searched for is entered in the Text to Expect field.
Expect Regex: The response is compared with a regular expression; the expression is entered in the Regex to Expect field.
Ping (ICMP)
The Ping check checks the reachability at the network level by using an ICMP Echo Request/Reply. It does not contain an additional field specific to the type; only the common fields are used.
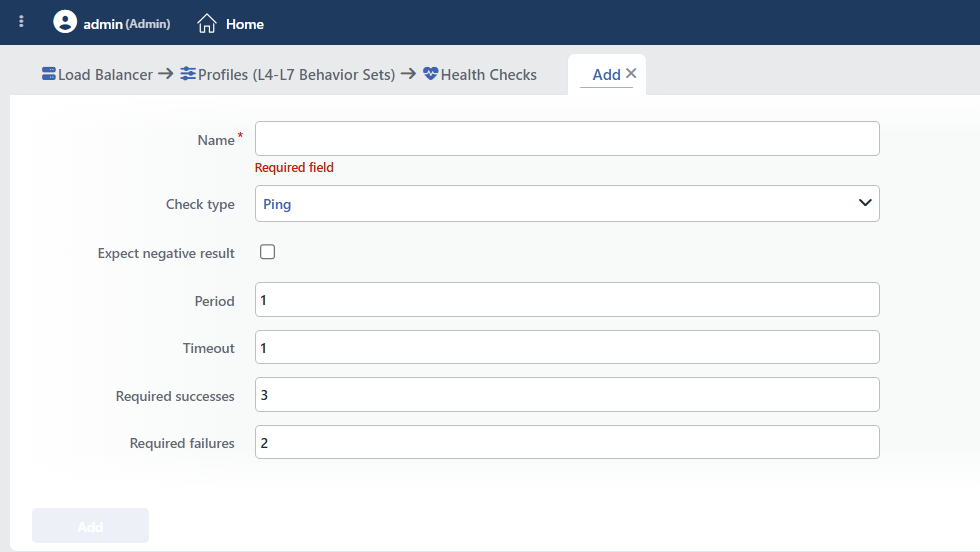 Ping Health Checks Profile Add Form
HTTP
The HTTP check sends a request over the HTTP protocol and evaluates the response.
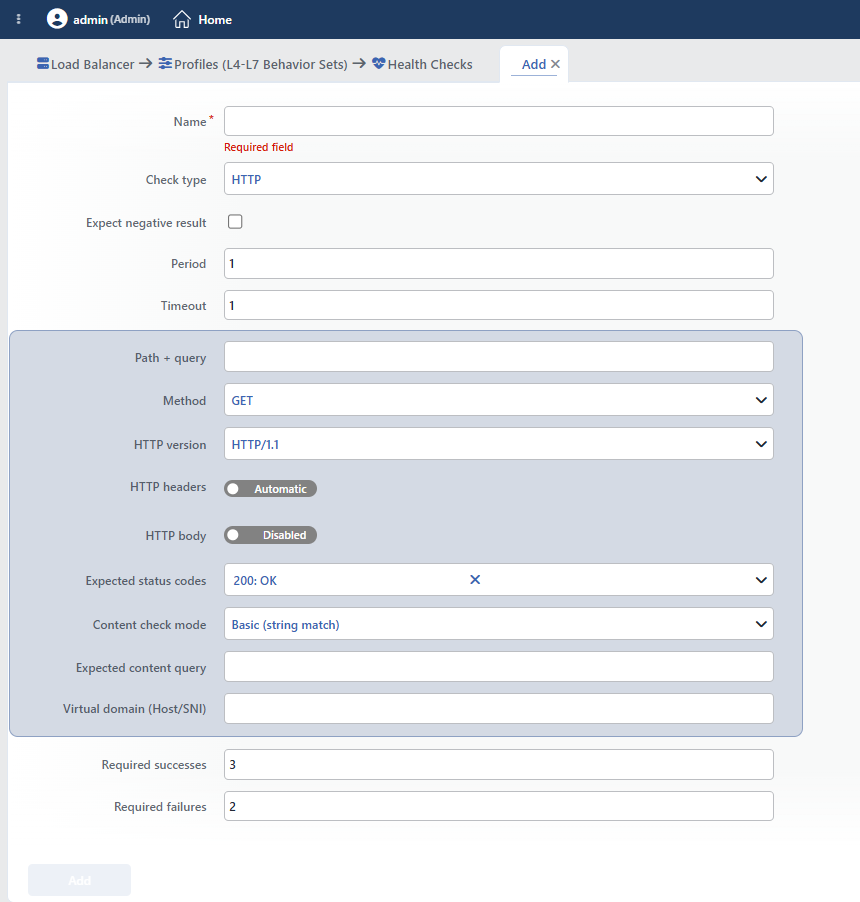 HTTP Health Checks Profile Add Form
INFO
Path + Query
The path and query string information on which the request will be made to the Backend Service is entered. When it is left empty, the requests are made to the / (root directory) path.
INFO
Method Default: GET
With which HTTP method the health check will be performed is selected. In the list, 39 options including the WebDAV methods are offered in alphabetical order: ACL, BASELINE-CONTROL, BIND, CHECKIN, CHECKOUT, CONNECT, COPY, DELETE, GET, HEAD, LABEL, LINK, LOCK, MERGE, MKACTIVITY, MKCALENDAR, MKCOL, MKREDIRECTREF, MKWORKSPACE, MOVE, OPTIONS, ORDERPATCH, PATCH, POST, PRI, PROPFIND, PROPPATCH, PUT, REBIND, REPORT, SEARCH, TRACE, UNBIND, UNCHECKOUT, UNLINK, UNLOCK, UPDATE, UPDATEREDIRECTREF, VERSION-CONTROL.
INFO
HTTP Version Default: HTTP/1.1
With which HTTP version the check request will be sent is selected: HTTP/1.1 or HTTP/2.
INFO
HTTP Headers
The custom HTTP headers to be sent while the request is being made to the Backend Service can be defined. The field is in the Automatic position by default; when it is set to the Choose position, header rows are added and in every row the HTTP Header Name and the HTTP Header Value are entered.
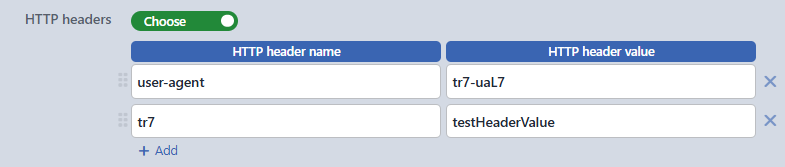 HTTP Headers Configuration
INFO
HTTP Body
The request body to be sent in methods such as POST and PUT can be defined. The field is in the Disabled position by default; when it is set to the Enabled position, the body text is entered.
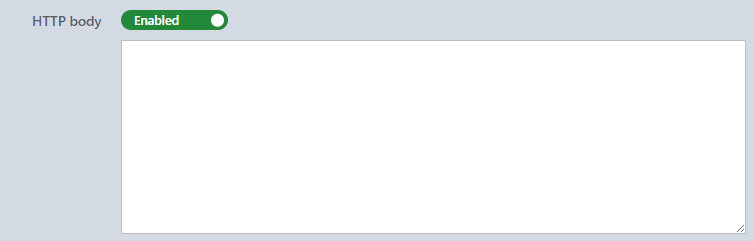 HTTP Body Configuration
INFO
Expected Status Codes Default: 200
The HTTP status codes expected to return from the Backend Service for the health check to be considered successful are selected. The codes are offered in the list with their descriptions in the 200: OK form and more than one code can be selected.
 The Expected Status Codes Selection
INFO
Content Check Mode Default: Basic (String Match)
It makes it possible for the response given to the health check request to be evaluated not only according to the HTTP status code but also according to the response content. It works as an additional verification layer to the Expected Status Codes check.
Two modes are offered; according to the selection, the next field changes:
- Basic (String Match): A text search is performed in the response body; the Expected Content Query field is displayed.
- JSONata Expression: The response is evaluated with a JSONata expression; the JSONata Query field is displayed.
Expected Content Query
It is displayed in the form while Basic (String Match) is selected in the Content Check Mode field (the default).
The text/expression to be searched for in the response body is entered. If this expression cannot be found in the response, the check is considered failed and the service is marked unhealthy (DOWN).
Examples:
- Searching for
OK,HealthyorService Runningon an HTML page. - The
"status":"up"check in a simple API response.
JSONata Query
When JSONata Expression is selected in the Content Check Mode field, it is displayed in the form in place of the Expected Content Query field.
The JSONata expression that evaluates the returning response is entered; if the result of the expression returns true, the check is accepted as successful.
Within the expression, the status (status code), headers (response headers), body (parsed body) and bodyRaw (raw body) fields can be used; the status code, the body fields and the headers can be evaluated together. In the editor of the field, the expression can be tried live on a sample response.
Examples:
status = 200status = 200 and body.status = "UP"$contains(headers.`content-type`, "json")$count(body.checks[status != "UP"]) = 0
INFO
Virtual Domain (Host/SNI)
The domain name information to be sent in the HTTP Host header is entered. It is used in the environments where more than one virtual server runs on the same IP.
HTTPS
The HTTPS health check contains the same parameters as the HTTP check and additionally works over an SSL/TLS connection.
The TLS verification fields below are located at the very top of the form; all the fields in the HTTP type come after these in the same order. In HTTPS, the Virtual Domain field is also used as the SNI in the TLS negotiation.
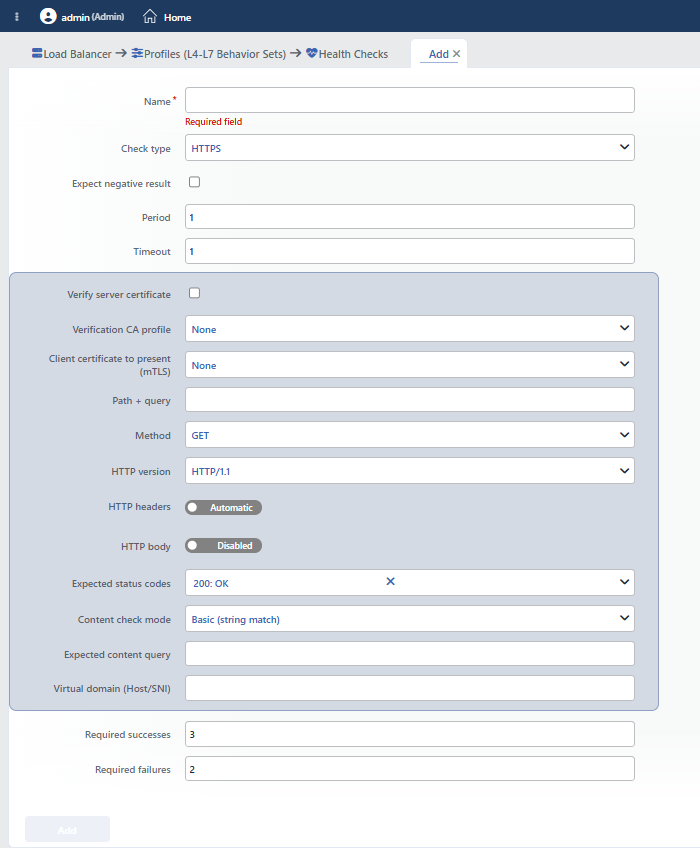 HTTPS Health Checks Profile Add Form
INFO
Verify Server Certificate Default: Off
When it is activated, the certificate presented by the Backend Service is verified; if the verification fails, the check is considered failed. In the environments that use a self-signed certificate, this option can be left off.
INFO
Verification CA Profile Default: None
The certificate authority profile against which the server certificate will be verified is selected; the selection is applied only while Verify Server Certificate is on. When it is left as None, the verification CA defined for the data traffic of the Backend Service to which the profile is assigned is used (if SSL Service is on and certificate verification is required on the Backend Service); in the profile preview this situation is displayed as From the Backend.
INFO
Client Certificate to Present (mTLS) Default: None
On the services that require mutual authentication, the client certificate to be presented during the check is selected. When it is left as None, the Backend Service’s own client certificate is used.
DNS
The DNS check sends a query to the DNS server and checks whether a response can be received.
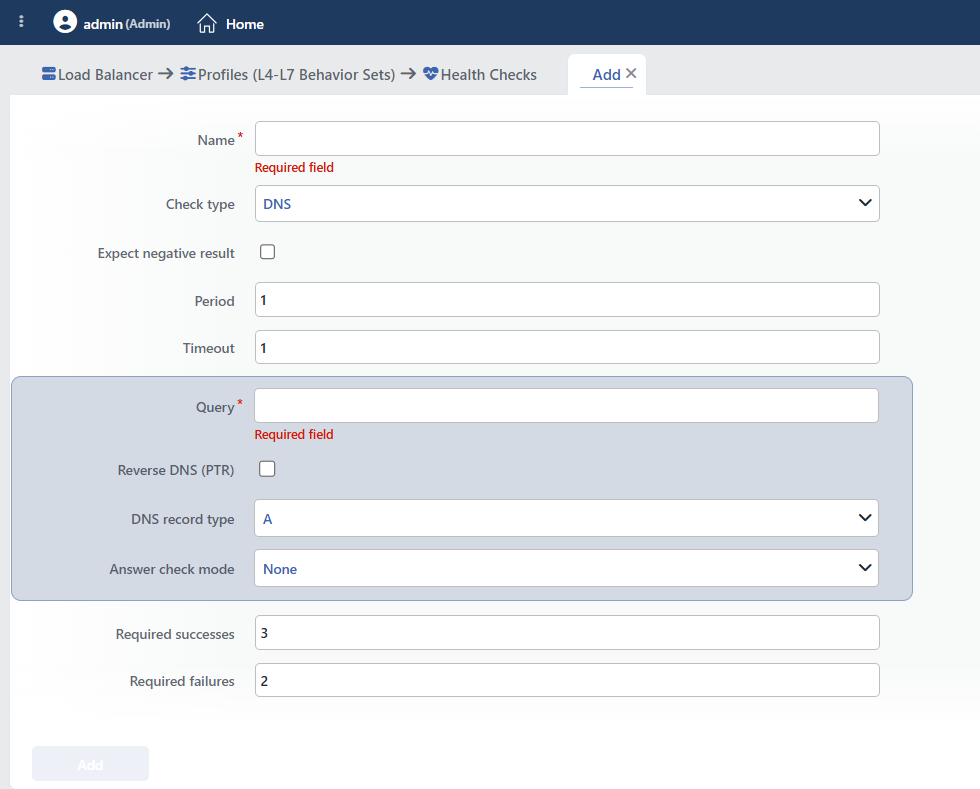 DNS Health Checks Profile Add Form
INFO
Reverse DNS (PTR) Default: Off
When it is activated, the query is made as an address-to-name resolution (PTR) and the record type selection is hidden.
DNS Record Type Default: A
It is displayed in the form while Reverse DNS (PTR) is off (the default); when PTR is turned on, it is hidden.
The record type to be queried is selected: A, AAAA, CAA, CNAME, MX, NAPTR, NS, PTR, SOA, SRV, TXT.
INFO
Answer Check Mode Default: None
Determines whether the content of the returning answer will be checked:
- None: Receiving an answer is sufficient.
- Text Match (Contains): The occurrence of the expected text in the answer is searched for; the Expected Answer Text field opens.
- Regex Match: The answer is compared with a regular expression; the Expected Answer Regex field opens.
Expected Answer Text
It is displayed when Text Match (Contains) is selected in the Answer Check Mode field. The text expected to occur in the DNS answer is entered.
Expected Answer Regex
It is displayed when Regex Match is selected in the Answer Check Mode field. The regular expression that the DNS answer is expected to match is entered.
FTP
The FTP check performs a connection and authentication check to the FTP server.
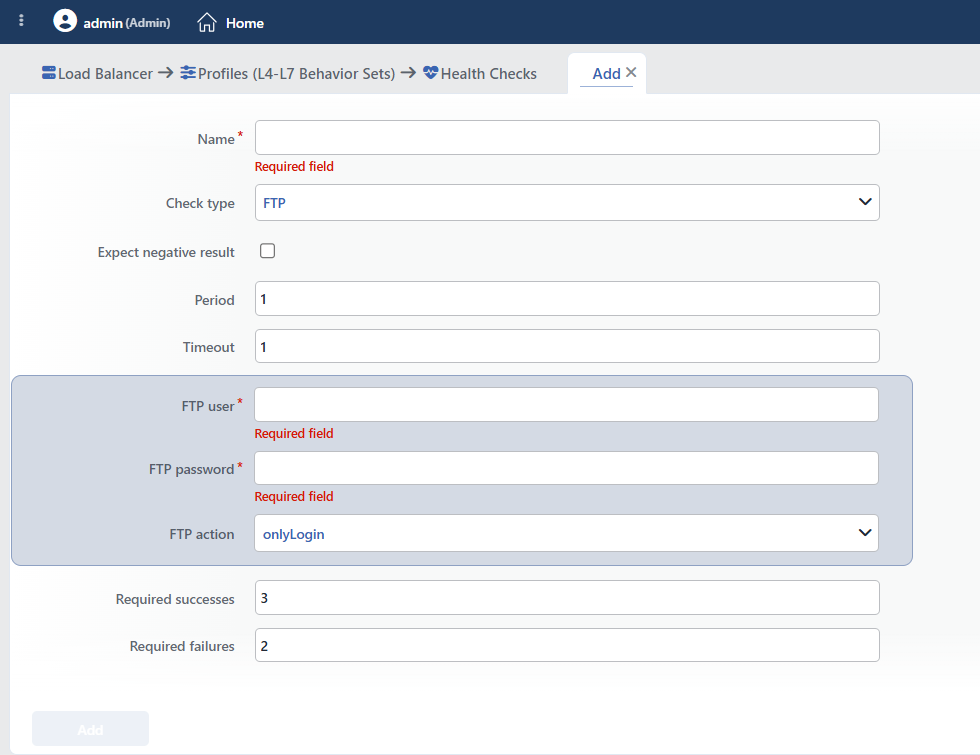 FTP Health Checks Profile Add Form
INFO
FTP Action
How the FTP health check operation will be performed is selected.
 The FTP Action Options
- onlyLogin: Only a login to the FTP server is made; if the connection is successful, the check passes.
- loginAndList: A login is made and the specified directory is listed; both operations must be successful.
FTP Path
It is displayed in the form when loginAndList is selected in the FTP Action field; while onlyLogin is selected, it is hidden.
The directory path on which the listing will be made is entered.
FTPS
The FTPS check is the encrypted equivalent of the FTP check; the connection is established over TLS.
The FTP User, FTP Password, FTP Action and FTP Path fields are exactly the same as in the FTP type; the TLS fields below come after these fields.
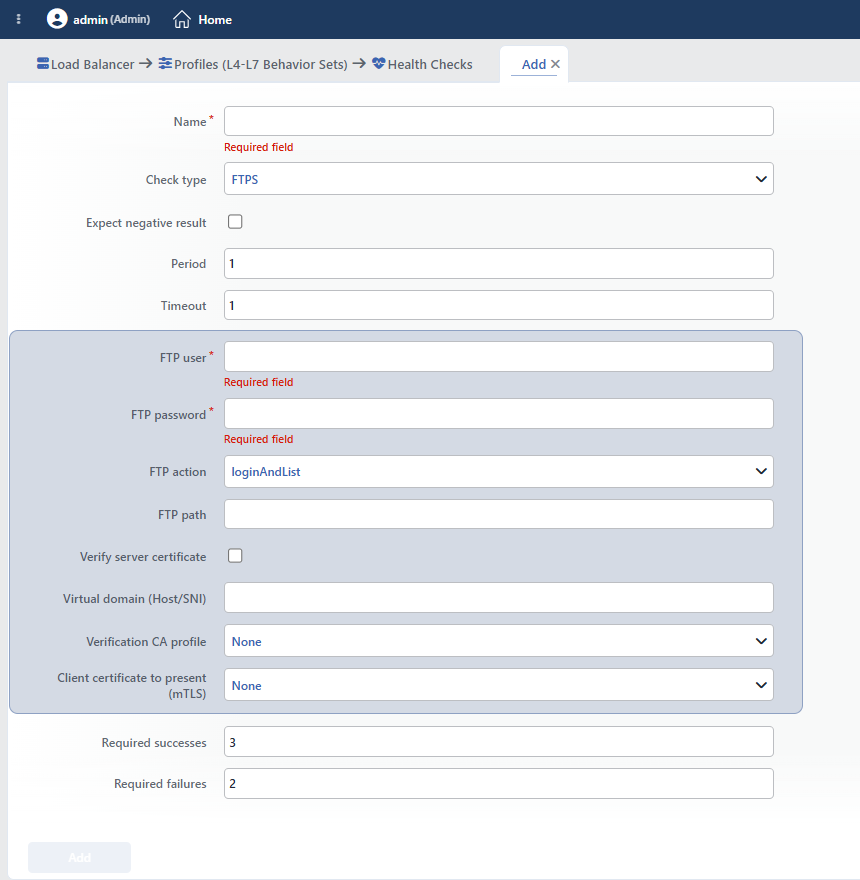 FTPS Health Checks Profile Add Form
INFO
Verify Server Certificate Default: Off
When it is activated, the certificate presented by the other server is verified; if the verification fails, the check is considered failed. In the environments where a self-signed certificate is used, it can be left off.
INFO
Virtual Domain (Host/SNI)
It is the domain name that will be announced to the server while the encrypted connection is being established. It makes it possible for the correct certificate to be selected on the services that present more than one certificate on the same address.
INFO
Verification CA Profile Default: None
The certificate authority profile against which the server certificate will be verified is selected; the selection is applied only while Verify Server Certificate is on. When it is left as None, the verification CA defined for the data traffic of the Backend Service to which the profile is assigned is used (if SSL Service is on and certificate verification is required on the Backend Service); in the profile preview this situation is displayed as From the Backend.
INFO
Client Certificate to Present (mTLS) Default: None
On the services that require mutual authentication, the client certificate to be presented during the check connection is selected. When it is left as None, the Backend Service’s own client certificate is used.
LDAP
The LDAP check performs a connection and optional authentication check to the LDAP server.
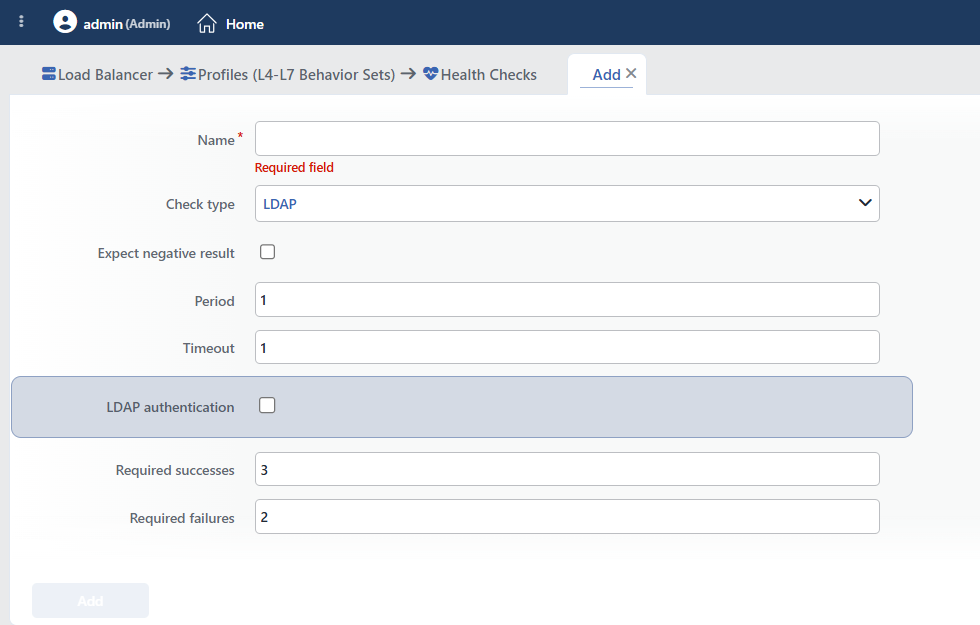 LDAP Health Checks Profile Add Form
INFO
LDAP Authentication
When it is activated, authentication is performed to the LDAP server; the user name and password fields become visible.
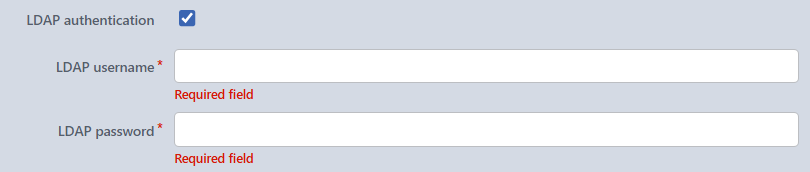 The LDAP Authentication Settings
LDAP Username
It is displayed when LDAP Authentication is turned on. The name of the LDAP user is entered.
LDAP Password
It is displayed when LDAP Authentication is turned on. The password of the LDAP user is entered.
LDAPS
The LDAPS check is the encrypted equivalent of the LDAP check; the connection is established over TLS.
The LDAP Authentication field and the user name/password fields bound to it are exactly the same as in the LDAP type; the TLS fields below come after these fields.
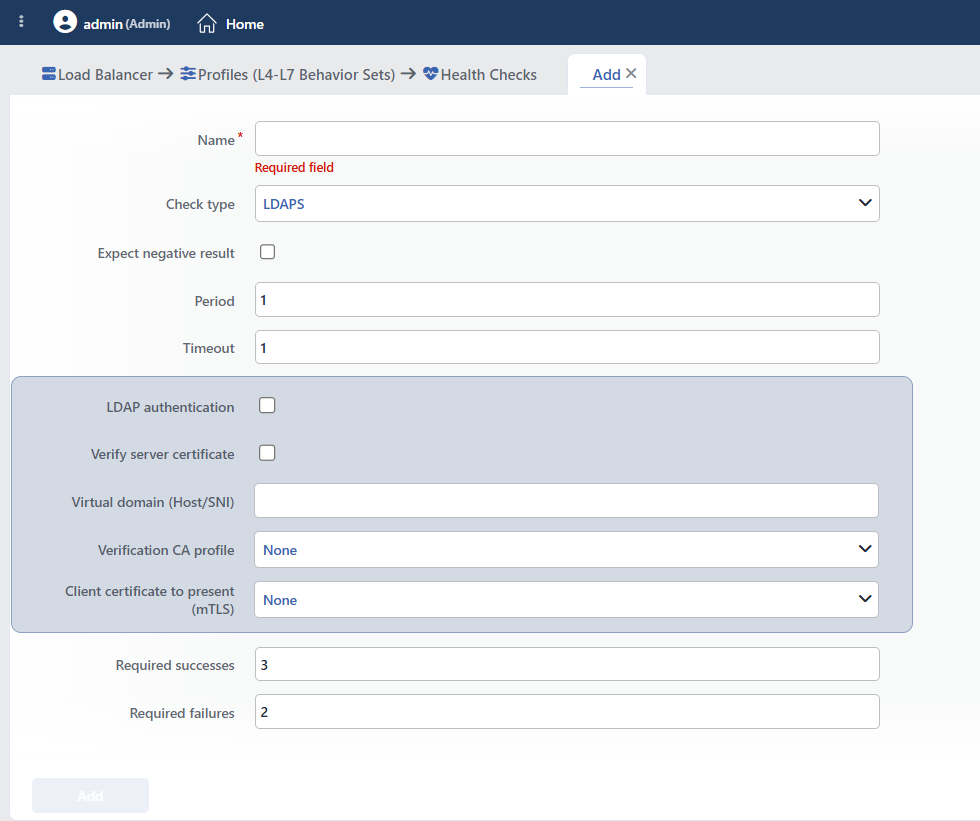 LDAPS Health Checks Profile Add Form
INFO
Verify Server Certificate Default: Off
When it is activated, the certificate presented by the other server is verified; if the verification fails, the check is considered failed. In the environments where a self-signed certificate is used, it can be left off.
INFO
Virtual Domain (Host/SNI)
It is the domain name that will be announced to the server while the encrypted connection is being established. It makes it possible for the correct certificate to be selected on the services that present more than one certificate on the same address.
INFO
Verification CA Profile Default: None
The certificate authority profile against which the server certificate will be verified is selected; the selection is applied only while Verify Server Certificate is on. When it is left as None, the verification CA defined for the data traffic of the Backend Service to which the profile is assigned is used (if SSL Service is on and certificate verification is required on the Backend Service); in the profile preview this situation is displayed as From the Backend.
INFO
Client Certificate to Present (mTLS) Default: None
On the services that require mutual authentication, the client certificate to be presented during the check connection is selected. When it is left as None, the Backend Service’s own client certificate is used.
SMTP
The SMTP check checks whether the greeting (EHLO) exchange can be completed by connecting to the mail server unencrypted.
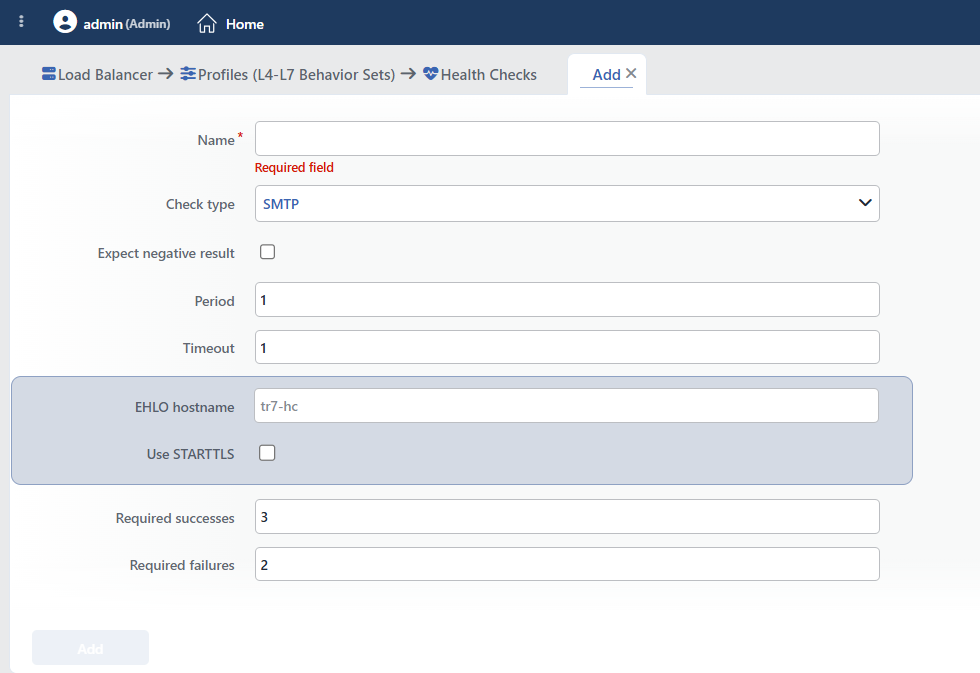 SMTP Health Checks Profile Add Form
INFO
EHLO Hostname Example: tr7-hc
The domain name to be announced to the server during the greeting is entered.
INFO
Use STARTTLS Default: Off
When it is activated, the connection starts unencrypted and is then upgraded to TLS.
When this option is turned on, the Verify Server Certificate, Virtual Domain (Host/SNI), Verification CA Profile and Client Certificate to Present (mTLS) fields are added to the form in order; the meaning of the fields is as explained in the SMTPS section.
SMTPS
In the SMTPS check, the connection is established directly with TLS.
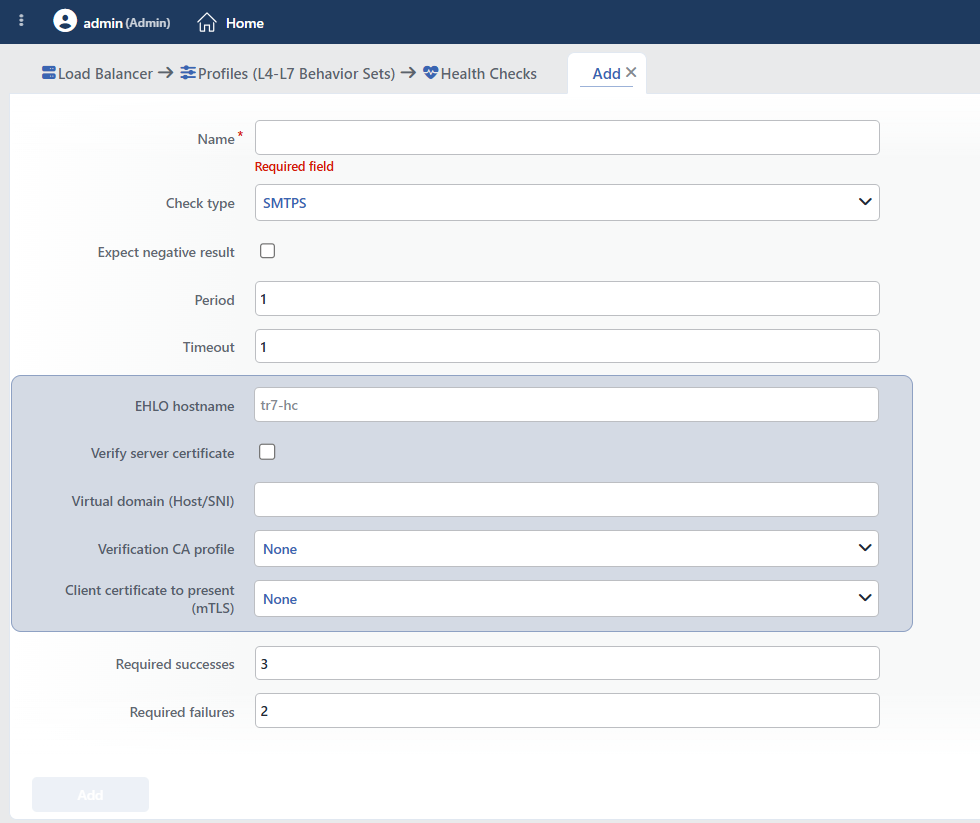 SMTPS Health Checks Profile Add Form
The EHLO Hostname field is the same as in the SMTP type and is located first; then the TLS fields below come. The Use STARTTLS field, which means a later transition to encryption, is not present in this type.
INFO
Verify Server Certificate Default: Off
When it is activated, the certificate presented by the other server is verified; if the verification fails, the check is considered failed. In the environments where a self-signed certificate is used, it can be left off.
INFO
Virtual Domain (Host/SNI)
It is the domain name that will be announced to the server while the encrypted connection is being established. It makes it possible for the correct certificate to be selected on the services that present more than one certificate on the same address.
INFO
Verification CA Profile Default: None
The certificate authority profile against which the server certificate will be verified is selected; the selection is applied only while Verify Server Certificate is on. When it is left as None, the verification CA defined for the data traffic of the Backend Service to which the profile is assigned is used (if SSL Service is on and certificate verification is required on the Backend Service); in the profile preview this situation is displayed as From the Backend.
INFO
Client Certificate to Present (mTLS) Default: None
On the services that require mutual authentication, the client certificate to be presented during the check connection is selected. When it is left as None, the Backend Service’s own client certificate is used.
Oracle
The Oracle check connects to the Oracle database and can run SQL queries.
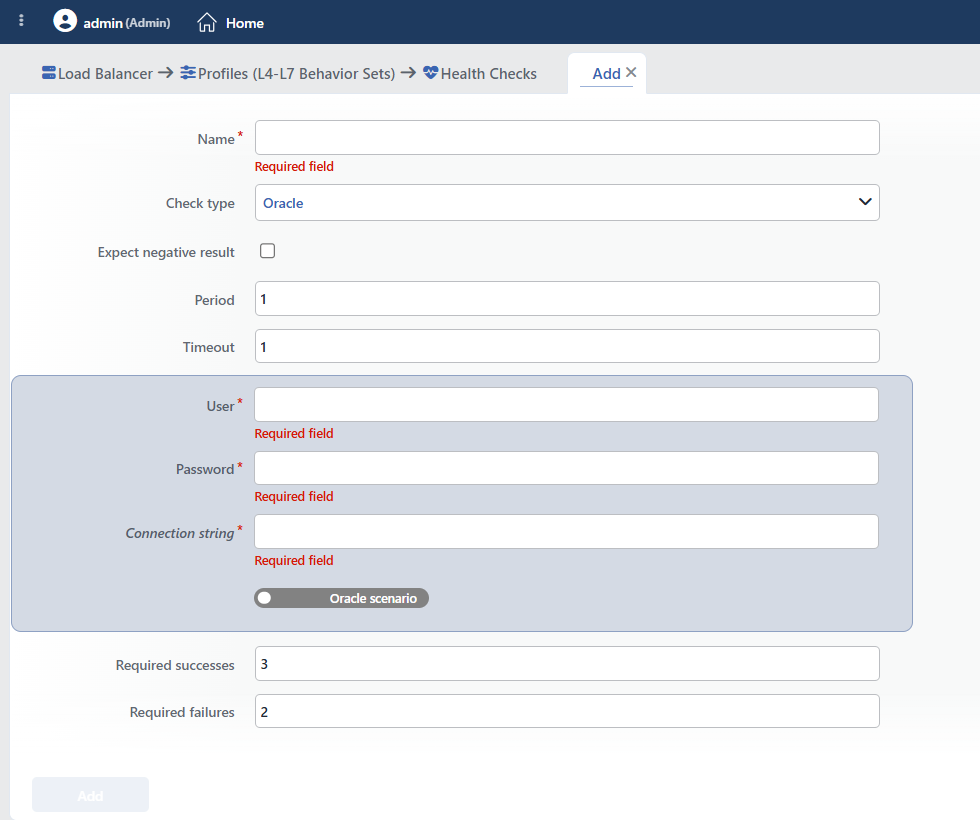 Oracle Health Checks Profile Add Form
INFO
User Required
The user name information with which the connection to the Oracle database will be made is entered.
INFO
Password Required
The password information of the user with which the connection to the Oracle database will be made is entered.
INFO
Connection String Required
The connection information in the IP:Port/SID or TNS format for the connection to the Oracle database is entered.
INFO
Oracle Scenario
It is used to perform a scenario-based Oracle health check. After the database connection is established, SQL queries can be run and the results can be checked.
Every step is added as a separate card; in the card first the Oracle Action selection is made (the field label contains the card order).
Execute Command: The specified SQL query is run. There are three fields in this step:
- Command: The SQL query to be run is entered.
- Expected Text: The text to be searched for in the query result is entered. It can be left empty; if it is empty, the content of the result is not checked.
- Expected Number of Rows: At least how many rows the result must return is entered (at least 1). It can be left empty; if it is empty, the number of rows is not checked.
Wait(ms): The period to be waited before passing to the next step is entered in milliseconds (Wait Time(ms), at least 1).
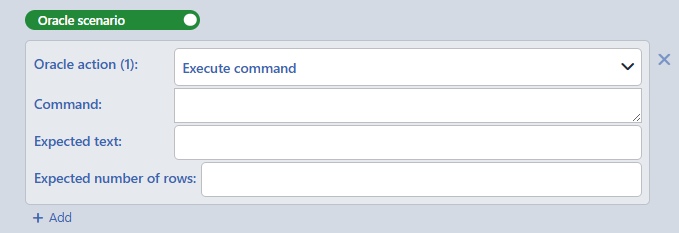 The Execute Command Configuration
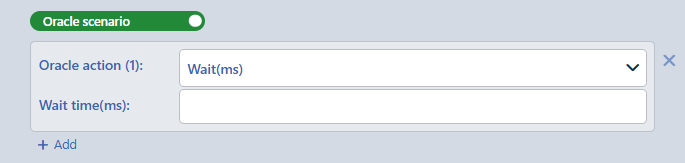 The Wait(ms) Selection
Expression (JSONata)
The Expression check sends no network request to a target. A JSONata expression is evaluated against the facts of the TR7 device running the check (e.g. the device number within the cluster, the device name) and the device's local time. If the result of the expression is a true (truthy) value the check is considered successful, if it is a false (falsy) value it is considered failed; 0, empty text and false count as failure. A broken expression also makes the check fail.
This type is used to tie health to the device's own state instead of the target server: for example to serve traffic only from the first device of the cluster (device.clusterId = 1) or to use a Backend Service only during working hours.
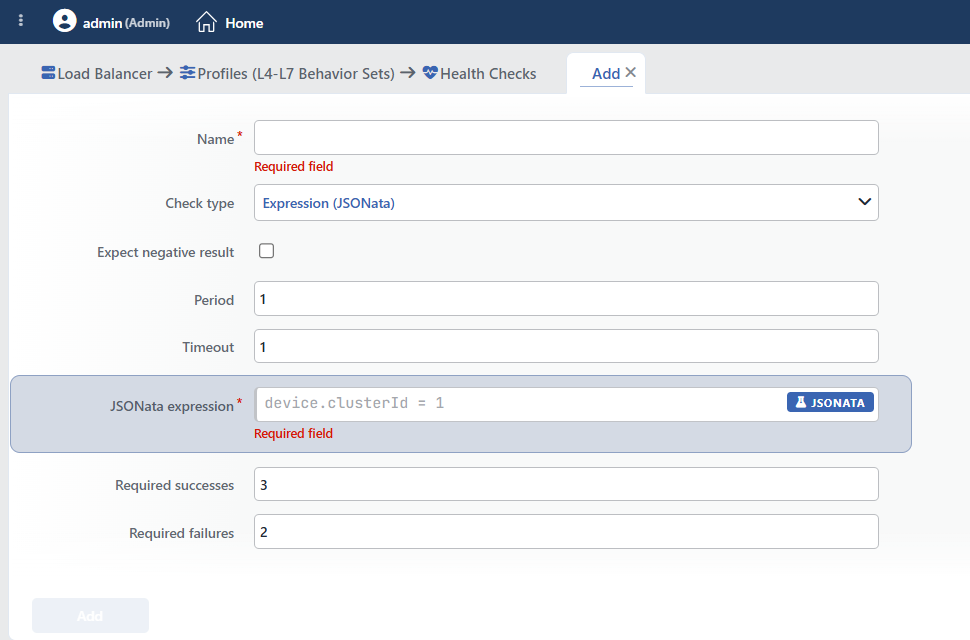 Expression (JSONata) Health Checks Profile Add Form
INFO
JSONata Expression Required
The JSONata expression to be evaluated is entered; the empty field shows the device.clusterId = 1 example. While the field is empty, the "Required field" warning is displayed below it. For an expression with a syntax error, the "JSONata syntax error: <detail>" warning is displayed below the field and the Add button stays disabled. The JSONATA button on the right of the field opens a separate window that helps with writing the expression.
The check is evaluated once every Period; the Expect Negative Result, Required Successes and Required Failures fields are applied as in the other types. When assigned to a Backend Service, the check runs separately for each Backend Service, but since the expression reads the device and time facts the results are the same. In a cluster setup each TR7 device evaluates the expression with its own facts; for this reason different results may be seen on the two devices.
It is also used inside a scenario
The Expression (JSONata) type is also selected in the checks inside a Scenario; in this way a network check is combined with a device or time condition using AND/OR logic.
Scenario
The Scenario check makes it possible to create complex checks by combining more than one health check with AND/OR logic.
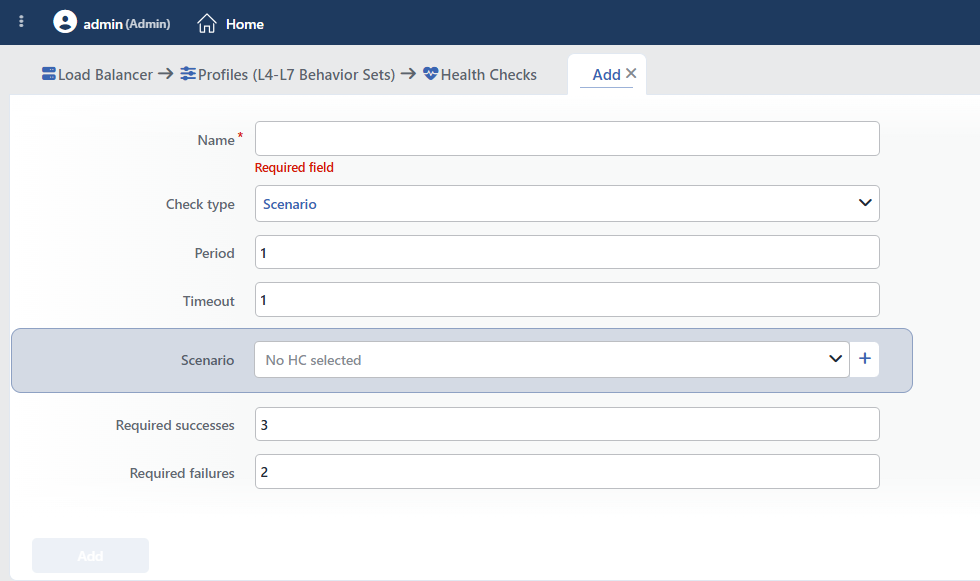 Scenario Health Checks Profile Add Form
INFO
Scenario
Complex health check rules are created through the scenario editor. The previously created health check profiles cannot be used in these scenarios; new checks must be defined within the scenario.
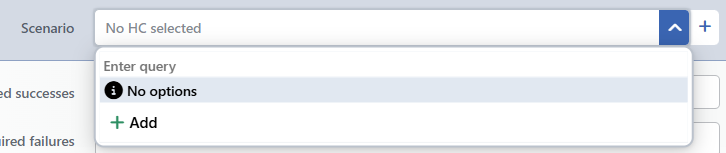 The Health Check Selection
With the + button next to the field, a new check is added to the scenario and a separate window opens. When an existing check is clicked on, the same window opens for editing purposes.
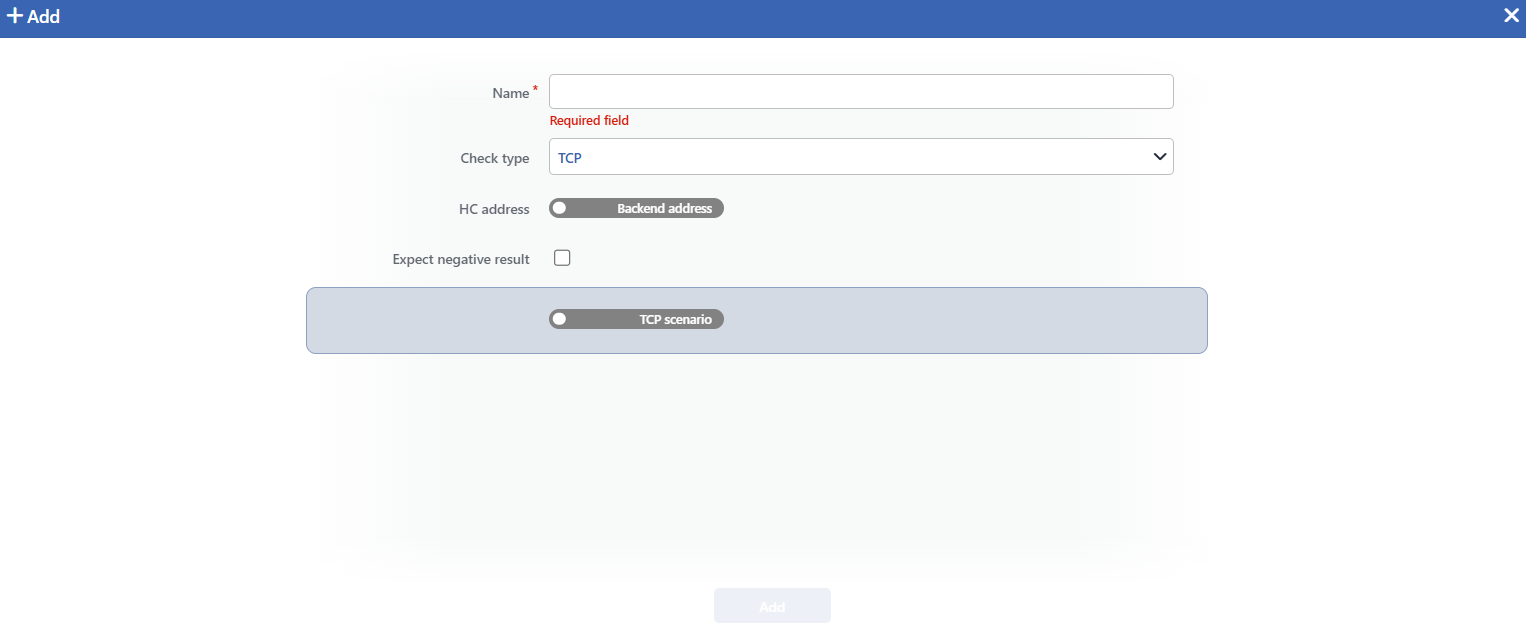 Adding a New Health Check Profile
The checks are grouped with AND (all the checks must be successful) or OR (at least one check must be successful) logic. At most three groups can be defined in a scenario.
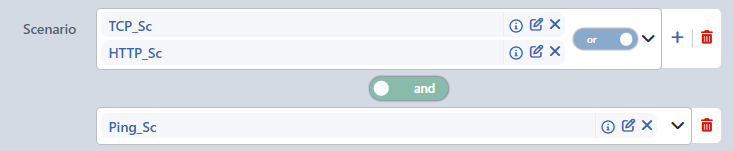 The AND/OR Operators
INFO
The Fields of the Checks Within the Scenario
The check form that opens in the scenario window differs from the main form in two points:
HC Address: This field, which is not present in the main form, determines to which address the check will be made. While the on/off switch is in the off position, it appears as Backend Address and the check is made to the Backend Service address; when it is turned on, the Static Address entry appears and the address (IP or domain name) and the port are defined manually. In the Ping type only the address is asked for, the port is not asked.
The period and threshold fields are not present: In the checks within the scenario, the Period, Timeout, Required Successes and Required Failures fields are not located. For Period and Timeout, the values in the upper profile are used; the Required Successes / Required Failures thresholds, on the other hand, are applied not to the sub-checks one by one but to the combined result of the scenario; the sub-checks are evaluated with their instant result in every round.
The field order in the window is: Name → Check Type → HC Address → Expect Negative Result → (the fields specific to the check type); Check Type comes as TCP by default in this window. The Scenario option is not present in the check type list; a new scenario cannot be defined within a scenario.
INFO
In the Scenario type, the Expect Negative Result field is not present in the main form.
How Is It Added to a Backend Service?
A Health Checks profile is assigned to a Backend Service by following the steps below.
INFO
Assignment for a group
A Health Checks profile can be assigned to a single Backend Service or, if desired, to a Backend Group. When a profile is assigned to a group, the same Health Checks profile takes effect for every Backend Service in the group.
1
Step 1 Go to the Backend Services screen
The Load Balancer → Backend Services path is followed in the TR7 web interface.
2
Step 2 Open the editing screen
The Backend Service to which the profile will be added is right-clicked and Edit is selected; or the service is clicked on and the Edit icon is clicked in the window that opens on the right.
3
Step 3 Select the Health Check profile
On the editing screen of the Backend Service, the previously created profiles are displayed in the Health Check field and the desired profile is selected.
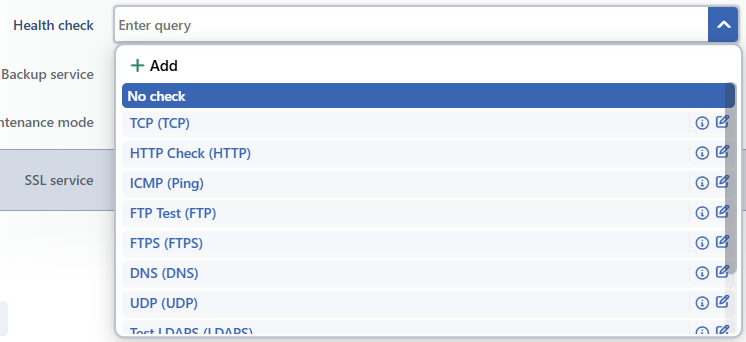 The Health Check Selection on the Backend Service Editing Screen
4
Step 4 Select a profile or add a new one
A selection can be made from the list, or a new Health Checks profile can also be added directly on the Backend Service editing/creation screen by clicking the Add button.
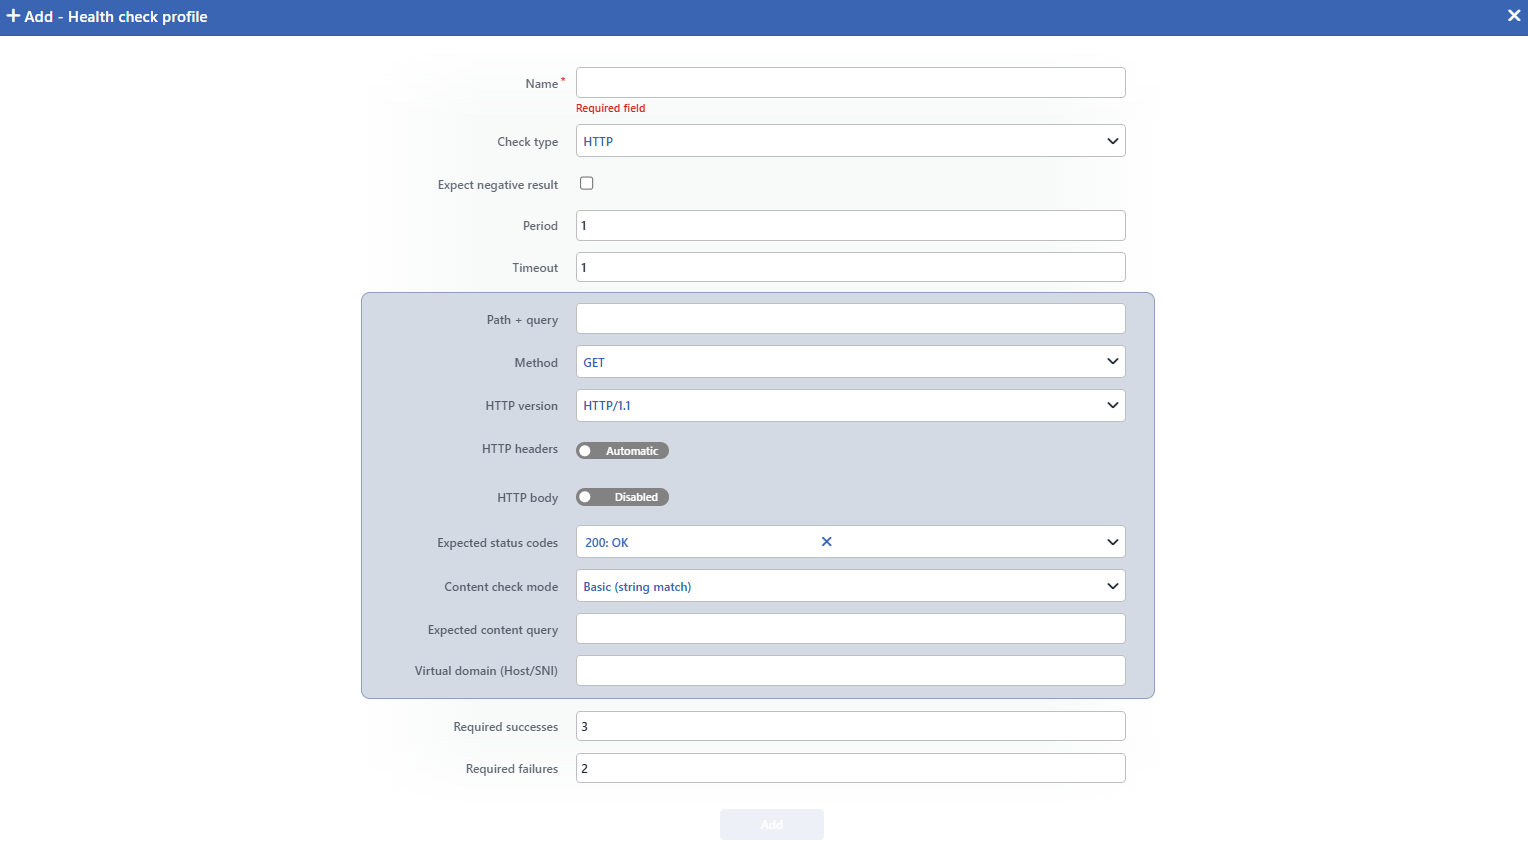 Adding a New Health Checks profile
5
Step 5 Save
The changes are saved by clicking the Save button and the health checks of the Backend Service are started.
