
Smarter by Design.Simpler for Business
Local Database
What Is Local Database?
Local Database is the Authentication Providers type that verifies the username and the password the user writes in the login form in the local user database on TR7. It is used in scenarios in which there is no external directory or identity provider; the users and the password policy are managed on the Local Databases screen. The fields in the account (the name, the e-mail, the groups) are written to the session with the automatic mapping.
How does it work?
- The database and the users are defined on the Local Databases screen.
- Local Database is selected as the Provider Type on this screen and the database is selected.
- The profile is added to the access flow as an Authentication Provider step after the login form.
- The username and the password are verified in the database; the flow continues from the success or the fail transition. If the database allows it, the user resets or changes their own password from the access pages.
Operational Best Practices
- The database first. The database and the users must be defined beforehand; the field is also created with the add icon without leaving the form.
- The lockout. In this type, which verifies a password, Account Lockout Policies must be assigned.
How to Add?
A new Local Database provider is added through the TR7 web management interface with the following steps:
- The Configuration Menu is opened by clicking the TR7 logo at the bottom left.
- The AGS → Authentication → Authentication Providers → Add steps are followed.
- A unique and descriptive name is entered for the profile; Local Database is selected as the Provider Type.
- The User Database is selected.
- The profile is added by clicking the
Addbutton.
Profile Add Form
When the AGS → Authentication → Authentication Providers → Add steps are followed and Local Database is selected in the Provider Type field, the form opens with the following fields: the User Database field under the Provider Type field, and then the username and password fields in the section headed Local Database Authentication.
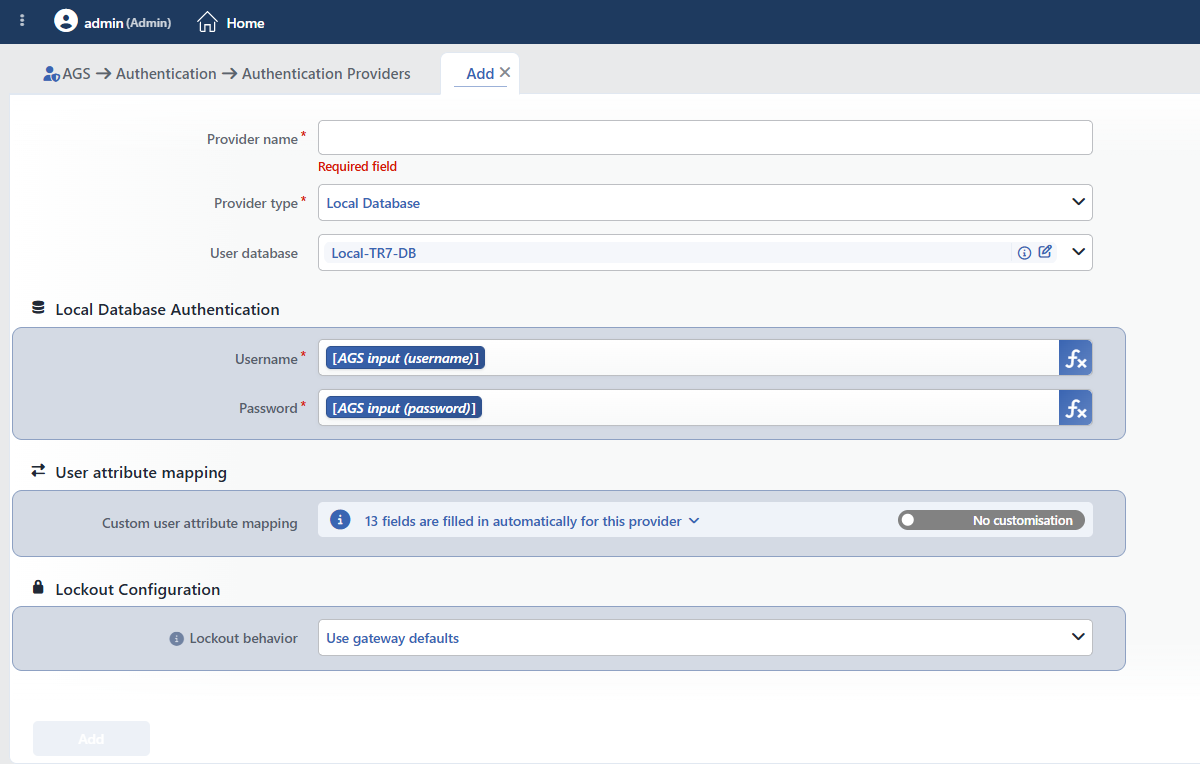 The Form While Local Database Is Selected
INFO
Provider Name Required
The name of the profile; it identifies the profile in the list, in the step selection in the flowchart, in the session list and in the logs. The name must be unique on the device; a second profile with the same name is not saved and the Name is used warning is displayed. When it is left empty, the Required field warning is displayed.
INFO
Provider Type Required
The provider type; Local Database is selected on this page. When the type is changed, only the fields of the new type are displayed and saved; the type is changed in the edit form as well.
INFO
User Database
The database profiles on the Local Databases screen are listed; the field comes with the first defined database selected. The field is required in the schema, but the required mark and the Required field warning are not displayed in the form. With the information and editing icons next to the selected database, the summary of the profile and the edit form are opened. With the + Add row at the top of the list that opens, a new profile is defined without leaving the page and comes selected in the field.
Local Database Authentication
INFO
Username Required
The username expression to be searched for in the database. The field comes filled with the AGS input (username) variable (%AGS_USER_INPUT(username)), which carries the value coming from the login form; another smart variable is selected with the ƒx icon.
INFO
Password Required
The password expression to be verified. The field comes filled with the AGS input (password) variable (%AGS_USER_INPUT(password)), which carries the value coming from the login form; another smart variable is selected with the ƒx icon.
User Attribute Mapping
INFO
Custom User Attribute Mapping Default: No customisation
How the fields in the provider response are mapped to the session attributes is managed. The information bar to the left of the field shows the number of fields mapped automatically for this type: 13 fields are filled in automatically for this provider. When the arrow icon on the bar is clicked, the 13 automatically mapped rows and the JSONata expression of each of them are listed.
When the switch on the right is moved to the Customised position, the AGS Attribute and Source Attribute table is displayed: the session attribute (with a suggestion list) is entered in the left column and the JSONata expression that is evaluated on the provider response in the right column. When the switch is turned on, the + Add link that adds a row appears on the right of the bar. A custom row that targets the same attribute as an automatic row overrides the automatic one (the replaced below badge) and the text of the information bar turns into the … fields are filled in automatically; you replace … of them form, which also says how many automatic rows are replaced. When a name outside the standard attributes of AGS is entered, this attribute is defined as a custom user field on the vService; names that start with _ are considered hidden fields and do not produce a custom user field.
Lockout Configuration
INFO
Lockout Behavior Default: Use gateway defaults
With which lockout policies the failed attempts on this provider are counted is selected:
| Option | Meaning |
|---|---|
| Use Gateway Defaults | The policies in the Default Lockout Policies list of the vService are used. |
| Replace Defaults | Only the policies selected in the Lockout Policies field are used. |
| Add to Defaults | In addition to the default policies of the vService, the ones selected in the Lockout Policies field are used as well. |
| No Lockout | Failed attempts are not counted on this provider, no lockout is performed. |
Lockout Policies
Displayed while Replace Defaults or Add to Defaults is selected; the built-in and defined policies on the Account Lockout Policies screen are selected.
INFO
Add
The profile is added by clicking the Add button; the tab closes and the profile is displayed in the list.
