
Smarter by Design.Simpler for Business
Trigger Actions
What Is a Trigger Action?
Trigger Action is the request profile that TR7 keeps towards an external system for when a Health Scenario condition is met or broken: in the HTTP / HTTPS type an HTTP request (the address, the method, the headers, the body and the expected answer), and in the Oracle type connecting to the database and ordered commands. This screen only defines the profiles; the actions are not run from this screen, they are assigned to the Activation Trigger → and Deactivation Trigger ← lists of the scenario and are executed in order when the scenario changes status.
When an action runs, the answer is evaluated: in the HTTP types the expected status code and the optional content check, and in the Oracle type the expected text and row count of the command result. The result is written into the GTM event record as a Trigger Action event and appears in the last action lines on the preview panel of the scenario.
3
Trigger type
Oracle · HTTP · HTTPS
Scenario
The triggering event
It runs when the condition of the health scenario is met or broken
Sequential
Execution
The actions in the list run one by one; a failed action stops the remaining ones
Verification
Result check
The success is determined with the status code, the content or the Oracle row/text check
vDevice
The place of work
The action is run over the selected vDevice and route table
Log
Traceability
Every run is written into the GTM record as a Trigger action event
How does it work?
- The basic status of a health scenario changes: when the condition is met, the Activation Trigger → list of the scenario, and when it is broken, the Deactivation Trigger ← list is run.
- The actions in the list are executed one by one, in the order in which they were selected in the scenario. Every action is run over the vDevice and the Route Table selected in the profile; in the HTTP / HTTPS type the request profile and in the Oracle type the database connection and the command steps are executed.
- The answer is evaluated: in the HTTP types Expected Status Codes and the content check, and in the Oracle type Expected Text / Expected Number of Rows. 2.5 seconds after a successful action it is passed to the next action; a failed action stops the remainder of the list: it is waited for one second and the loop is terminated, and no retry is made.
- The starting, success, failure and stopping events are written into the GTM record as a Trigger Action event.
The Trigger Types
The Trigger Type list offers three types, in the screen order:
| Trigger Type | Description |
|---|---|
| Oracle | It connects to the Oracle database with User / Password / Connection String and executes the command running / waiting steps in the step list in order. |
| HTTP | The HTTP request defined with the Address, Method, header and body fields; the answer is evaluated with the status code and the optional content check. |
| HTTPS | The same request profile over TLS; the server certificate is verified and the verification cannot be turned off on this screen. |
Operational Best Practices
- The critical action must be placed at the beginning of the scenario list. The actions assigned to a scenario run in the order in which they were selected in the selector of the scenario form; the only way to change the order is to remove the actions from the selection and select them again in the desired order. When one of them fails, the remaining ones are not run and are not retried; the action whose success is compulsory must be selected first and the ones for information purposes afterwards.
- The expected status codes must be selected according to the target system. Some systems return
202 Acceptedand some200 OKfor a successful operation; the Expected Status Codes list is arranged accordingly; if the list is left empty and there is no content check either, every answer (including 5xx) is considered successful. The redirection answers (3xx) are not followed; if they are not in the list, the action is considered failed. - The certificate of the HTTPS target must be verifiable by the device. On this screen there is no field for turning off the certificate verification or selecting a CA; a certificate that cannot be verified makes the action fail.
- Waiting must be added between the Oracle commands. While more than one command is run in order, time is allowed for the previous command to be processed with the Wait(ms) step.
- Separate profiles must be defined for the activation and the deactivation. Different external operations are required at the moment of the transition and of the return; separate actions are created for the two directions and assigned to the related list in the scenario.
- The scenarios must be reviewed before deleting. The deleted action is not removed from the lists of the scenarios by itself; when the scenario is triggered, that action is skipped silently.
- The results must be monitored from the GTM record. Every run is listed on the GTM Logs screen as a Trigger Action event with the scenario name and the action name; the failed records contain the error text.
How to Add?
A new Trigger Actions action is added through the TR7 web management interface with the steps below:
- The Configuration Menu is opened by clicking the TR7 logo at the bottom left.
- The GTM → Trigger Actions → Add steps are followed.
- A unique and descriptive name is entered for the action.
- Trigger Type is selected and the fields that appear according to the type are configured.
- The action is added by clicking the
Addbutton.
TIP
Reaching the page via quick search
Instead of navigating the menu step by step, the related page is reached directly by using the search bar in the bottom left corner of the screen. The search bar opens with the Alt + T shortcut on Windows and Opt + T on macOS; typing the name of the feature being searched for is then sufficient.
The created action can be used in the trigger list of one or more health scenarios. The same form is also opened in a window from the Add button of the Activation Trigger → and Deactivation Trigger ← selectors in the scenario form; the saved action is added directly to the list of the scenario.
Trigger Actions Listing Screen
By following the GTM → Trigger Actions path, the list of all the trigger actions added on the TR7 device is reached. Action adding, editing and deleting operations are performed through this screen.
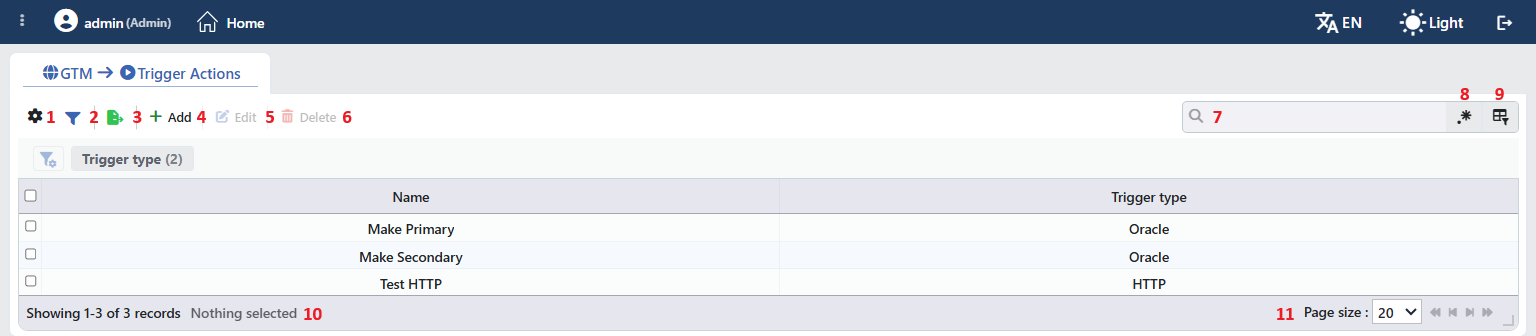 Trigger Actions Listing Form
The table opens with the following columns by default:
| Column | Description |
|---|---|
| Name | The name of the action. |
| Trigger Type | The action type: Oracle, HTTP or HTTPS. |
There is no column hidden by default; these two columns are in the column selector. The table is not sorted by default; when a column header is clicked, descending sorting is applied first, then ascending, and on the third click the sorting is removed. The trigger actions do not have a working status; there is no status column or status circle on this screen.
The items in the toolbar are arranged from left to right in the following order; the last two items (Page Information and Page Size) are located in the information strip below the table.
Columns
Which columns are shown in the table is selected; both columns are on by default. In the same panel, columns are reordered by dragging and alignment is selected per column; the row height is fitted to the page with the Fit rows to the page button, and the column layout is reset to default with the Reset button. When the width badge next to a manually widened column is clicked, the column returns to the automatic width. The layout is stored per user.
Filter
The Filter button is used to filter the actions shown in the list according to certain criteria. When the button is clicked, the filter strip above the table opens and closes; the strip comes open when the screen opens and the button shows the number of active filters with a badge. There is a single card in the strip: Trigger Type; in the card the types seen in the list are listed with their row counts and more than one type can be selected together. The number in the parentheses in the card title shows the number of distinct values that have at least one row in the list.
Export
The table is exported as Excel, CSV or PDF by clicking the Export button. In the window that opens, the Filename, Format and Data Source, together with the Columns to be exported, are determined; the remaining fields are displayed according to the format: CSV Separator for CSV, Excel Sheet Name for Excel, and Page Orientation and Page Size for PDF.
Add
By clicking the Add button, the form for creating a new action opens in the Add tab.
Edit
By clicking the Edit button, the editing form of the selected action opens in the Edit tab. The button becomes enabled only when a single action is selected. The editing form is the same as the add form; all the fields including the type can be changed and the change is saved without asking for confirmation.
Delete
When one or more actions are selected and the Delete button is clicked, the related actions are deleted. Before deleting, the "Are you sure?" confirmation is asked. The button is passive while there is no selection.
WARNING
An action that is in use can also be deleted and the confirmation window does not show in which scenarios the action is used; before deleting, the Used in tab on the preview panel must be checked.
The Activation Trigger → and Deactivation Trigger ← lists of the health scenarios that refer to the deleted action are not updated by themselves; when the scenario is triggered, the deleted action is skipped silently and this skipping is not written into the record. The related scenarios must be edited after the deletion. The deletion is written into the user operation record as a separate line for every action.
Search
Used to search all information in the table.
RegExp Search
Used to search all information in the table with a regular expression (RegExp).
Column Based Search
Used to perform a column-based search on the information in the table; a separate search line opens for every column and next to every box there are the Negate button that reverses the result and its own RegExp switch.
Page Information
Contains information about the total number of defined actions and the number of actions displayed in the list: Showing N-M of T records and the number of selected actions (N selected, or Nothing selected when there is no selection). While a filter is active, the number of applied filters and the number of shown rows are also written.
Page Size
The maximum number of actions to be displayed on the page is selected. The default is 20; the options are 5, 10, 20, 50, 100, 200, 500 and All. With the arrow icons next to it, the pages are switched between.
Right-Click Menu
When a row is right-clicked, a menu with the name of the action in its title opens. Both operations in the menu apply only to the right-clicked action; a selection made in the list does not affect the menu.
| Operation | What it does |
|---|---|
| Edit | Opens the editing form of the action in the Edit tab; it is the same as the form opened by the Edit button in the toolbar. |
| Delete | Deletes the right-clicked action; the same confirmation question as the deletion in the toolbar is displayed. |
Preview of the Selected Action
When a row in the list is clicked, the preview of the action opens on the right of the screen; when the selected row is clicked again, the panel closes. In the title there are the name of the action and the Trigger Action subtitle, and at the top right there are two operations; a status circle does not take place.
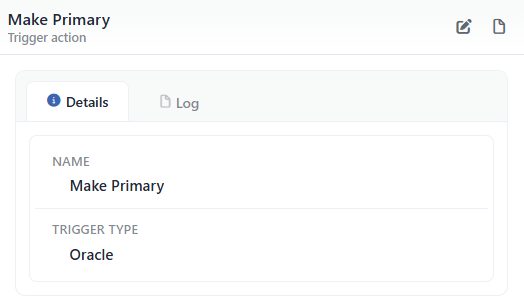 Preview of the Selected Action
| Operation | What it does |
|---|---|
| Edit | Opens the editing form of the action in the Edit tab. The same form is also opened with the Edit button in the toolbar and with Edit in the right-click menu of the row. |
| Log | Opens the GTM event records (the run results) and the user operations that belong to the action in a window, without leaving the page. |
The panel has three tabs; the last one is displayed only if there is a scenario that uses the action:
Details
It lists only two lines: Name and Trigger type. The address, the method, the headers, the expected status codes or the Oracle fields are not shown in the preview; for these the editing form is opened.
Log
Lists the run events of the action (started, successful, failed, stopped) and the user operations performed on it as a timeline.
Used in
Lists the health scenarios that use the action in their Activation trigger → or Deactivation trigger ← list; the badge next to the tab name shows the number of usages. When a row is clicked, it is passed to the related scenario.
The rows in the Details tab are as follows, in order:
| Row | Description | Visibility condition |
|---|---|---|
| Name | The name of the action. | Always |
| Trigger Type | The action type: Oracle, HTTP or HTTPS. | Always |
The type-specific fields (the address, the method, the headers, the expected status codes, the Oracle steps) do not take place in the preview; for these the editing form is opened.
Action Add Form
A new trigger action is added on the TR7 device by following the GTM → Trigger Actions → Add steps.
INFO
Name Required
The name of the trigger action is entered. The name identifies the action in the list, in the action selectors in the scenario form and in the GTM records. This screen does not prevent the same name from being used in a second action; giving a distinctive name is recommended.
INFO
Trigger Type Default: Oracle
The action type is selected: Oracle, HTTP, HTTPS (in the screen order). According to the selected type, the lower box of the form changes. The type can be changed in the editing form as well; when the type is changed and saved, the fields that belong to the previous type are deleted from the profile.
INFO
vDevice
From which virtual device the action will be run is selected; in the list Host Device (the main device) is in the first place and comes selected by default, and afterwards the defined vDevices take place.
INFO
Route Table Default: the first option
From which route table of the selected vDevice the action will be run is selected; the first table of the list comes selected. The list is refreshed when the vDevice is changed, but the previous selection is not cleared by itself; when the vDevice is changed, the route table must be selected again as well.
INFO
Address Required
It is visible in the HTTP and HTTPS types; it is not present in the Oracle type (the connection information is entered into the Connection String field). The field consists of two boxes side by side: on the left the address of the target and on the right its port. An IP or a domain name is entered as the address and it cannot be left empty; the badge at the right of the box says IP while the field is empty or when a domain name is entered, and IPv4 or IPv6 when a valid IP address is entered. The badge of the port box says Port; the port cannot be left empty and must be between 1 and 65535, otherwise the Invalid port error is given. On this screen no format check is made for the address.
Oracle
It connects to the Oracle database and runs the defined command steps in order. If the connection cannot be established or the expectation of a step is not met, the action is considered failed.
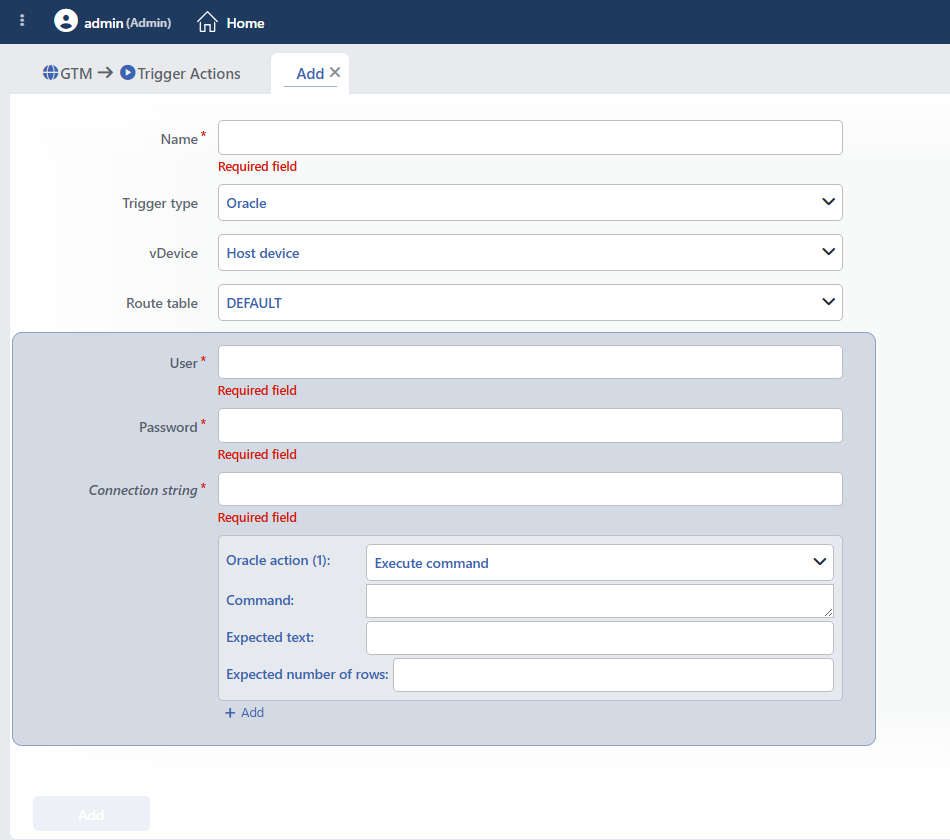 Oracle Trigger Action Add Form
INFO
Connection String Required
The connection string of the database; the entered value is used as it is (e.g. 172.16.101.63:1521/FREEPDB1). On this screen no format check is made.
INFO
The step list
The steps to be executed in order after the connection; the field appears without a title in the form, the list opens with at least one step and cannot be left empty. The type of every step is selected from the Oracle Action (N) field:
- Execute Command: the query in the Command box is run and the transaction is finalized automatically (autocommit). If Expected Text is filled, the text is expected to be found in any cell of the returning rows (case-insensitive; within the first 1,000 rows), and if Expected Number of Rows is filled, at least that many rows are expected to return; if both fields are empty, the result rows are not read. An expectation that is not met makes the action fail (Expected text failed / Expected row count failed).
- Wait(ms): it is waited for as long as the Wait Time(ms) (at least 1).
A new step is added with the Add button with the plus icon; the new step opens with the Execute Command type. While there is a single step, the delete cross is not displayed; while there is more than one step, the steps are sorted by being dragged from their handle and are removed with the cross icon (the last step cannot be removed). The steps are executed in the order in the list.
HTTP and HTTPS
It defines an HTTP request profile; the answer is evaluated with the expected status codes and the optional content check. In the HTTPS type the request is made over TLS; on this screen there is no field for turning off the certificate verification or selecting a CA profile or a client certificate, and a certificate that cannot be verified makes the action fail. The redirection answers are not followed.
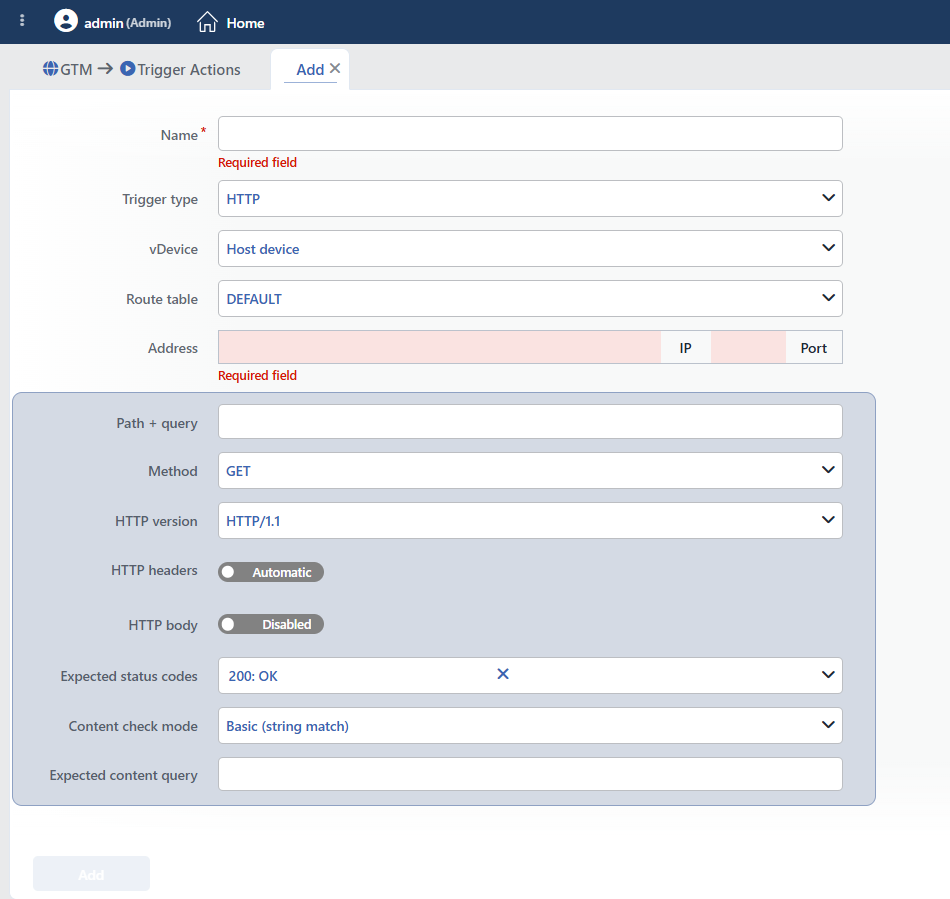 HTTP Trigger Action Add Form
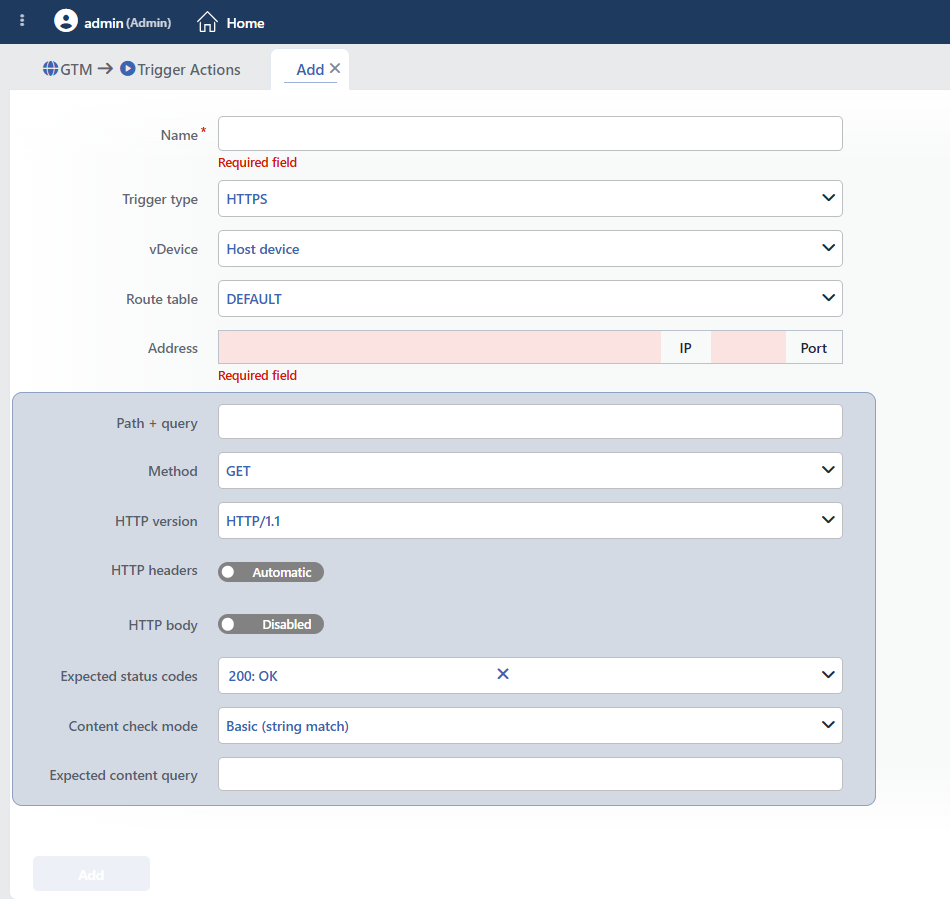 HTTPS Trigger Action Add Form
INFO
Path + Query
The path and the query string on which the request will be made are entered. When it is left empty, the request is made to the root path; a / is added to the beginning of a value that does not start with /.
INFO
Method Default: GET
The HTTP method is selected. The list is in alphabetical order; besides the standard methods such as GET, HEAD, POST, PUT, DELETE, OPTIONS and PATCH, it also contains the WebDAV methods.
INFO
HTTP Headers Default: Automatic
The headers to be sent with the request. While Automatic is selected, the headers are created automatically; when Choose is selected, the table opens with one empty row and the HTTP Header Name / HTTP Header Value pairs are added with the Add button; the rows are sorted by being dragged and are removed with the cross icon. The header names are sent by being converted to lowercase; the request carries a user-agent header that identifies TR7 in every case.
INFO
HTTP Body Default: Disabled
It is opened with the Enabled / Disabled switch; the body to be sent with the request is entered.
INFO
Expected Status Codes Default: 200
The HTTP status codes expected for the action to be considered successful are determined with a multiple selection; if the answer code is not one of the selected ones, the action fails with the Unexpected status code error. If the list is left empty, the status code is not checked; if there is no content check either, every answer is considered successful.
INFO
Content Check Mode Default: Basic (string match)
It makes it possible for the answer to be evaluated according to its content in addition to the status code. The content is checked only in the successful (2xx) answers; in the other answers only the status code is evaluated. If both the content and the status code checks fail, the content check error appears in the record.
- Basic (string match): the text in the Expected Content Query field is searched for in the answer body; if it is not found, the action is considered failed with the HTTP(s) content check failed error. If the field is left empty, no content check is made.
- JSONata Expression: the expression in the JSONata Query field is evaluated on the status code (
status), the parsed body (body; it is parsed as JSON or XML, and if it cannot be parsed, the raw text), the raw body (bodyRaw) and the headers (headers). If the result is not true, it is considered failed with JSONata check returned false, and if the expression is erroneous, with JSONata evaluation error (e.g.status = 200 and body.status = "UP"). An expression that has a syntax error prevents the form from being saved.
According to the selection, only the related query field is visible.
INFO
Add
The action is added by clicking the Add button; while there is an erroneous field in the form, the button is passive. The adding does not ask for confirmation; the record returns immediately and the Add tab closes. The operation is written into the user operation record ("<name>" trigger profile is created). The action never runs until it is assigned to a health scenario.
Operating Mechanism
INFO
- The triggering event. The actions run only when the basic status of a health scenario changes: when the condition is met, the Activation Trigger list of the scenario, and when the condition is broken, the Deactivation Trigger list. An action that is not assigned to a scenario never runs; there is no manual running on this screen.
- The order and the stopping. The actions in the list are executed one by one, in the order in which they were selected in the scenario. 2.5 seconds after a successful action it is passed to the next one; a failed action stops the remainder of the list: it is waited for one second and the loop is terminated, and no retry is made. If the same scenario is triggered again, the actions that are in progress are stopped first (stopped).
- Where does it run? Every action is run on the vDevice selected in the profile and within the selected Route Table; the profile information is conveyed to this device at the moment of the run.
- HTTP and HTTPS. The request profile is run with the headers and the body; the redirections are not followed. The request is sent in every case with a
tr7-health-check/2.0-valueduser-agentheader and the entered header names are converted to lowercase. The request must be completed within 120 seconds (Request timeout error). In HTTPS a server certificate that cannot be verified produces a Certificate error. In a successful answer the content check (Content Check Mode) and in every answer the status code check (Expected Status Codes) is made; if any one of them fails, the action fails. - Oracle. The connection is established and the steps are run in order; if Expected Text / Expected Number of Rows is not met, the action fails. The connection is closed at the end.
- The cluster. Only the primary device of the cluster runs the actions; if the peer device remains inaccessible for longer than one hour, the other device takes over.
- The monitoring. The starting, success, failure and stopping events are written into the GTM record as a Trigger Action event with the scenario name, the action name, the direction (activation / deactivation) and the order number (N/total); in a failure the error text is added. The Latest Actions lines on the preview panel of the scenario show the last action event for every direction (only in the directions in which With Trigger is selected). The record contains the whole of the action profile.
Scope and Limits
INFO
- The screen requires a GTM license and full GTM authorization. The GTM tab is visible with the display authorization; this screen opens only on the users who have full authorization in the GTM area, and if there is no GTM module in the license, the Not covered by your license card is displayed.
- There is no status. The action profile is only a configuration; there is no status column or circle in the list and in the preview. The run results are monitored only from the records and from the scenario preview.
- The preview is two lines. The address, the method, the headers, the expected codes and the Oracle fields are seen only in the editing form.
- The name uniqueness is not verified on this screen. A second action that carries the same name can be saved from this screen.
- There is no certificate setting in HTTPS. The certificate verification cannot be turned off; a CA profile or a client certificate (mTLS) cannot be selected.
- There is no retry and parallel running. The actions run sequentially; at the first failure the remaining ones are skipped.
- The deletion does not clean the dependencies. The scenarios that refer to the deleted action must be updated manually.
- The logs. The run events and the user operations are monitored in the Log window on the preview panel and on the GTM Logs screen.
Usage Location
The trigger actions do not work on their own; they are bound to the trigger lists of a scenario on the Health Scenarios screen.
| The place where it is used | What it does |
|---|---|
| The Activation Trigger → list of the scenario | When the basic condition of the scenario is met, the actions in the list are run in order. |
| The Deactivation Trigger ← list of the scenario | When the basic condition of the scenario is broken, the actions in the list are run in order. |
The actions are selected only in the scenarios in the With Trigger mode; the lists are filled from the selectors in the scenario form and with the Add button of the selector, a new action can be defined in the same window and added to the list. In which scenarios an action is used is seen from the Used in tab on the preview panel.
