
Smarter by Design.Simpler for Business
Modify Response Content
What Is the Modify Response Content Action?
The Modify Response Content action makes it possible to modify the content of the HTTP responses returning from the Backend Services in real time. With this action, sensitive data can be masked, code can be added to the HTML content or certain texts can be replaced with other texts.
This action works only at the response stage and processes the content in the response body.
The Importance of the Modify Response Content Action
The ability to modify the response content is used in scenarios that are critical in terms of security, compliance and functionality. Thanks to this action, the response content can be manipulated without making a manual change in the Backend Service.
The Modify Response Content action;
- KVKK/GDPR Compliance: Masks sensitive data in the responses such as TC ID number and credit card,
- Security: Prevents sensitive information from reaching the client,
- HTTP→HTTPS Conversion: Automatically converts the links within the HTML to HTTPS,
- Analytics Integration: Adds JavaScript tracking codes to the pages,
- A/B Testing: Changes the page contents dynamically,
- Legacy Application Support: Modernizes the outputs of the old applications.
For this reason, the Modify Response Content action is a powerful tool for content manipulation at the application layer.
Supported Modification Types
This action offers three different modification modes:
Mask
Masks the matching texts (the length does not change). Hiding TC ID/credit card/phone.
Add HTML Code
Adds code to the HTML tags. Script injection, analytics, meta tag.
Replace
Replaces the matching texts with other texts. URL correction, content update.
| Type | Description | Area of Use |
|---|---|---|
| Mask | Masks the matching texts (the length does not change) | Hiding TC ID, credit card, phone number |
| Add HTML Code | Adds code to the HTML tags | Script injection, analytics, meta tag adding |
| Replace | Replaces the matching texts with other texts | URL correction, text replacement, content update |
TIP
- Mask: Preserves the length of the original text (e.g.
12345678901→1*********1). It hides the data without breaking its format. - Replace: The length of the text can change (e.g.
http://→https://). It performs a full replacement.
Supported vService Types
HTTP
L7 TCP
Network
Execution Timing
On Request
On Response
How to Add?
A new Modify Response Content Action can be added through the TR7 web management interface by following the steps below:
- The Configuration Menu is opened by clicking the TR7 logo at the bottom left.
- The Load Balancer → Actions → Add steps are followed.
- A unique and descriptive name is entered for the action.
- Modify Response Content is selected as Action Type.
- The related configurations of the action are made.
- In the Conditions tab, the condition/conditions under which the action takes effect are determined.
- The action is added by clicking the
Addbutton.
Mask Mode Add Form
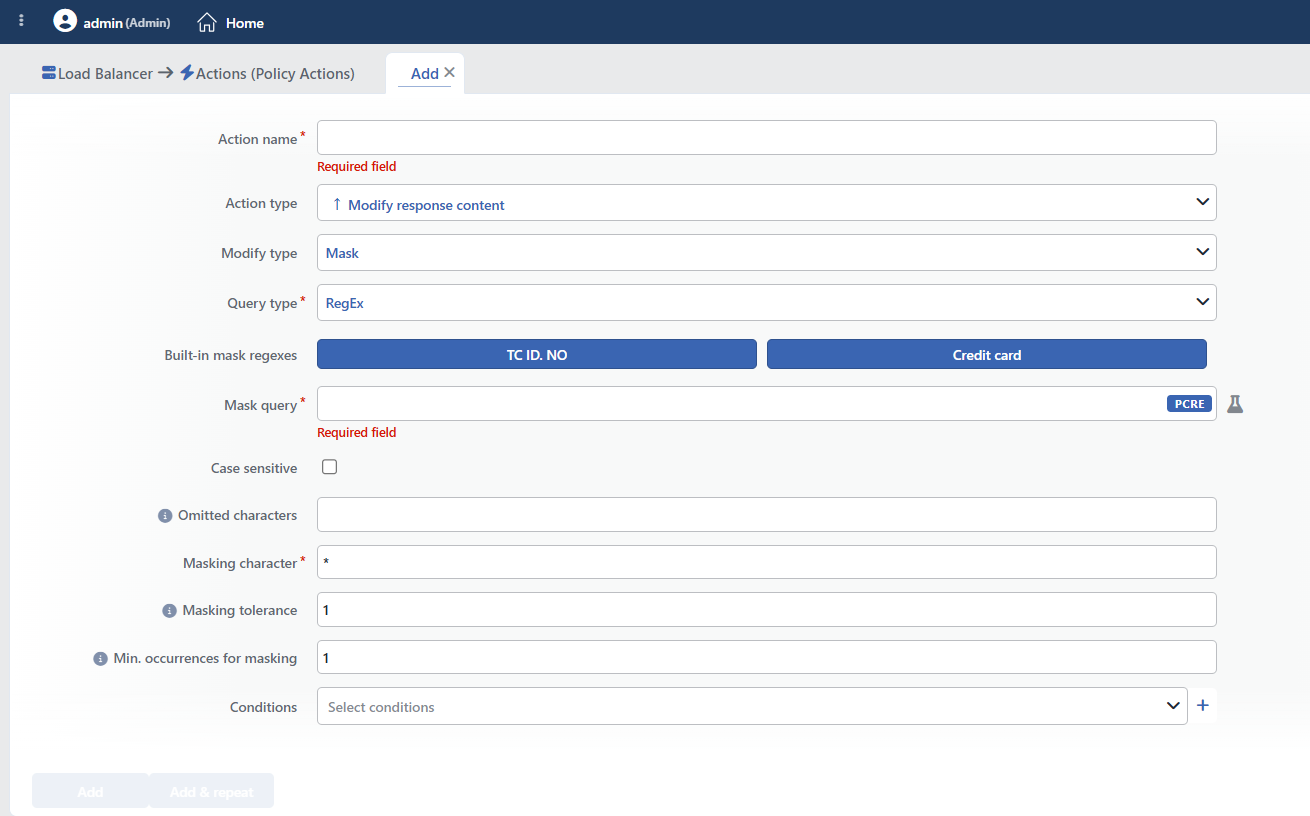 Action Add Form for the Mask Mode
INFO
Modify Type
The modification type is selected as Mask. This mode masks the matching texts with the specified character and preserves the original length.
INFO
Query Type Default: RegEx
Determines the type of the search query:
- String: Performs a plain text search. The entered text matches everywhere it occurs within the response; a full match condition is not required and the search is case sensitive.
- Regex: Performs a search with a regular expression (regex). It is used for pattern matching.
TIP
Regex is used for masking structural data such as TC ID number and credit card.
INFO
Built-in Mask Regexes
Ready regexes can be used for the frequently used masking patterns. When clicked, the related regex is automatically added to the Mask query field:
- TC ID. NO: The Republic of Türkiye identity number pattern (
\b\d{11}\b) - Credit card: The credit card number pattern
 TC ID Number Regex Pattern
 Credit Card Regex Pattern
INFO
Mask Query
The search query to be used to find the content to be masked is selected.
- For the String mode: the text to be searched exactly
- For the Regex mode: the regular expression pattern
Regex test feature: The regex pattern is tested with the button on the right. By adding sample inputs in the test panel, it is checked whether the pattern works correctly.
 TC ID Regex Test: 11-Digit Numbers Match
 Credit Card Regex Test: Different Formats
INFO
Case Sensitive Default: Off
It is visible only in the RegEx mode and determines whether the search will distinguish between uppercase and lowercase letters.
- When it is not checked (default): The search is case insensitive;
TCKNandtcknare considered the same. - When it is checked: The search is performed case sensitive.
WARNING
In String searches this field is not visible and the search is always case sensitive. In addition, in the regex test panel next to the field the check is always performed case sensitive; the live behavior can differ according to the state of this field.
INFO
Omitted Characters
The characters that will be preserved (that will not be masked) during masking can be determined. These characters remain in their original form.
TIP
- Omitted characters:
1978 - Input:
12345678901 - Output:
1*****789*1(the characters 1, 7, 8, 9 are preserved)
This feature can be used in situations where certain information such as the year of birth needs to remain visible.
INFO
Masking Character Required Default: *
The character to be used for masking is entered in this field. The field accepts a single character.
TIP
*: Standard maskingX: More distinct masking#: For numeric data masking
INFO
Masking Tolerance
Determines how many characters from the beginning and from the end of the matching text will not be masked.
TIP
- Tolerance:
2 - Input:
12345678901 - Output:
12*******01(the first 2 and the last 2 characters are preserved)
This feature is used to hide the data while preserving its verifiability.
WARNING
The tolerance is applied only if the match is long enough: the length of the match must be more than twice the tolerance value. Otherwise the tolerance is not taken into account and the whole match is masked.
In an 11-digit value the tolerance works up to 5 (12345*12345). When the tolerance is made 6, since the part that is wanted to remain visible would cover the whole match, the result becomes ***********. The form does not give a warning in this case.
INFO
Min. Occurrences for Masking
Determines from which match on the masking will start. The matches in the response body are counted in order; the matches before this order go to the client without being masked.
TIP
- Min. occurrences:
2 - Content: "TC: 12345678901, Phone: 05551234567"
- Result:
TC: 12345678901, Phone: 0*********7: the first match remains as it is, the masking starts from the second match on.
If there were a single match in the content, nothing would be masked.
WARNING
The default value is 1; that is, "mask from the first match on": all the matches are masked. This field does not mean "let at least this many matches be found for masking", as its name suggests. If the purpose is to cover all the sensitive data, the field must be left at 1; increasing it means that the first data in every response remains exposed.
INFO
Conditions
In this field, it is defined under which condition or conditions the related action takes effect.
By adding one or more conditions, the behavior can be applied in a targeted and controlled way with the and/or structure.
Detailed information about conditions is on the Conditions page.
WARNING
If no condition is defined in this field, the related action runs unconditionally (Always). In this case, the action is applied to all traffic coming to the related vService.
In live environments, using an action without defining a condition can lead to unexpected situations (service outages). For this reason, it is recommended that at least one condition always be defined when an action is created.
INFO
Form Buttons
Add
The action adding process is completed by clicking the Add button.
Add & Repeat
With the Add & Repeat button, the action adding process is completed, and another new action can be added with different configurations without leaving the related window.
 Action Added
Add HTML Code Mode Add Form
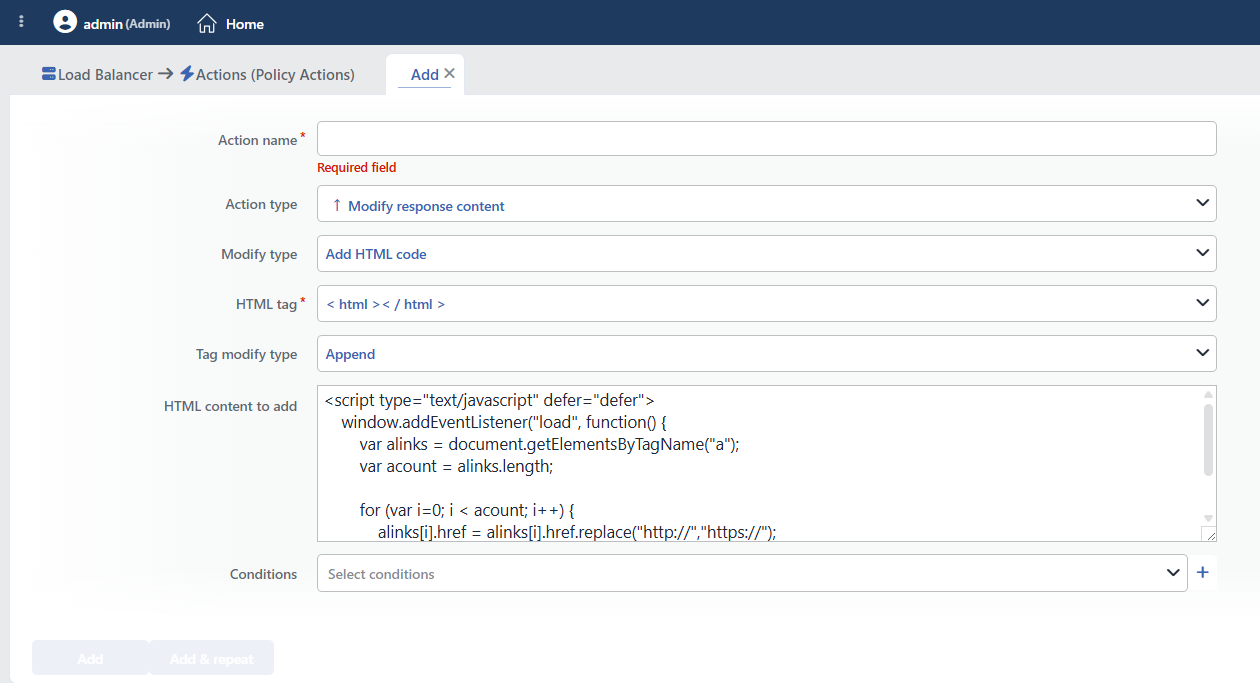 Action Add Form for the Add HTML Code Mode
INFO
Modify Type
The modification type is selected as Add HTML code. This mode injects code into the specified HTML tag.
INFO
HTML Tag
The HTML tag to which the code will be added is selected.
| Tag | Description |
|---|---|
<html></html> | The main HTML tag |
<head></head> | The page header section (ideal for meta, script, style) |
<body></body> | The page body (for the visible content) |
<title></title> | The page title |
INFO
Tag Modify Type
Determines where within the tag the code will be added:
- Append: Adds it right after the opening of the tag (
<html>→<html>[CODE]...) - Prepend: Adds it right before the closing of the tag (
...</html>→...[CODE]</html>)
TIP
- For scripts:
<head>+ Append or<body>+ Prepend - For meta tags:
<head>+ Append
INFO
HTML Content to Add
The HTML/JavaScript content to be added is entered in this field. Any valid HTML code can be entered.
Default value: The HTTP→HTTPS link conversion script
html
<script type="text/javascript" defer="defer">
    window.addEventListener("load", function() {
        var alinks = document.getElementsByTagName("a");
        var acount = alinks.length;

        for (var i=0; i < acount; i++) {
            alinks[i].href = alinks[i].href.replace("http://","https://");
        }
    })
</script>
WARNING
The added code can affect the loading time and the performance of the page; minified and optimized code is used.
INFO
Conditions
In this field, it is defined under which condition or conditions the related action takes effect.
By adding one or more conditions, the behavior can be applied in a targeted and controlled way with the and/or structure.
Detailed information about conditions is on the Conditions page.
WARNING
If no condition is defined in this field, the related action runs unconditionally (Always). In this case, the action is applied to all traffic coming to the related vService.
In live environments, using an action without defining a condition can lead to unexpected situations (service outages). For this reason, it is recommended that at least one condition always be defined when an action is created.
INFO
Form Buttons
Add
The action adding process is completed by clicking the Add button.
Add & Repeat
With the Add & Repeat button, the action adding process is completed, and another new action can be added with different configurations without leaving the related window.
Action Added
Replace Mode Add Form
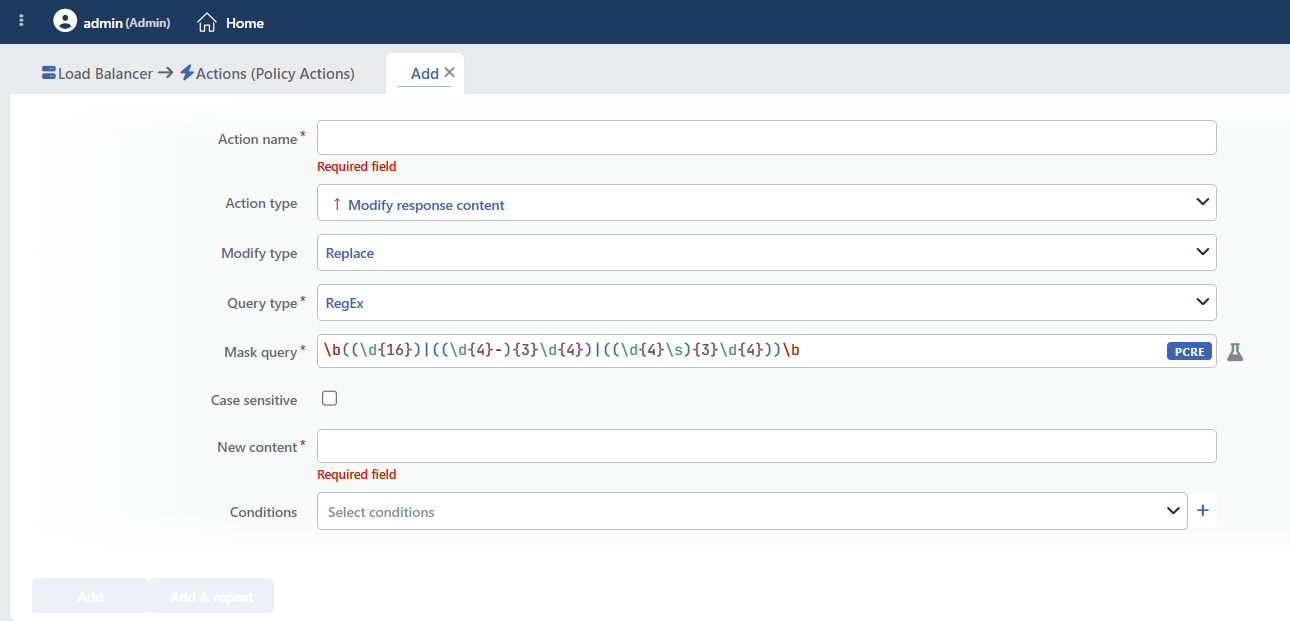 Action Add Form for the Replace Mode
INFO
Modify Type
The modification type is selected as Replace. This mode replaces the matching texts with the new content.
INFO
Query Type Default: RegEx
Determines the type of the search query:
- String: Plain text search
- Regex: Search with a regular expression
INFO
Mask Query
The search query to be used to find the content to be replaced is entered in this field.
INFO
Case Sensitive Default: Off
It is visible only in the RegEx mode. When it is not checked, the search is performed case insensitive, and when it is checked, case sensitive. String searches are always case sensitive.
INFO
New Content Required
The new content information to be placed instead of the matching text is entered.
| Mask Query | New Content | Result |
|---|---|---|
http:// | https:// | All the HTTP links are converted to HTTPS |
example.com | newsite.com | Domain change |
<div class="old"> | <div class="new"> | CSS class change |
WARNING
The new content is written as plain text. The capture groups used in the RegEx mode cannot be referred to with back references such as \1, \2; these expressions pass to the output as they are written. If a part of the match needs to be preserved, the pattern must be narrowed accordingly.
INFO
Conditions
In this field, it is defined under which condition or conditions the related action takes effect.
By adding one or more conditions, the behavior can be applied in a targeted and controlled way with the and/or structure.
Detailed information about conditions is on the Conditions page.
WARNING
If no condition is defined in this field, the related action runs unconditionally (Always). In this case, the action is applied to all traffic coming to the related vService.
In live environments, using an action without defining a condition can lead to unexpected situations (service outages). For this reason, it is recommended that at least one condition always be defined when an action is created.
INFO
Form Buttons
Add
The action adding process is completed by clicking the Add button.
Add & Repeat
With the Add & Repeat button, the action adding process is completed, and another new action can be added with different configurations without leaving the related window.
Action Added
This action disables compression throughout the vService
So that the content can be read, TR7 requests an uncompressed response from the Backend Service. This request is applied independently of the condition to all the traffic passing through the vService; not only to the requests that meet the condition.
Its results:
- The Backend Service responses are not compressed with gzip/brotli → the bandwidth usage and the response time increase.
- If a compression profile is defined on the vService, it remains ineffective.
- The responses are transmitted as chunked instead of a fixed length.
For this reason, the action must be defined only on the vServices where content modification is really needed.
Processing Limits
- No content type check is performed; JSON, XML, JavaScript and binary responses are processed as well. In binary content, the matching byte sequences are modified and the file can be corrupted; the action must definitely be used with a condition that limits the content type.
- The response body is scanned chunk by chunk. Very long matches that coincide with a chunk boundary can be missed; when the Min. occurrences for masking value is selected greater than 1, the first match of every chunk can remain unmasked in large responses.
- More than one content modification action can be added to the same vService; in this case the actions are chained in order and the output of one becomes the input of the other.
- If an invalid regular expression is entered, the action silently does nothing; no warning is produced.
Operational and Safe Usage Recommendations
- Use Masking for KVKK/GDPR Compliance. Legal compliance is ensured by masking personal data such as TC ID number, credit card and phone number before it arrives from the Backend Service.
- Test the Regex Patterns. Before the masking or the replacement operation, the regex pattern is verified in the test panel. A wrong pattern can cause the content to be corrupted.
- Take the Performance Impact into Account. The content modification operation requires the whole response to be processed and causes latency in large responses; by using conditions, it is enabled only on the necessary pages.
- Use defer in HTML Injection. While a script is being added, the page loading performance is preserved by using the
defer="defer"attribute. - Leave the Possibility of Verification with Tolerance. By using a tolerance value in masking, a part of the data is kept visible. This is necessary for verification in scenarios such as customer service.
- Apply It in a Targeted Way with Conditions. Content modification is applied not in all the responses but only on certain URLs or content types, and thus unnecessary processing load is avoided.
- Perform a Content-Type Check. This action works best with the
text/htmlcontent type. Unexpected results can occur in JSON, XML or binary contents.
Common Usage Scenarios in Live Environments
The examples below show how the related action is applied in the most frequently encountered use cases in real systems. These scenarios are based on practices that are widely preferred in live environments and rest on experience gained in the field.
Scenario 1: Mask Mode: Masking the TC ID Number for KVKK Compliance
Problem: A web application that uses e-Government integration displays the user information on an HTML page. The TC ID numbers are fully visible and this creates a KVKK violation. Making a change in the Backend Service will take a long time, an urgent solution is needed.
Solution: By using the Mask mode, the TC ID numbers in the responses are masked automatically and personal data leakage is prevented.
Configuration:
- Modify Type: Mask
- Query Type: RegEx
- Built-in Mask Regexes: TC ID. NO (added automatically by clicking)
- Mask Query:
\b\d{11}\b - Case Sensitive: (not checked: the search is performed case insensitive)
- Omitted Characters: (left empty)
- Masking Character:
* - Masking Tolerance:
1 - Min. Occurrences for Masking:
1 - Conditions: Path starts with
/user/profile
Result:
- ✅ KVKK compliance → The TC ID numbers are masked, the legal problem disappears.
- ✅ Possibility of verification → The first and the last digit remain visible (
1*********1), verification can be done. - ✅ No Backend Service change → No change is needed in the Backend Service code.
- ✅ Automatic masking → All the 11-digit numbers are detected and masked automatically.
- ✅ Path condition → It is active only on the user profile pages, there is no unnecessary processing load.
Example transformation:
- Input:
TC ID No: 12345678901, Name: Ahmet Yılmaz - Output:
TC ID No: 1*********1, Name: Ahmet Yılmaz
Scenario 2: Add HTML Code Mode: Adding Google Analytics Tracking Code to All the Pages
Problem: The company has published a new web site and the Google Analytics tracking code needs to be added to all the pages. However, the site consists of 50+ different PHP pages and adding the code manually to every page will take a lot of time. In addition, some pages are generated dynamically.
Solution: By using the Add HTML Code mode, the Google Analytics code is added automatically to the <head> section of all the HTML pages.
Configuration:
- Modify Type: Add HTML code
- HTML Tag:
<head></head> - Tag Modify Type: Append
- HTML Content to Add:
html
<!-- Google Analytics -->
<script async src="https://www.googletagmanager.com/gtag/js?id=G-XXXXXXXXXX"></script>
<script>
  window.dataLayer = window.dataLayer || [];
  function gtag(){dataLayer.push(arguments);}
  gtag('js', new Date());
  gtag('config', 'G-XXXXXXXXXX');
</script>- Conditions: HTTP Header Content-Type contains
text/html
Result:
- ✅ Automatic injection → The Analytics code is added automatically to all the HTML pages.
- ✅ Time saving → There is no need to add the code manually for 50+ pages.
- ✅ Dynamic pages included → Dynamically generated pages such as PHP and JSP are included as well.
- ✅ Performance → With the use of
asyncanddefer, the page loading speed is not affected. - ✅ Content-Type condition → It is active only on the HTML pages, the JSON/XML responses are not affected.
- ✅ No Backend Service change → No change is needed in the Backend Service code.
Page output:
html
<!DOCTYPE html>
<html>
<head>
<!-- Google Analytics -->
<script async src="https://www.googletagmanager.com/gtag/js?id=G-XXXXXXXXXX"></script>
<script>
  window.dataLayer = window.dataLayer || [];
  function gtag(){dataLayer.push(arguments);}
  gtag('js', new Date());
  gtag('config', 'G-XXXXXXXXXX');
</script>
<title>Home Page</title>
...
Scenario 3: Replace Mode: Converting the HTTP Links of a Legacy Application to HTTPS
Problem: The old ASP.NET application has been moved from HTTP to HTTPS, but there are hardcoded http:// links in the application code (e.g. http://cdn.example.com, http://api.example.com). Changing the code is risky and takes time. The browsers give a mixed content warning and some resources are not loaded.
Solution: By using the Replace mode, all the http:// links in the response content are replaced with https:// and the mixed content problem is solved.
Configuration:
- Modify Type: Replace
- Query Type: String
- Mask Query:
http:// - Case Sensitive: (not checked: the search is performed case insensitive)
- New Content:
https:// - Conditions: HTTP Header Content-Type contains
text/html
Result:
- ✅ Mixed content solution → All the HTTP links are converted to HTTPS, the browser warning disappears.
- ✅ Resource loading → CDN, API and external resources are loaded over HTTPS, they are not blocked.
- ✅ Security → All the content is loaded over a secure connection.
- ✅ No Backend Service change → The legacy code remains as it is, no risk is taken.
- ✅ Content-Type condition → It is active only in the HTML content, the JSON/XML/image files are not affected.
Example transformation:
Input (the Backend Service response):
html
<img src="http://cdn.example.com/logo.png">
<script src="http://cdn.example.com/jquery.js"></script>
<a href="http://api.example.com/docs">API Docs</a>
Output (the response going to the client):
html
<img src="https://cdn.example.com/logo.png">
<script src="https://cdn.example.com/jquery.js"></script>
<a href="https://api.example.com/docs">API Docs</a>