
Smarter by Design.Simpler for Business
Flowchart
What Is Flowchart?
Flowchart is the tab on which the login flow of a vService with the AGS access control enabled is displayed and edited as a flowchart. The flow consists of the steps the visitor passes before accessing the vService: the login form, the authentication provider, the multi-factor authentication, the branching according to a condition, the user attribute assignment and the Allow or Deny steps that conclude the flow. Every step is a box in the diagram, and the transitions between the steps are the arrows that connect the boxes to each other.
The flow is edited only on this tab. The AGS Management tab summarizes the same configuration with sentences and its editing links belonging to the flow open this tab in Edit Mode. In the General Settings window of the same screen, the general AGS settings of the vService (the activation condition, the root path, the policies, the appearance, the gateway mode and the Backend SSO) are edited as well.
The User Attributes panel on the right shows which steps of the flow assign and read which user attributes. Thus the questions "where is the user name written to the session?" or "is there an attribute that is read but assigned in no step?" are answered over the diagram.
2 Modes
View · Edit
The changes are made in the Edit Mode; the Edit links open the tab directly in the Edit Mode
8 Types
AGS Action
Form · MFA · Authentication Provider · Decision Point · Allow · Deny · Assign User Attributes · Switch
3 Modes
Gateway Mode
Standalone Application · Portal · Portal Application
5 Sections
General Settings
General Settings · Appearance · Security · Gateway Mode · Backend SSO
15
Built-in Attributes
userId and username are mandatory; the custom attributes are derived from the flow
Save
Single Save Point
The Accept in the windows changes only the diagram; the configuration is applied with Save
Two Clicks
Connection
The output point is clicked, and then the input point of the target step
120 × 80
Canvas
The grid cell limit; the zooming is done with Ctrl + the mouse wheel
/ags-portal
AGS Root Path
Every request that starts with this path goes to the AGS engine; it is not taken into the WAF check
1 Hour
Idle Time
The duration valid if no session protection policy has been selected; the extension is done at most once a minute
How Does the Flow Work?
AGS works only in the HTTP vServices and a separate AGS engine is used for every vService. Every request that comes to the vService is first evaluated in the traffic engine. If the request does not carry a valid authenticated session and matches the AGS Activation Condition condition, it is directed to the AGS engine without reaching the actions of the vService and the Backend Service. The requests that start with the AGS Root Path, on the other hand, always go to the AGS engine independently of the session state and of the condition; the login forms, the verification and the auxiliary pages are served under this path. The requests on this path are not taken into the WAF check; the password, OTP and CAPTCHA contents do not enter the WAF rules and the WAF learning.
The visitor enters the flow from the step to which the Start box is connected. Every step takes an address according to its type under the AGS root path (e.g. /ags-portal/form) and the traffic engine determines from this address which step the request belongs to:
| Step | Address |
|---|---|
| Form | /form |
| MFA | /mfa |
| Authentication Provider (the OAuth2 and OIDC providers) | /oauth |
| Authentication Provider (the other provider types) | /auth |
| Decision Point and Switch | /security-check |
| Assign User Attributes | /context |
| Allow | /access-check |
The following steps that share the same address are numbered with the -2, -3 suffix (e.g. /ags-portal/form-2). The numbers are given not according to the place of the boxes on the canvas but according to the order of being reached along the connections starting from Start; moving the boxes does not change the addresses, while changing the connections can change the address of a step. The steps that cannot be reached from Start take an address at the end of the order as well.
The Decision Point conditions together with the field and button visibility conditions in the forms are evaluated in the traffic engine, only in the request of the step in question, and the result is transmitted to the AGS engine; the request headers with which the visitor imitates these results are deleted. The lockout policies work only in the requests of the Authentication Provider and MFA steps; the bot protection policies, on the other hand, are evaluated in every request directed to the AGS engine, independently of the step.
When the flow is completed with Allow, the session is marked as authenticated in the session store. In the following requests the traffic engine verifies the signed session cookie and the state in the session store; if the session is valid, the request is forwarded to the Backend Service with the actions of the vService without visiting the AGS engine. The AGS cookies of the vService are always stripped from the request that goes to the Backend Service. A request that comes with a session cookie issued by another vService (except the trusted portals in the Portal Application mode) is refused with the text Session cookie issuer not trusted by this gateway.
The session protection policy is applied to the requests after the flow is completed. The idle time of the session is extended at most once a minute as the requests come; the duration comes from the selected Session Protection Policies policy, and if no policy has been selected it is 1 hour. If the session is bound to a client property and the binding value does not match, the request is not counted as authenticated and is directed to the AGS engine again.
The AGS variables such as %AGS_USERNAME, %AGS_USER_ATTR(<name>) and %AGS_USER_INPUT(<field>) are read in the traffic engine from the session store at the moment of the request; for this reason they are used in the vService conditions and in the Backend SSO headers besides the flow steps. The OTP code and message variables (e.g. %AGS_OTP_CODE), on the other hand, are resolved only in the AGS engine, during the OTP sending.
The flow saved with Save is applied together with the Load Balancer configuration and is synchronized to the AGS engine of the vService. The AGS engine is recreated only when its own working settings change; it is not recreated for the changes in the flow. While the AGS engine is not ready, an error page (HTTP 503) containing the text Access Gateway is being prepared. Please try again shortly. is returned to the requests directed to the AGS engine.
Accessing the Flowchart
- Left Monitor Panel is opened.
- AGS-Enabled vServices is selected from the category tabs at the top left.
- The vServices defined on TR7 with AGS access control enabled are listed.
- The vService to be monitored is clicked; the screen opens with the Dashboard tab that carries the vService's name.
- On the screen that opens, the Flowchart tab is clicked.
The tab is displayed unconditionally to the users who have monitoring authorization in the Load Balancer area. If AGS is not enabled in the vService, the text No gateway configured is displayed instead of the diagram.
The tab is also opened in Edit Mode from the following surfaces: the Edit link of the Sign-in Flow section on the AGS Management tab and the Flow Editor → link on the flow strip; the Edit button of the preview panel on the Dashboard and AGS Management tabs together with the editing icon of the Sign-in Flow card in the preview drawing. The Edit links and buttons are displayed only in the users who have the editing authorization, and the Flow Editor → link in every user. The editing icon of the Sign-in Flow card in the preview drawing of the Load Balancer vService screen, on the other hand, opens this tab with the View Mode.
The editing authorization
The Edit Mode switch can be used on the screen independently of the authorization. The Edit links are displayed with the Load Balancer change authorization; the saving of the configuration also requires the same authorization. In a user who does not have this authorization, the Save operation is refused with an error window.
View Mode
The tab opens with the View Mode; when it is come from the Edit links, it opens with the Edit Mode. When it is passed to the tab again on the same screen after one of these links has been used, it opens with the Edit Mode as well. In the View Mode the flowchart and the User Attributes panel are displayed; the boxes are not moved, the connections are not changed and there is no button on the toolbar.
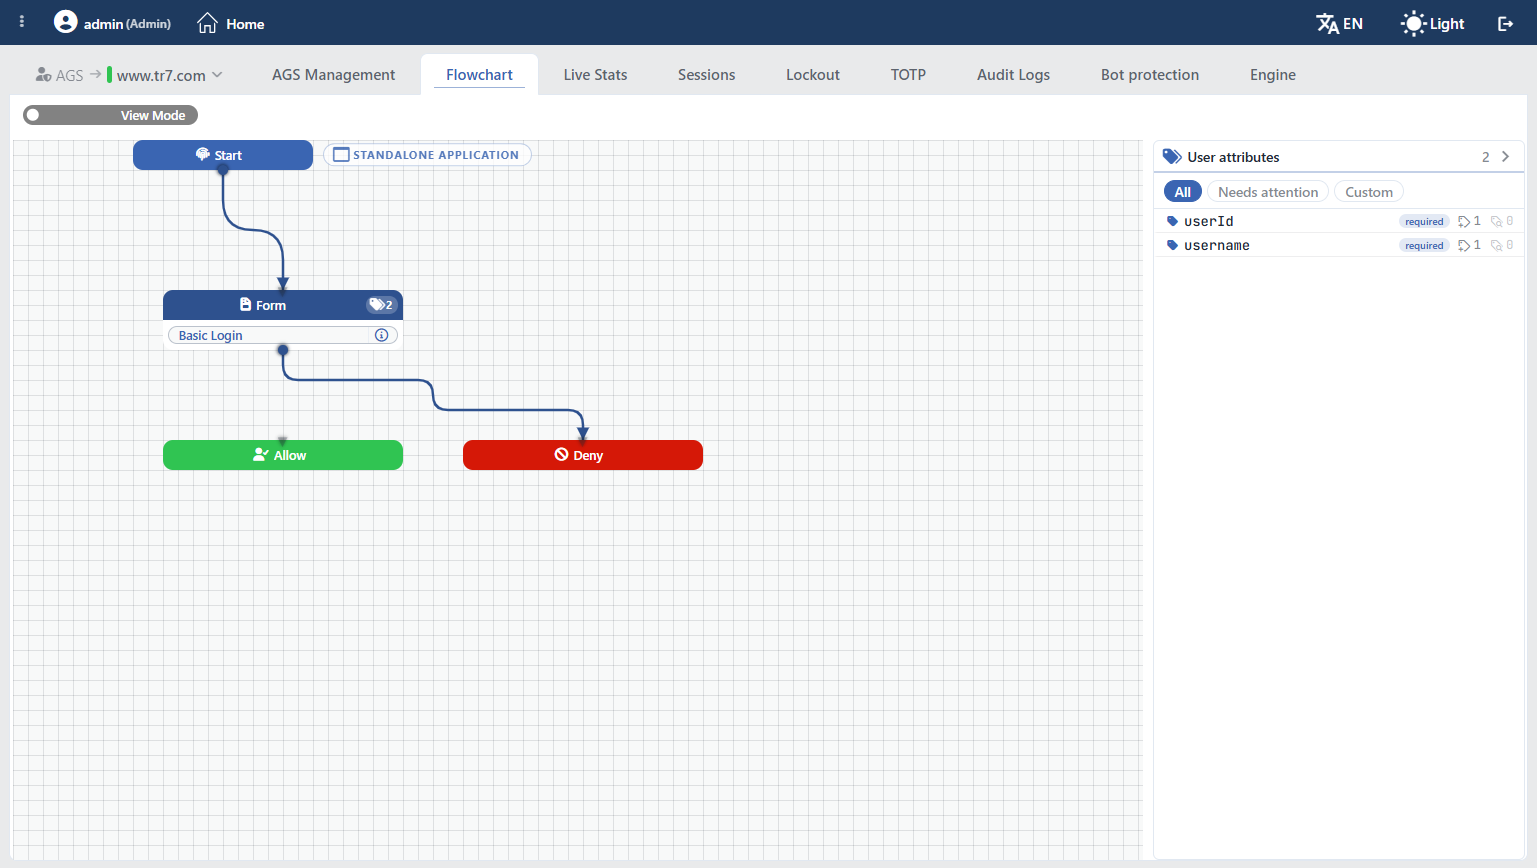 Flowchart View Mode
The elements on the screen:
| Element | Explanation |
|---|---|
| The View Mode / Edit Mode switch | The switch at the top left. It is passed to the Edit Mode by clicking it. |
| Start | The starting point of the flow. The connection that goes out of this box determines the first step the visitor meets when entering the AGS flow. It is not displayed in the Portal Application mode. |
| The gateway mode badge | The framed badge next to the Start box (in the top left corner of the canvas in the Portal Application mode); it shows the working mode of the vService in capital letters (STANDALONE APPLICATION, PORTAL, PORTAL APPLICATION). It is informational, it is not clicked; the mode is changed from the Gateway Mode section of the General Settings window. |
| The action boxes | The steps of the flow (the Action Types below). In the body of the boxes that use a profile there are the name of the profile and the icon; when the icon is clicked, the settings of the profile are shown in a small window without an editing button. |
| The label badge | The number with the label icon on the right of the box title (the 2 in the Form box in the image). It is explained in the Label Badge section. |
| The connections | The transitions between the steps. Their paths are not written to the record; at every change in the diagram they are recalculated so that they go around the boxes. |
| The User Attributes panel | The panel on the right; the user attributes assigned and read in the flow (User Attributes Panel). |
When a box, an input or output point or a connection is hovered over, that step and the steps neighboring the connection come to the front and the other boxes fade; the attribute rows in question in the panel are highlighted as well. The Start and Backend SSO (Re)Sync boxes do not participate in the highlighting; while a box is being moved, the highlighting does not work. This highlighting works in both modes.
Edit Mode
When the switch is taken to the Edit Mode position, the boxes become movable, the connections become establishable and removable and three buttons are displayed on the toolbar. In the title of the action boxes there is also the menu icon.
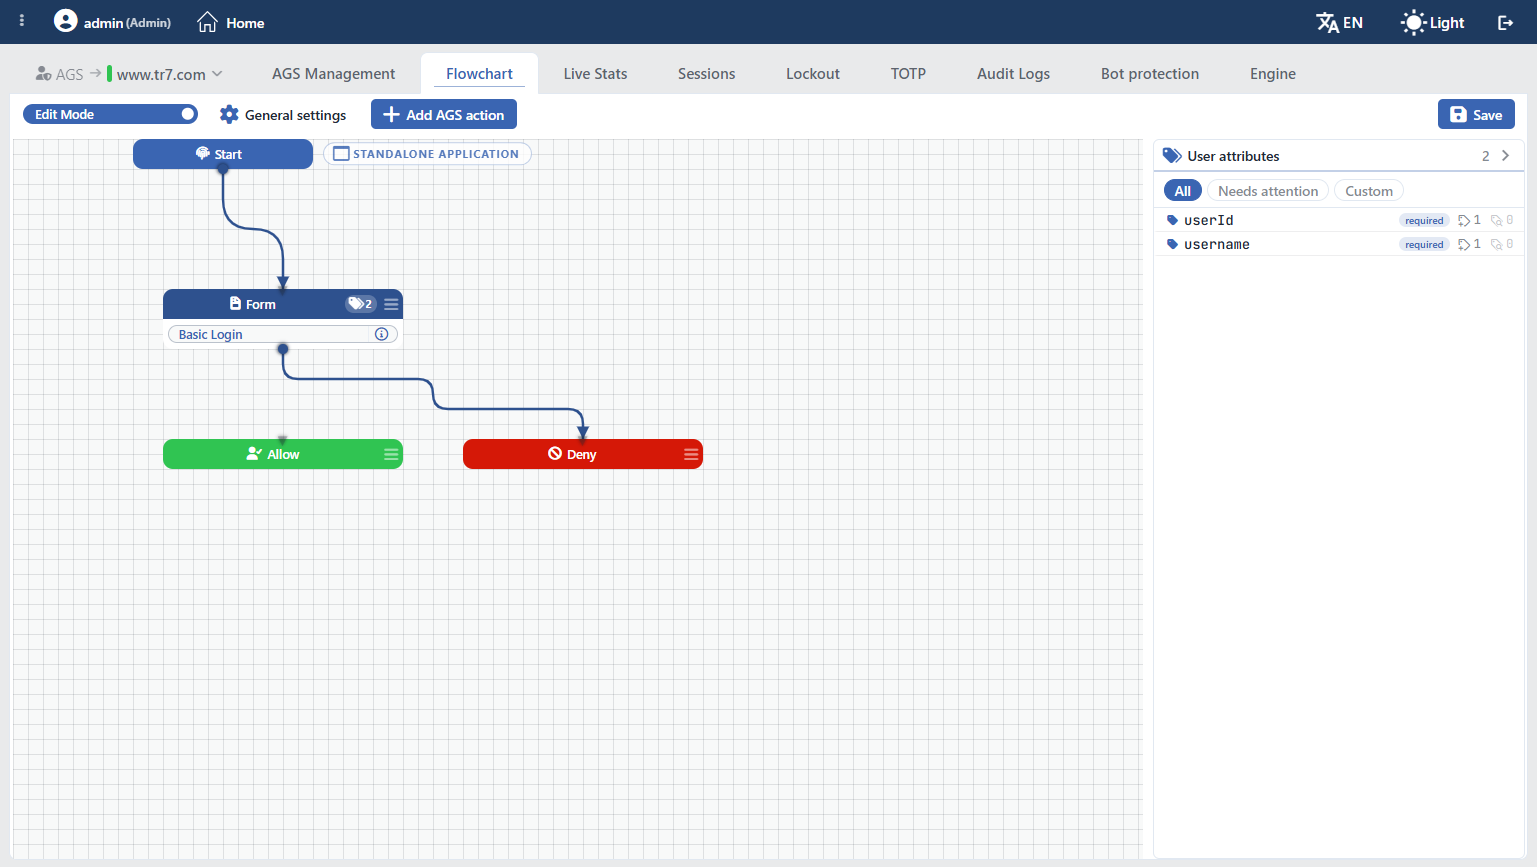 Flowchart Edit Mode
| Button | What it does |
|---|---|
| General Settings | It opens the General Settings window (The General Settings Window). |
| Add AGS Action | It opens the Add AGS Action window (Add AGS Action). |
| Save | It saves all the changes in the diagram. |
Every change made in the Edit Mode (moving a box, establishing or removing a connection, adding, editing or removing an action and Accept in the General Settings window) changes only the diagram on the screen; the configuration is not applied until the Save button is clicked.
Save
The changes in the diagram are saved by clicking the Save button. In the saving, only the fields changed in this editing session are written over the current state of the AGS record; the fields changed from another screen but not touched in this session are preserved. After the save the Load Balancer configuration is applied and the operation is written to the User Logs screen.
- When the save is successful, no separate notification is shown; the screen returns to the View Mode by itself and the diagram is rebuilt with the saved configuration.
- When the save is refused (e.g. if a mandatory field is empty or if the selected profile no longer exists), an error window opens; the screen stays in the Edit Mode and the changes are preserved.
- The Save button is active even if there is no change; when it is clicked while there is no change, a save is made as well and the operation is written to the User Logs screen.
- The integrity of the flow is not checked before the saving: no warning is shown for the steps that are not connected to Start, that do not end with Allow or Deny or whose output is not connected.
Unsaved Changes
If the switch is taken to the View Mode while there are unsaved changes, the confirmation "You have unsaved changes. Are you sure you want to discard them?" is asked. When Yes is selected, the changes are discarded and the diagram is rebuilt with the saved configuration; when No is selected, the screen stays in the Edit Mode. Only the moving of a box is counted as an unsaved change as well.
When it is passed to another tab, this confirmation is not asked and the unsaved changes are lost.
The Flowchart
The Canvas
- The diagram is on a canvas with a grid; the canvas grows according to the content, becomes at most 120 × 80 cells and, when it overflows, is navigated with the scroll bars. The lines on the canvas are displayed with a half cell spacing.
- The zooming is done only with the mouse wheel while the Ctrl key is pressed; the zoom level is not stored.
- In the Edit Mode the boxes are moved by being dragged so that they stick to the grid. A box that is wanted to be left outside the right or the bottom border of the canvas is shown with a red frame and returns to its old position when it is dropped; a box dragged outside the left and the top edge is placed at the edge. The boxes overlapping is not prevented.
- The positions of the boxes are written to the record. There is no automatic layout; the path of the connections, on the other hand, is calculated automatically so that they go around the boxes.
- The position of the Start and Backend SSO (Re)Sync boxes is fixed, they are not moved. After one of these boxes is clicked, an empty area of the canvas is clicked first in order to move another box.
Action Types
| Box | Title color | Body | Output points |
|---|---|---|---|
| Start | Blue | None | A single output, at the bottom middle |
| Form | Dark blue | The name of the form profile + | A single output, at the bottom middle |
| MFA | Dark blue | The name of the MFA profile + | SUCCESS at the bottom middle (green), FAILURE on the right (red, dashed line) |
| Authentication Provider | Dark blue | The name of the provider profile + | SUCCESS at the bottom middle (green), FAILURE on the right (red, dashed line) |
| Decision Point | Dark blue | The short display of the condition | YES on the right (green), NO on the left (red, dashed line) |
| Switch | Dark blue | The variable and Match mode = <mode> | An output on the bottom edge for every branch pattern; the outputs are ordered according to the position of the target steps from left to right and the neighboring branches are displayed in alternating colors. The noMatch output used when there is no match is on the right (red, dashed line) |
| Assign User Attributes | Dark blue | The names of the assigned attributes (+name) + | A single output, at the bottom middle |
| Allow | Green | None | None; it concludes the flow with the access permission |
| Deny | Red | None | None; it concludes the flow with the access refusal |
| Backend SSO (Re)Sync | Blue | None | A single output; it is displayed only when the Backend Session Lost Strategy value is Re-sync in the connected Backend SSO profile |
In the top middle of every action box there is an input point shown with a gray triangle; there is no input point in the Start and Backend SSO (Re)Sync boxes. The SUCCESS, FAILURE, YES and NO labels are displayed only when the step, the point or the connection in question is hovered over; the Switch branch patterns and the noMatch label, on the other hand, are always displayed. The labels are located on the connection; they are not displayed while the zoom is below 50% or when there is no empty place for the label. When an unconnected point is hovered over, the label text is shown as a tooltip. The connection of the boxes with a single output is without a label.
More than one action of the same type can be used in the flow; there is no restriction between the action types and the gateway mode.
Label Badge
The number with the label icon in the box title is the number of different user attributes that step assigns or reads; if the step touches no attribute, the badge is not displayed. When the badge is hovered over, the attribute names are shown under the N user attributes title with the assigns and reads rows; the rows in question in the User Attributes panel are highlighted as well. In the Form box in the image, since the Basic Login form assigns the userId and username attributes, the badge reads 2.
The Connections
- In the Edit Mode a connection is established with two clicks: first an output point is clicked, and then the input point of the target step (the order can be reversed as well). The selected point is marked by growing.
- Every output point is connected to a single step; when a connected output is connected to a new step, it takes the place of the previous connection. More than one connection can come to the input point of a step.
- In order to remove a connection, the output point of the connection is selected and an empty area of the canvas is clicked. The connection line itself is not selected.
- The same step being connected to its own input or a loop being established is not prevented.
The Action Menu
When the icon in the title of the action boxes is clicked in the Edit Mode, a menu whose title is the name of the action type opens. There is no menu in the Start and Backend SSO (Re)Sync boxes.
| Operation | What it does |
|---|---|
| Remove | It removes the action from the diagram without asking for confirmation. A selected box is removed with the Delete key on the keyboard as well. |
| Edit | It opens the Edit AGS Action window; the window shows the same fields as Add AGS Action with the current values. The same window opens when the box is double-clicked as well. |
The action type is changed in the Edit AGS Action window as well. When the type changes, the position of the box and the connections that come to the box are preserved. The output connections are matched according to the output name: the outputs with the same name (e.g. SUCCESS and FAILURE between MFA and Authentication Provider, the single output between Form and Assign User Attributes) are preserved, and the ones that have no counterpart are removed; when the type is turned into Switch, the connection of the single output is carried to the noMatch output.
When an action is removed, the outputs connected to it are seen unconnected in the diagram, but the old target stays in the configuration and no warning is given during the save. A new action added after the removal can be seen connected to these outputs; for this reason, before saving, the outputs that are seen unconnected are connected to their new targets and the incoming connections of the newly added box are checked.
In the boxes that use a profile, the icon in the body chip of a profile created by the user (not built-in) opens not the action but the profile itself in the editing window. The pencil in the body of the Assign User Attributes box, on the other hand, opens the Edit AGS Action window. In the window opened with the icon in the Edit Mode there is an editing button for the user profiles as well.
Add AGS Action
A new step is added to the flow by clicking the Add AGS Action button. In the window the action type is selected first; the fields change according to the selected type. When the Accept button is clicked, the new box is added to the top left region of the canvas, connected to nowhere; the boxes added one after the other are placed at the same position and are separated by being moved.
In the fields that select a profile, the icon next to the selected profile shows the settings of the profile. The Add option at the beginning of the drop-down list opens the adding window of the profile in question and the created profile becomes selected. When the window is opened and when the action type is changed, the first profile on the list comes selected in the profile field; in the Edit AGS Action window, if the profile of the step has been deleted, the first profile on the list comes selected as well.
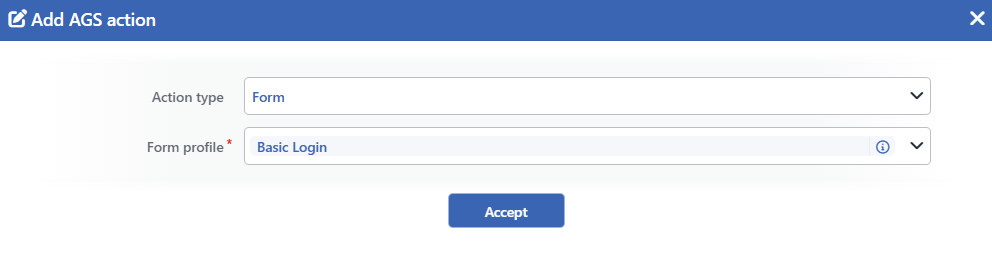 The Add AGS Action Window
INFO
Action Type Default: Form
The type of the step to be added is selected. The options in order: Form, MFA, Authentication Provider, Decision Point, Allow, Deny, Assign User Attributes and Switch.
Form
It shows a login form to the visitor. The values entered from the form are used in the following steps with the %AGS_USER_INPUT(field name) variable; according to the field settings of the form, some fields are assigned as a user attribute as well.
INFO
Form Profile Mandatory
The Login Forms profile to be shown is selected. The list contains the built-in forms (Basic Login, Email Login) and the forms created by the user.
MFA
It does the second factor verification; if the verification is successful it is continued from the SUCCESS output, and if it fails from the FAILURE output.
INFO
MFA Profile Mandatory
The Multi-Factor Authentication (MFA) profile to be used is selected. The list contains the built-in profiles (TOTP Standard, TOTP Strict, Email OTP) and the profiles created by the user.
Authentication Provider
It verifies the identity of the visitor with the selected provider and writes the user attributes to the session according to the mapping rules of the provider; the result continues from the SUCCESS or the FAILURE output.
INFO
Authentication Provider Profile Mandatory
The Authentication Providers profile to be used is selected. There is no built-in provider profile; the list contains only the providers created by the user. If there is no provider created, the list comes empty and a provider is created with the Add option at the beginning of the list.
Decision Point
It evaluates a condition and separates the flow into two: if the condition is met it is continued from the YES output, and if it is not met from the NO output.
INFO
Conditions Mandatory
The conditions to be evaluated are defined with the combined condition editor. On the list there are the Conditions records belonging to the HTTP request and the predefined conditions, together with the met and not met options. The conditions inside a group and the groups are combined with the AND/OR switch; at most three groups are added with the + on the right. The Add option at the beginning of the list opens the new condition window with the AGS Condition criterion selected and the created condition is added to the group. The window opens with an empty condition group; while any of the groups is empty, the Empty condition error is displayed in the field and the Accept button stays inactive.
Allow
It concludes the flow with the access permission; after the access permission page is shown, the visitor is redirected.
INFO
Client JavaScript Default: Off
When it is enabled, the JavaScript code to be run in the browser of the visitor before the redirection is entered (e.g. in order to write a client side cookie or a local storage value). Smart variables are used in the code.
INFO
Redirect Location
The address to which the visitor will be sent after the access permission is given. When it is left empty, the visitor is redirected to the page they wanted at the beginning, and if it is not known, to the root address of the application.
INFO
Redirect Delay (Seconds) Default: 3
The duration for which the access permission page will stay on the screen before the redirection; it is entered between 1 and 10 seconds. When it is left empty, 3 seconds is applied.
Deny
It concludes the flow with the access refusal and the access denied page is shown to the visitor.
INFO
Custom Access-Denied Message Default: Off
When it is turned on, the title and the text of the refusal page are customized.
Deny Page Title Default: Default
The page title. The text type is selected as Static (a text supported by Smart Variables (fx)), Dictionary (a dictionary key), Default (the default text) or No Text.
Deny Page Message Default: Default
The page text; the text types are the same as those of Deny Page Title.
Assign User Attributes
It writes a user attribute to the session row by row. The values are entered as smart content and can read other attributes as well.
INFO
AGS User Attributes Mandatory
The attributes to be written to the session are entered row by row; there has to be at least one row. In every row the two fields below are located.
AGS User Attribute Name Mandatory
The name of the attribute to be written to the session (e.g. department). The name is entered uniquely among the rows; a repeated name is reported with an error window during Save. When a built-in attribute name (e.g. email, groups) is entered, that attribute is written. The names that start with _ are for internal use; they are not displayed in the User Attributes panel and on the Sessions tab. The names that do not start with _ and are not found in the built-in catalog are displayed as a separate column on the Sessions tab after the configuration is saved.
Content Mandatory
The value to be assigned to the attribute. The field supports Smart Variables (fx): besides a fixed text, the values calculated from the request or from the session are used as well (e.g. a request header, %AGS_USER_INPUT(field name) for a field entered from the form or %AGS_USER_ATTR(attribute name) for another attribute). The variables that can be used are on the Variables page and the value conversion functions on the Converters page. %AGS_USER_INPUT(field name) returns a value only for the input fields located in the Form steps in the flow; the value of the fields of the Password type is written as [secret] in this field. The values that read another attribute are counted in the User Attributes panel as a place where that attribute is read.
Switch
It compares the value of a variable with the branch patterns; it is continued from the output of the matching branch, and if no branch matches, from the noMatch output.
INFO
Switch Variable Mandatory
The smart variable or the smart content whose value will be compared is entered.
INFO
Match Mode Mandatory Default: Exact Match
It determines how the Switch Variable value will be compared with the branch patterns.
| Option | Code | Description |
|---|---|---|
| Exact Match | exact | The value has to match the pattern exactly. |
| Starts With | prefix | The value has to start with the pattern. |
| Ends With | suffix | The value has to end with the pattern. |
| Contains | contains | The value has to contain the pattern. |
| Regular Expression | regex | The value has to match the regular expression entered as the pattern. |
Example matches (when %AGS_USER_ATTR(department) is used as the Switch Variable):
| Method | Pattern | Matching values |
|---|---|---|
| Exact Match | Finance | Finance |
| Starts With | IT- | IT-Istanbul, IT-Ankara |
| Ends With | -EU | Sales-EU, Finance-EU |
| Contains | admin | sysadmin, admin-team |
| Regular Expression | ^(HR|Legal)$ | HR, Legal |
Case Insensitive Default: Off
When it is turned on, the comparison is made without a distinction between upper and lower case. It is displayed in the modes other than Regular Expression.
INFO
Branches Mandatory
At least one branch is entered; the Pattern field of every branch is mandatory. Every pattern is displayed as a separate output point on the bottom edge of the box; the pattern text is shown when the point is hovered over and in the label of the connection. The pattern of every branch is entered differently; noMatch and incoming are not used as a pattern.
Accept
INFO
The action is added to the diagram by clicking the Accept button; in the Edit AGS Action window the changes are applied to the box. While a field in the window is invalid (e.g. while a profile has not been selected, while the Switch Variable or a Pattern is empty, while the condition group is empty or while Redirect Delay (Seconds) is outside 1 to 10), the button stays inactive. The fullness of the AGS User Attribute Name and Content fields together with the uniqueness of the names is not checked in the window; these errors are reported with an error window during Save. The action is saved to the configuration with Save.
The General Settings Window
The General Settings window whose title is Edit / General settings is opened by clicking the General Settings button on the toolbar in the Edit Mode. In the window all the AGS settings of the vService outside the flow are gathered in five sections. When the Accept button is clicked, the values are transferred to the diagram but are not saved; for it to be permanent, the Save button on the toolbar is clicked. When the window is closed with ×, the changes are not transferred.
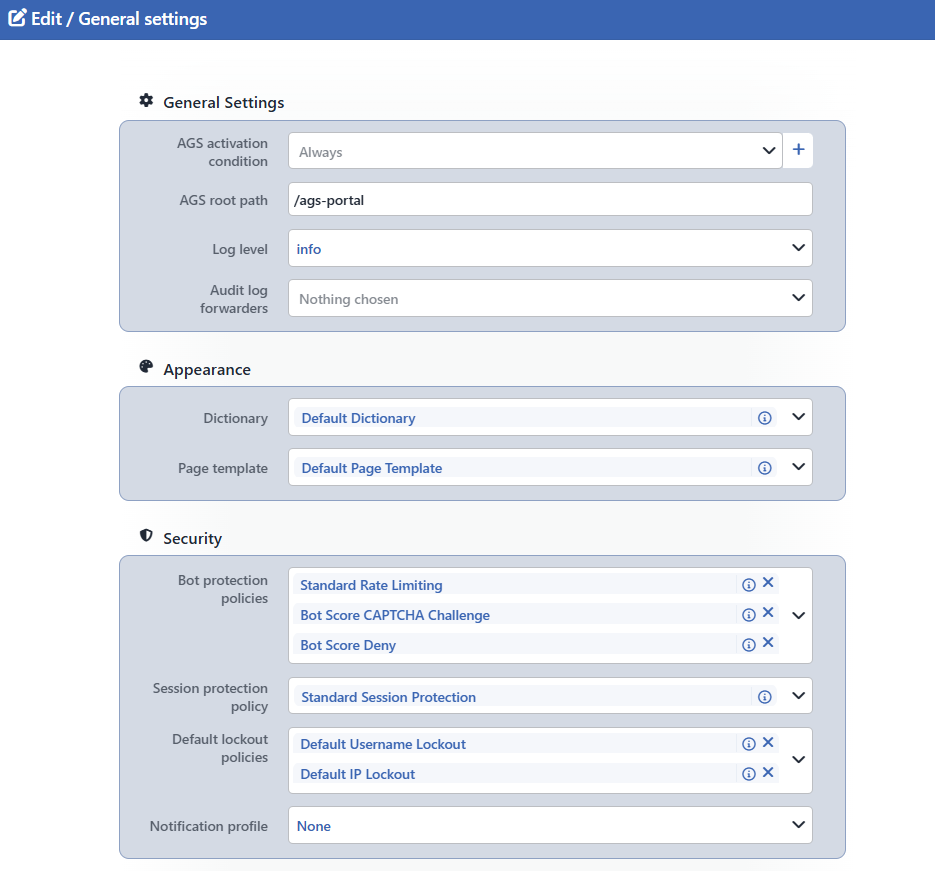 The General Settings Window - 1
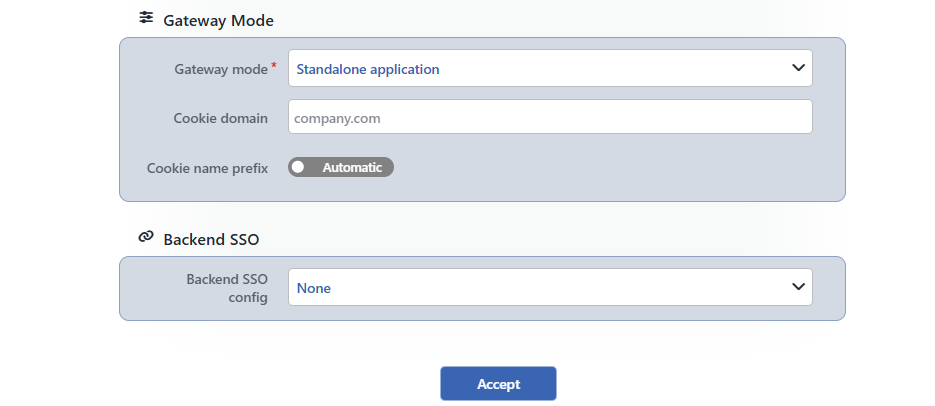 The General Settings Window - 2
In the fields that select a profile, the icon next to the selected record shows the settings of the record, and in the multiple selections × removes the record from the list; the Add option at the beginning of the drop-down list opens the adding window of the record in question and the created record becomes selected. The length, format and selection count limits are not checked in the window; the values that do not obey these limits are reported with an error window during Save.
The policy selections on the screen come from the default configuration written when AGS is enabled in the vService: the Standard Rate Limiting, Bot Score CAPTCHA Challenge and Bot Score Deny bot protection policies, the Standard Session Protection session protection policy, and the Default Username Lockout and Default IP Lockout lockout policies.
General Settings
INFO
AGS Activation Condition Default: Always
The condition that determines to which requests the AGS access control will be applied. When it is left empty, all the requests that come to the vService are within the AGS scope; when a condition is defined, the requests that do not match the condition are forwarded to the Backend Service without visiting AGS. In the Portal mode, if the requests that do not match the condition do not match the actions of the vService, they go to the AGS engine, which is the default target; in the Portal Application mode, the requests that have no session are directed to that portal independently of the condition if there is a trusted portal whose Portal URL value is defined. The requests under the AGS Root Path are always directed to AGS independently of the condition. The conditions are selected from the Conditions records belonging to the HTTP request; the conditions inside a group and the groups are combined with the AND/OR switch, and a new condition group is added with the + on the right (at most three groups).
INFO
AGS Root Path Default: /ags-portal
The path on which the AGS login, verification and auxiliary pages are served. Every request that starts with this path is directed to AGS. The value has to start with / and must not contain a space; when it is left empty, /ags-portal is used. The matching is done with the text prefix; e.g. the /ags-portal value covers the paths that start with /ags-portalx as well, for this reason there must not be a path that starts with the same prefix in the Backend Service.
INFO
Log Level Default: info
The detail level of the working logs of the AGS engine is selected; the AGS engine is started with the selected level. The levels are ordered from the least detailed to the most detailed and the selected level covers the records of the levels more important than itself as well.
| Option | Description |
|---|---|
error | Only the errors are recorded. The log volume is at the lowest level. |
warn | In addition to the errors, the warnings that do not stop the flow but require attention are recorded. |
info | In addition to the errors and the warnings, the ordinary working information of the engine is recorded. It is the level recommended for daily use. |
debug | The detailed internal working information for troubleshooting is recorded as well. The log volume increases noticeably; when the troubleshooting is completed, it is returned to the info level. |
silly | All the details that can be recorded are recorded. It is used only for short term and targeted troubleshooting. |
The http value left from the previous versions is applied as info, the verbose value as debug and the trace value as silly. When a level other than the default is selected, the row Log level <level> is displayed in the Monitoring & Notification section of the AGS Management tab.
INFO
Audit Log Forwarders
The Log Forwarding targets to which the audit events will be forwarded are selected; at most five targets are selected. If there is no selection, Nothing chosen is written and the events are kept only on the Audit Logs tab.
Appearance
INFO
Dictionary Default: Default Dictionary
The Dictionaries (Multilingual) record from which the texts on the AGS pages are taken. If the selected dictionary is deleted, the selection in the record does not change by itself; when the General Settings window is opened, the field comes as Default Dictionary and the change is saved after Accept and Save.
INFO
Page Template Default: Default Page Template
The Page Templates record that determines the appearance of the AGS pages. If the selected template is deleted, the selection in the record does not change by itself; when the General Settings window is opened, the field comes as Default Page Template and the change is saved after Accept and Save.
Security
INFO
Bot Protection Policies
The Bot Protection Policies policies to be applied to the vService; more than one policy is selected.
INFO
Session Protection Policy
The Session Protection Policies policy that determines the client properties to which the session will be bound, the requests that will be exempt from the binding check, the timeouts and the concurrent session limit. When None is selected, no session binding is done and the idle time of the session is 1 hour.
INFO
Default Lockout Policies
The Account Lockout Policies policies applied by default to the Authentication Provider steps in the flow; more than one policy is selected. According to the Lockout Behavior setting of the provider profile, this list is used (Use Gateway Defaults), is replaced with the list of the provider (Replace Defaults), is added on top of it (Add to Defaults) or the lockout is turned off (No Lockout). The own policies of the MFA profile are bound to the MFA step.
INFO
Notification Profile
The Notification Profiles profile to which the AGS events will be notified. There is no built-in profile. When None is selected, the notifications bound to a profile are not sent; the status alarm of the AGS engine continues to be displayed as an interface notification.
The single selections that point to a deleted policy or profile (Session Protection Policy, Notification Profile, Backend SSO Config) come as None when the window is opened; in the multiple selections (Bot Protection Policies, Default Lockout Policies, Audit Log Forwarders) the deleted records are removed from the list manually.
Gateway Mode
INFO
Gateway Mode Mandatory Default: Standalone Application
The working mode of AGS is selected. When the mode is changed, the fields specific to the mode appear or disappear in the window immediately. With Accept the values of the fields that are not valid in the new mode are removed from the diagram without a confirmation being asked and are deleted from the record with Save; in order to return before saving, the changes are discarded by passing to the View Mode.
- Standalone Application: the vService protects a single application behind it with its own login flow.
- Portal: the vService works as a portal on which the users access more than one application with a single login.
- Portal Application: the vService works as an application that accepts the session of a portal it trusts instead of its own login flow.
INFO
Cookie Domain
The domain name for which the session cookie will be valid (e.g. company.com). The value is entered in the domain name form (a dot at the beginning is accepted). When it is left empty, the cookie is valid only for the address the request comes to.
INFO
Cookie Name Prefix Default: Automatic
While the switch is in the Automatic position, the names of the AGS cookies are created with the AGS_ prefix; in the Portal Application mode the prefix of the first portal for which a prefix has been defined in the Trusted Portals list is used. When the switch is taken to the Choose position, a prefix consisting only of letters, digits, _ and - characters and between 1 and 32 characters is entered; if it is left empty, Automatic is used. The prefix is entered in order to separate the cookies of the vServices that share the same Cookie Domain; in the Portal Application mode, when a prefix different from that of the portal is entered, the session of the portal is not recognized in this vService.
Backend SSO
INFO
Backend SSO Config
The Backend SSO Configurations profile that provides the transfer of the login information to the Backend Service. When None is selected, it is not used. If the Backend Session Lost Strategy value of the profile is Re-sync, the Backend SSO (Re)Sync box is displayed in the diagram; the output of this box is connected to the step that will be run in the re-synchronization. When None is selected, this connection is removed.
Accept
INFO
The changes made in the window are transferred to the diagram by clicking the Accept button. While there is an invalid field in the window, the button stays inactive; the length, format and selection count limits together with the Trusted Portals list being empty are reported during Save. The changes are saved to the configuration with Save.
User Attributes Panel
The User Attributes panel on the right lists the user attributes assigned and read in the flow. The attributes whose name starts with _ are not listed on the panel. The calculation is made from the configuration of the flow: in the View Mode the saved configuration and in the Edit Mode the diagram on the screen, including the unsaved changes, is taken as the basis.
- The number in the title is the number of rows listed in the selected filter.
- With the arrow in the title the panel is reduced to a narrow strip; when the strip is clicked, the panel opens again. The open or closed preference is stored per user; if the preference has not been saved, the panel opens closed on narrow screens. The number of rows is displayed on the closed strip as well.
| Filter | The attributes listed |
|---|---|
| All Default | All the attributes. |
| Needs Attention | The problematic attributes (the table below). |
| Custom | The attributes that are not found in the built-in catalog. |
In every row the following elements are located:
| Element | Explanation |
|---|---|
| The name | The name of the attribute (e.g. userId). |
required | A mandatory built-in attribute (userId, username). These attributes are on the list even if they are never assigned in the flow. |
custom | An attribute that is not found in the built-in catalog. |
| There is a problem in the attribute; when it is hovered over, the text of the problem is shown (if there are two problems together, the first one). | |
| The left counter | The number of places where the attribute is assigned (assigned in this many places); a built-in mapping overridden with a custom mapping is counted as well. |
| The right counter | The number of places where the attribute is read (read in this many places); if it is zero, it is displayed faded. |
When a row is hovered over, under the Assigned by and Read by titles the steps that assign and read the attribute together with the origin of the assignment (built-in mapping, custom mapping, assign action, form field, smart variable) and the mapping expression or the field name are shown. At most six usages are shown under every title, and the rest are summarized with +N more; a built-in mapping overridden with a custom mapping is marked with overridden. The steps that touch the attribute are highlighted in the diagram. Clicking the row has no separate function.
The situations that fall into the Needs Attention filter:
| Situation | The text displayed |
|---|---|
| The mandatory attribute is assigned in no step | Required, but nothing assigns it — the session starts without it |
| The attribute is read somewhere but is assigned in no step | Read somewhere, but nothing assigns it — that reference resolves to nothing |
The attributes that are assigned but read nowhere on the panel are not counted as a problem; they are written to the session and may be being used in the places the panel does not scan (e.g. the Backend SSO Config or the protection policies).
The sources of the attributes:
- The steps that assign: the built-in mappings of the provider and the Custom User Attribute Mapping rows of the profile in the Authentication Provider step, the rows of the Assign User Attributes step, the Assign to User Fields selections of the fields in the Form step together with the fields whose name or type is in the e-mail or user name form (except the password and secret fields).
- The places that read: the
%AGS_USER_ATTR(<name>)references that appear in the configuration of the steps and in the profiles the steps use, together with the selected Page Template and Dictionary records. The references in the Backend SSO Config and in the protection policies are not counted. - The built-in catalog:
userId,username,email,displayName,firstName,lastName,phone,picture,locale,timezone,company,department,title,employeeId,groups.
Scope and Limits
INFO
- The flow is edited only on this tab. The AGS Management tab summarizes the flow according to the roles of the steps; the branches and the transitions are displayed only in this diagram.
- The single save point is Save. The Accept in the Add AGS Action, Edit AGS Action and General Settings windows changes only the diagram. The Accept button of the section windows on the AGS Management tab, on the other hand, saves the change immediately.
- The flow integrity is not checked. No warning is shown for the unconnected outputs, the steps that cannot be reached from Start or the branches that do not end with Allow or Deny; before saving, it is checked on the diagram that every branch of the flow is connected to a concluding step.
- The removal does not ask for confirmation. Remove and the Delete key remove the step immediately. There is no single step undo; when it is passed to the View Mode and the confirmation is given, not only the removal but all the unsaved changes are discarded.
- Concurrent editing is not merged. While in the Edit Mode, a change made from another surface is not reflected in the diagram; if both sides save the same field (e.g. the flow steps), the last saved one becomes valid.
- The default flow. When AGS is enabled in the vService, the flow is created with the Basic Login form together with the Allow and Deny steps; the output of the form is connected to the Deny step. The flow is arranged according to the authentication steps that will be used.
- There is no Start in the Portal Application mode. In this mode the visitor comes with the session of the portal; the steps added to the diagram are not reached from Start.
- The box positions are part of the configuration. The positions are written to the record; the zoom level and the panel filter are not stored.
