
Smarter by Design.Simpler for Business
Add HTTP Header
What Is the Add HTTP Header Action?
The Add HTTP Header action is used to add a new header to the HTTP traffic. The added header is included in the request or response traffic and transmitted to the Backend Services or to the clients.
This action can work both at the request and at the response stage. According to the Execution Level selection, the header is added to the request before it is sent to the Backend Service, or to the response before it is returned to the client.
WARNING
If the header to be added already exists, this action does not change the header. A second header with the same name is added. The Set HTTP Header action is used to change an existing header.
The Importance of the Add HTTP Header Action
HTTP headers carry critical meta information in the communication between the client and the server. The header adding action is a powerful tool for enriching and customizing this communication.
The Add HTTP Header action;
- enables additional information to be transmitted to the Backend Services (the client IP, session information, etc.),
- makes it possible to send custom response headers to the clients,
- performs tagging for monitoring and debugging at the application layer,
- enables cache control headers to be added,
- makes it possible to add CORS and security headers,
- supports the creation of dynamic content with Smart Variables.
For this reason, the Add HTTP Header action is one of the basic building blocks of traffic manipulation.
Supported vService Types
HTTP
L7 TCP
Network
Execution Timing
On Request
On Response
How to Add?
A new Add HTTP Header Action can be added through the TR7 web management interface by following the steps below:
- The Configuration Menu is opened by clicking the TR7 logo at the bottom left.
- The Load Balancer → Actions → Add steps are followed.
- A unique and descriptive name is entered for the action.
- Add HTTP Header is selected as Action Type.
- The related configurations of the action are made.
- In the Conditions tab, the condition/conditions under which the action takes effect are determined.
- The action is added by clicking the
Addbutton.
Add HTTP Header Action Add Form
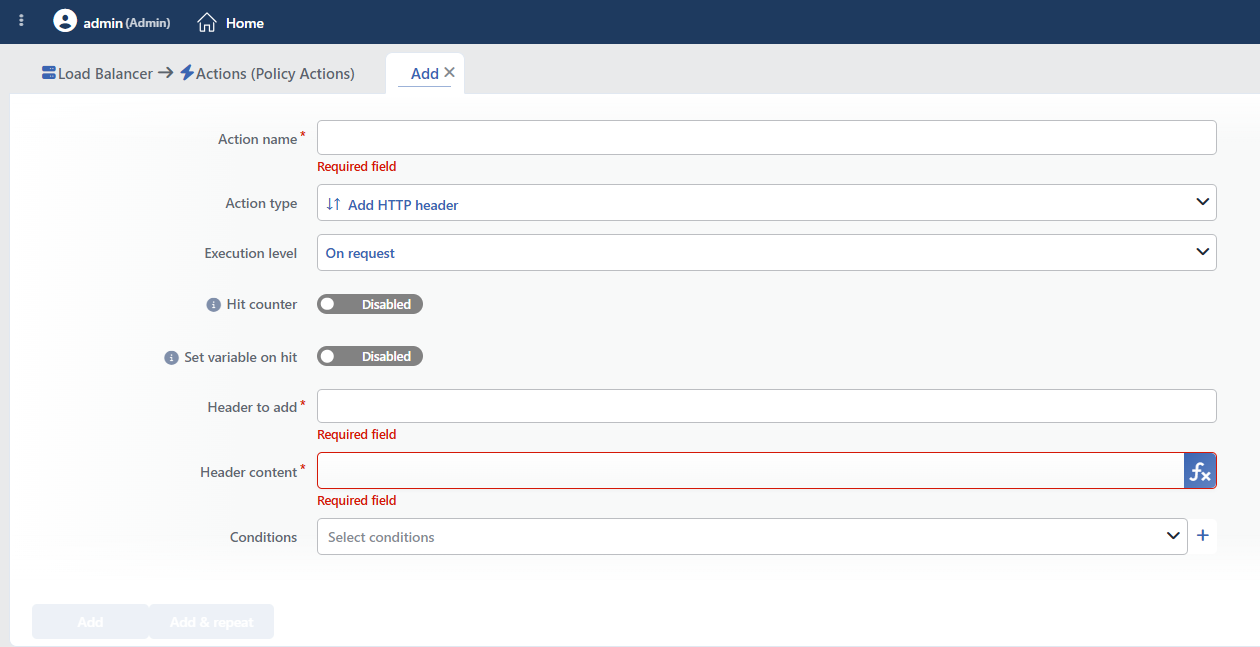 Add HTTP Header Action Add Form
INFO
Execution Level
Determines at which stage the action is run.
This field cannot be changed after saving; if a direction change is needed, a new action is defined. If no selection is made, the action runs at the request stage.
- On Request: The action is applied before the request is forwarded to the related Backend Service. This level is used in cases where changes need to be made to the request or additional information needs to be passed to the Backend Service.
- On Response: The action is applied before the response is forwarded to the client. This level is used in cases where edits or additions need to be made to the response sent to the client.
INFO
Hit Counter Default: Off
Hit Counter counts every run of the action (it is evaluated together with the action's own condition; the count is not lost even in terminating actions such as Deny). Action-based rates and totals are displayed in the Action Hits tab of the vService dashboard and on the live statistics screen; they do not appear as a separate column in the lists. The counter is cumulative; there is no interface for resetting it manually: it starts from zero when the set of counted actions changes or when the vService is reloaded, while the history is preserved on the dashboard as a rate (hit/s).
INFO
Set Variable on Hit
A variable name whose value is assigned each time the action runs can be entered (optional; empty by default). The name can consist of letters, digits and underscores (at most 32 characters). When the action is triggered, the variable is set to 1, and chained behaviors can be built by reading it with the %TR7VAR(name) smart variable in other conditions and actions on the same vService.
INFO
Header to Add
The name (key) of the HTTP header to be added is entered in this field.
While the field is being written, TR7 suggests common header names as auto-completion; the suggestion list changes according to the selected Execution Level (request/response). Custom header names can also be entered.
Header names are case-insensitive, but the use of the standard format is recommended (e.g. X-Custom-Header).
TIP
Sample header names:
X-Forwarded-For: The client IP informationX-Request-ID: The request identifierX-Real-IP: The real client IPCache-Control: Cache control
INFO
Header Content
The content (value) of the header to be added is entered in this field.
The smart variable pool offered with fx changes according to the selected Execution Level: when On Response is selected, the response stage variables (e.g. %STATUS, %RESHEADER) are listed; some variables specific to the request stage are not offered in this case.
TIP
This field supports Smart Variables. When the variable row (or the fx button) is clicked, the Add variable / Edit variable window opens. In this window, the Variable name is selected from the searchable list, the related field is filled in if the variable takes an argument (a header name, a cookie name, etc.), and a smart function chain is defined with Add functions if necessary; the preview of the resulting expression is seen in the Summary field and it is written to the field with Submit.
Detailed information is on the Variables page.
INFO
Conditions
In this field, it is defined under which condition or conditions the related action takes effect.
By adding one or more conditions, the behavior can be applied in a targeted and controlled way with the and/or structure.
Detailed information about conditions is on the Conditions page.
WARNING
If no condition is defined in this field, the related action runs unconditionally (Always). In this case, the action is applied to all traffic coming to the related vService.
In live environments, using an action without defining a condition can lead to unexpected situations (service outages). For this reason, it is recommended that at least one condition always be defined when an action is created.
INFO
Form Buttons
Add
The action adding process is completed by clicking the Add button.
Add & Repeat
With the Add & Repeat button, the action adding process is completed, and another new action can be added with different configurations without leaving the related window.
 Action Added
Operational and Safe Usage Recommendations
The difference between Add Header and Set Header:
| Action | Behavior |
|---|---|
| Add Header | Adds a new header even if the header already exists (multiple headers are created) |
| Set HTTP Header | If the header exists, changes its value; if not, adds a new one |
If an existing header needs to be updated, the Set HTTP Header action is preferred.
- The X- Prefix Should Be Used. Using the
X-prefix for custom headers prevents conflicts with the standard HTTP headers. For example:X-Custom-ID,X-Trace-ID. - Sensitive Information Should Be Added Carefully. Sensitive information (API keys, passwords, etc.) must not be present in the header contents. This information will be visible in the network traffic.
- It is used together with conditions. Instead of adding a header to all traffic, targeted headers are added to specific paths or user groups.
Common Usage Scenarios in Live Environments
The examples below show how the related action is applied in the most frequently encountered use cases in real systems. These scenarios are based on practices that are widely preferred in live environments and rest on experience gained in the field.
Scenario 1: Transmitting the Client IP Information to the Backend Service
Problem: The Backend Services behind the reverse proxy cannot see the real client IP address and think that all the requests come from the TR7 IP. This situation makes log analysis, security and user tracking impossible.
Solution: The real client IP address is transmitted to the Backend Service with the X-Forwarded-For header.
Configuration:
- Execution Level: On Request
- Header to Add:
X-Forwarded-For - Header Content: The Client IP address (%SRCIP) variable is selected from the Smart Variables (fx) button. (Note: if the vService's own Add X-Forwarded-For Header option is on, a double XFF header is created together with this action: one of the two must be used.)
- Conditions: Unconditional (applied to all requests)
Result:
- ✅ All requests → The client IP is transmitted to the Backend Service with the X-Forwarded-For header.
- ✅ Backend Service logs → Record the real client IP addresses.
Scenario 2: Request Tracing for Microservices
Problem: In a microservice architecture, it is difficult to track how a request flows between different services and debugging becomes complex.
Solution: Distributed tracing is enabled by adding a unique X-Request-ID header to each request.
Configuration:
- Execution Level: On Request
- Header to Add:
X-Request-ID - Header Content: A unique ID variable is selected from the Smart Variables (fx) button (e.g. a timestamp or a unique identifier)
- Conditions: Path STARTS WITH
/api/
Result:
- ✅ Requests starting with /api/ → A unique X-Request-ID header is added.
- ✅ Tracking between microservices → They are matched in the logs with the same Request-ID.
- ❌ Requests outside /api/ → The X-Request-ID header is not added.
Scenario 3: Adding a CORS Header
Problem: The frontend application runs on a different domain (e.g. app.example.com) and makes AJAX requests to the API (api.example.com). The browser gives a CORS error.
Solution: Cross-origin requests are allowed by adding the Access-Control-Allow-Origin header to the API responses.
Configuration:
- Execution Level: On Response
- Header to Add:
Access-Control-Allow-Origin - Header Content:
https://app.example.com - Conditions: Path STARTS WITH
/api/
Result:
- ✅ The responses returned to /api/ requests → The Access-Control-Allow-Origin header is added.
- ✅ Browser → Does not give a CORS error, the AJAX requests are successful.
- ❌ The responses outside /api/ → The CORS header is not added.
Scenario 4: Adding a Cache Control Header
Problem: Static files (CSS, JS, images) are fetched from the Backend Service on every request and the bandwidth consumption is high. The browser cache is not used.
Solution: By adding the Cache-Control header to the static files, the browser is made to cache these files for 7 days.
Configuration:
- Execution Level: On Response
- Header to Add:
Cache-Control - Header Content:
public, max-age=604800 - Conditions:
Result:
- ✅ .css, .js and .png files → The Cache-Control: public, max-age=604800 header is added.
- ✅ Browser → Caches these files for 7 days, and bandwidth saving is achieved.
- ❌ Other files → The Cache-Control header is not added.
Scenario 5: Adding the HSTS Security Header
Problem: Users sometimes try to access the site with the HTTP protocol and are not redirected to HTTPS. This situation leaves them open to man-in-the-middle attacks.
Solution: By adding the Strict-Transport-Security header to all HTTPS responses, the browser is forced to use only HTTPS.
Configuration:
- Execution Level: On Response
- Header to Add:
Strict-Transport-Security - Header Content:
max-age=31536000; includeSubDomains; preload - Conditions: Unconditional (applied to all HTTPS responses)
Result:
- ✅ All HTTPS responses → The Strict-Transport-Security header is added.
- ✅ Browser → Uses only HTTPS for 1 year and automatically converts HTTP requests to HTTPS.
- ✅ Man-in-the-middle attacks → Are prevented thanks to HSTS.
