
Smarter by Design.Simpler for Business
IP Intelligence & Reputation
What Is IP Intelligence & Reputation?
IP Intelligence & Reputation is the IP reputation infrastructure where known malicious and suspicious (blacklist) IPv4 and IPv6 addresses are detected and managed. The blacklist database is updated online via the TR7 reputation server (or offline via a file); in this way the device can evaluate the known malicious/suspicious IP addresses against an up-to-date database.
In addition to the built-in blacklist, Whitelist and Blacklist IP addresses can be defined manually when needed. In addition, the location, blacklist and reputation information of any IP address can be queried with IP Lookup; with IP Tags, names are given to single addresses and network blocks so that the IP addresses in the logs become recognizable.
The blacklist is based on the categorized threat database that TR7 provides, the defined external sources (External Sources) and the manually added Blacklist entries. The whitelist always takes priority: if an IP is on both the blacklist and the whitelist, it is not blocked. The resulting merged blacklist is used in the source IP evaluation in the traffic security policies.
Blacklist
Blacklist
Known malicious IPv4 / IPv6 addresses
25 Categories
Threat classes
User, External + 23 threat categories
External Sources
External sources
At most 10 external IP lists (URL)
Online / Offline
Update
From the TR7 reputation server or via a file
Periodic
Automatic update
Daily / weekly / monthly scheduling
Manual List
Whitelist / Blacklist
Manual IP addition; the whitelist takes priority
IP Lookup
Query
IP location and reputation query
IP Tags
Address tags
Gives names to addresses and network blocks
Platform
Common component
A part shared by all the products
A platform component
IP Intelligence & Reputation is a platform component that comes together with TR7. The online update only requires internet access to the TR7 reputation server; in the environments where there is no access, the update can be done offline with a file provided by the TR7 Support Team.
Stop the threats before they reach the door
With continuously updated, categorized records of tens of thousands of malicious IPs, it filters out the botnet, brute-force, scanning and DDoS sources before the traffic reaches the application.
Malicious IP → blocked Clean IP → allowed
Why Is It Important?
The IP reputation is a proactive defense layer that filters out the known malicious addresses before they even reach the application. This provides:
- Proactive blocking: the botnet, brute-force, port scanning, DDoS and exploit sources are blocked automatically without the need to write rules one by one,
- Smaller attack surface: the greater part of the malicious traffic is filtered out at the edge; the load on the application behind and on the WAF decreases,
- Categorized visibility: thanks to the 23 threat categories, it is seen what type of attack sources are targeting the device,
- Always up to date: the database is refreshed automatically on a periodic basis (daily, weekly or monthly) and can be fed with external sources,
- Full control: exceptions and additional blocks are defined with the manual Whitelist and Blacklist (the whitelist always takes priority),
- A platform component: it comes together with TR7.
How Does It Work?
The blacklist is applied to the incoming traffic after it is updated, merged and filtered against the whitelist:
01 · UpdateThe database is updatedReputation server + external sources (periodic)
02 · MergeGathered in a single blacklistTR7 DB + External + manual Blacklist
03 · FilterThe whitelist is subtractedThe IPs on the whitelist are not blocked
04 · ApplyApplied to the trafficThe incoming source IP is evaluated against the blacklist
Where and How Is It Used?
The resulting merged blacklist is used in the source IP evaluation in different layers of TR7. There are five main points of use:
vService Traffic Protection L7 · IP Reputation Protection
In the Traffic Protection settings of a vService, IP Reputation Protection works in the off, monitoring (Monitor) or active (Active) modes and comes active by default. A request coming from an IP on the blacklist is handled with the action rules; on every rule row a threat category group and an action are defined, and the request is concluded with the action of the first matching rule row from top to bottom:
- The default 1st rule row: the critical categories (DDoS Attack, Open Proxy, Hacking, SQL Injection, Brute-Force, Web App Attack, Exploited Host, Bad Web Bot, User Blacklist) → quarantine.
- The default 2nd rule row: all the remaining categories (VPN IP is deliberately excluded) → blocking (403); on TCP vServices this row comes as silent drop.
- The action options: blocking, delayed answering (Tarpit), CAPTCHA, quarantine, redirection, showing custom content and silent drop.
- Whitelist: with the whitelist condition and the type-based whitelist entries, the exceptions are exempted from the protection.
WAF L7 · Web Application Firewall
With the Blacklist Protection option and the Blacklist IP Category filter in the WAF Whitelist & Blacklist settings, the requests whose source IP is in the selected reputation categories are blocked. In addition, in the WAF logs the source IP of every event is shown together with its blacklist status; the security events are filtered by this status.
Rules and Conditions Rule · Blacklist IP Category
The Blacklist IP Category (IP intelligence category) condition can be used in the traffic rules. The requests whose source IP is in a specific reputation category are matched and any desired action (blocking, redirection, logging etc.) can be applied to them; it is a fine-grained, rule-based use.
Network Firewall L3/L4 · Firewall
At the network firewall level, the IPs and the CIDR blocks with a bad reputation are handled in monitoring (Monitor) or blocking mode; in monitoring mode only the match counter is kept. The setting is made in the Blacklist field of the L4 DDoS protection. It filters the traffic at the network layer (L3/L4) before it reaches the load balancer; it is especially effective against DDoS / volumetric attacks.
Bot Protection L7 · Bot scoring
While scoring a request, the bot protection uses the reputation categories of the source IP as a score factor: the open proxy, bad bot, attack, reconnaissance, spam, VPN, botnet, fraud, DNS abuse and operator blacklist (manual Blacklist + external sources) sub factors contribute to the bot score.
TIP
All five uses are based on the same blacklist database. The addresses in Whitelist Content are exempted in all the layers; the whitelist always takes priority.
In addition, a notification is defined for the IP reputation database under Notification Management: if the database is not updated for the determined period (by default 45 days) or if there is no data at all, a warning is produced.
How to Edit?
The IP Intelligence & Reputation settings are edited via the TR7 web management interface with the steps below:
- The Configuration Menu is opened by clicking the TR7 logo at the bottom left.
- The steps Settings → General Settings → IP Intelligence & Reputation are followed.
- By clicking the Edit button, the update settings (the period, the source etc.) are edited and are saved with Save.
- The blacklist database is updated with Update Online or Update Offline.
- If needed, IP addresses are added manually to the Whitelist / Blacklist content.
TIP
Reaching the page via quick search
Instead of navigating the menu step by step, the related page is reached directly by using the search bar in the bottom left corner of the screen. The search bar opens with the Alt + T shortcut on Windows and Opt + T on macOS; typing the name of the feature being searched for is then sufficient.
The IP Intelligence & Reputation Screen
By following the path Settings → General Settings → IP Intelligence & Reputation, the IP reputation information belonging to the TR7 device is displayed. At the top of the screen there are the Edit, Update Online and Update Offline entries, and on the top strip there are the Distribution, IP Lookup and IP Tags tabs.
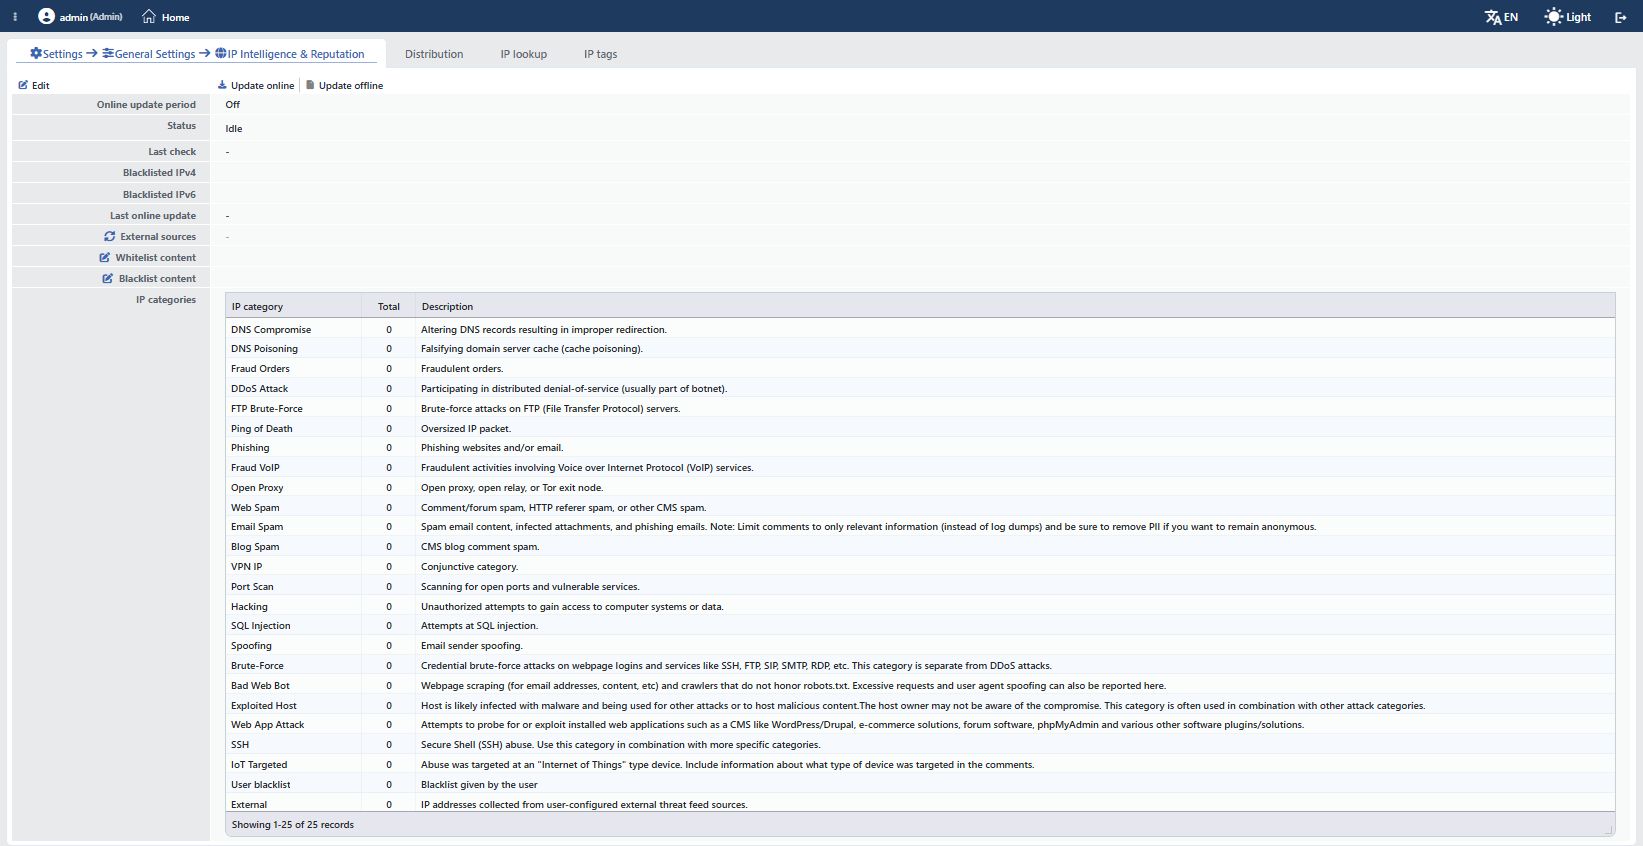 The IP Intelligence & Reputation Screen (empty database)
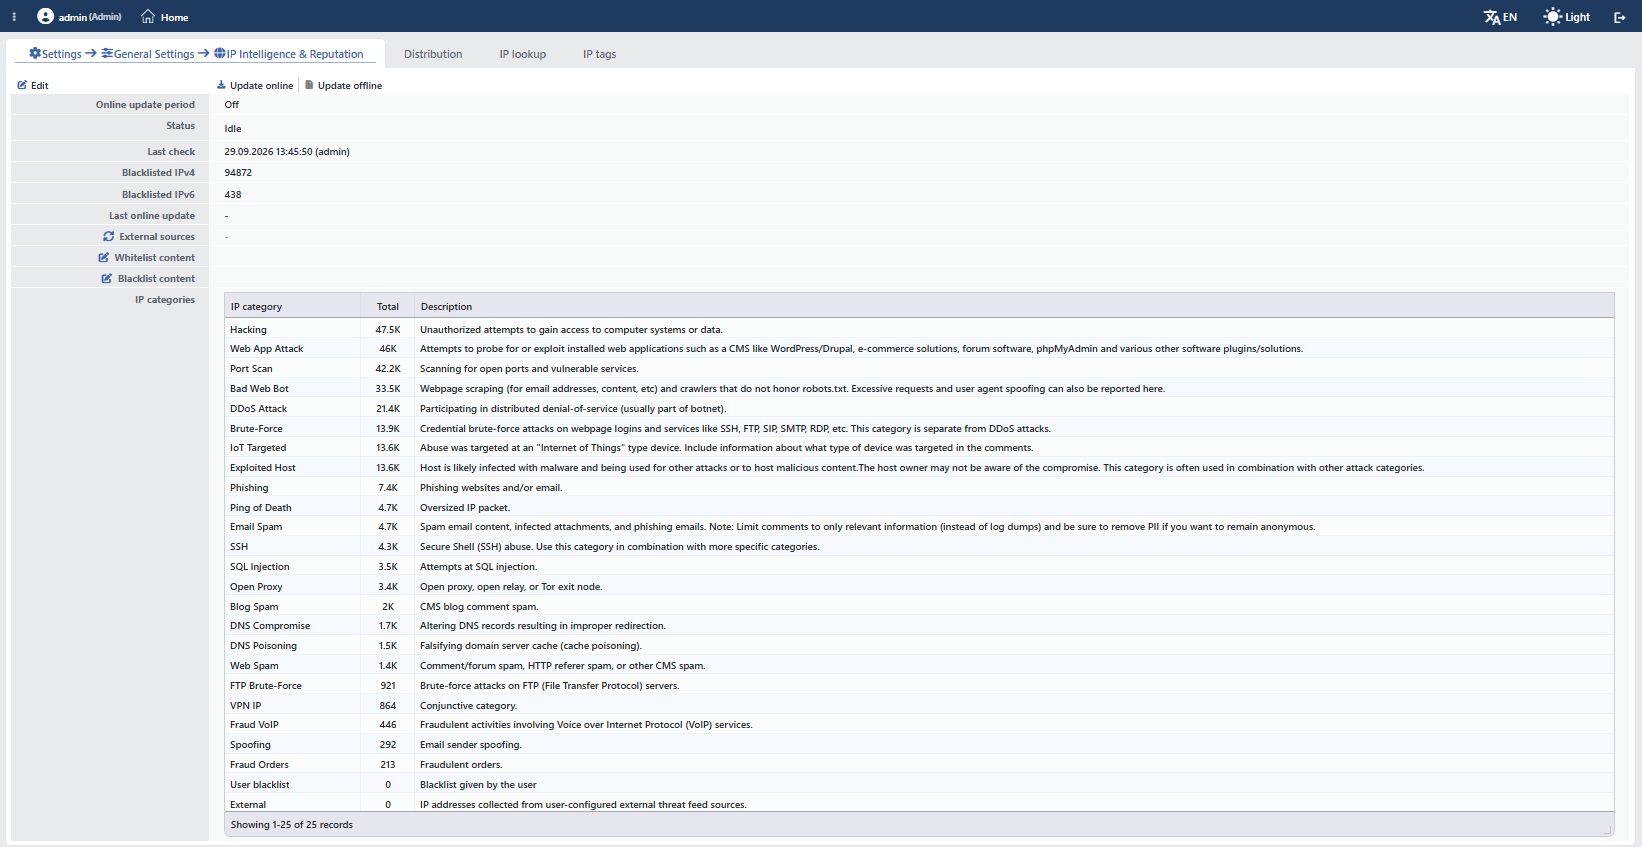 The IP Intelligence & Reputation Screen (updated database)
The following information is displayed on the screen in order:
INFO
Status
Shows the instant update status of the database and its stage (idle, uploading, downloading, extracting the archive, copying files, preparing the IP categories, applying, updating the external sources); during an ongoing operation a progress bar is displayed next to the status. With the stop icon that appears on the status row during a cancellable operation, the update is cancelled. If the update ends with an error, the error message is shown next to the status text.
INFO
Last Check
Shows when and by whom the last database update was started; since the stamp is written with the update attempt, an update that ends in failure also changes this row; in the scheduled automatic updates the user is displayed as TR7.
INFO
Blacklisted IPv4
Shows the total number of the IPv4 addresses on the blacklist (all the sources merged).
INFO
Blacklisted IPv6
Shows the total number of the IPv6 addresses on the blacklist (all the sources merged).
INFO
External Sources
The list of the defined external IP reputation sources; each source is displayed with its address (URL), the number of IPs retrieved, the date of the last successful update and a source-specific status icon / progress bar. These sources are configured from the Edit form and the IPs retrieved are added to the blacklist under the external category. With the refresh icon next to the field title, the external sources are refreshed manually without waiting for a full database update; the operation starts after the "Are you sure?" confirmation. While the device is busy with an update, a waiting symbol is displayed in place of the icon.
INFO
Whitelist Content
Used to define Whitelist IP addresses manually. By clicking the Edit icon on the left, IP addresses or CIDR blocks (IPv4 /8–/32, IPv6 /29–/128) are added line by line; the lines starting with # are counted as comments. The value area of the row shows the first 30 characters of the list content. An address on the whitelist is not blocked even if it is on the blacklist; the whitelist always takes priority. The invalid lines are ignored and are reported with a badge showing the number of lines; when the badge is hovered over, at most 10 samples of the rejected lines are displayed. The list file can be at most 4 MB; content exceeding this limit is rejected entirely (it is not truncated) and the previous list content is preserved.
INFO
Blacklist Content
Used to define Blacklist IP addresses manually. By clicking the Edit icon on the left, IP addresses or CIDR blocks (IPv4 /8–/32, IPv6 /29–/128) are added line by line; the lines starting with # are counted as comments. These addresses are included in the blacklist under the user category. The invalid lines are ignored and are reported with a badge. The list file can be at most 4 MB; content exceeding this limit is rejected entirely and the previous list content is preserved.
INFO
IP Categories
Shows the threat categories of the IPs on the blacklist and the total count in each category. The categories cover the threat classes coming from the TR7 reputation database as well as the manually added (User Blacklist) and the external-source (External) entries. The table consists of the IP Category, Total and Description columns and is listed in descending order of Total; when the record counts are equal (e.g. in an empty database) the categories are displayed in the order below. Below the table there is the Showing 1-25 of 25 records information:
| Category | Description |
|---|---|
| DNS Compromise | DNS records being hijacked, leading to incorrect/malicious redirection |
| DNS Poisoning | Poisoning of the DNS cache with forged records (cache poisoning) |
| Fraud Orders | Fraudulent fake order/transaction activity |
| DDoS Attack | Participation in a distributed denial-of-service (DDoS) attack; usually part of a botnet |
| FTP Brute-Force | Brute-force login attempts against the FTP service |
| Ping of Death | Oversized IP packet |
| Phishing | Phishing sites or emails |
| Fraud VoIP | Fraudulent VoIP activity |
| Open Proxy | Open proxy, open relay or Tor exit node |
| Web Spam | Comment/forum/referrer spam on the web |
| Email Spam | Source of unwanted email, malicious attachments or phishing emails |
| Blog Spam | Blog/CMS comment spam |
| VPN IP | VPN server IP (usually flagged together with other categories) |
| Port Scan | Scanning for open ports and vulnerable services |
| Hacking | General attack/unauthorized access attempts |
| SQL Injection | SQL injection (SQLi) attempts or attacks |
| Spoofing | Email sender spoofing |
| Brute-Force | Credential brute-force attacks against web and service logins (SSH, FTP, SMTP, RDP etc.) |
| Bad Web Bot | Bots that ignore robots.txt and scrape content (e.g. email addresses); excessive requests and user agent spoofing are also reported in this category |
| Exploited Host | A compromised/infected host used in further attacks |
| Web App Attack | Exploit and vulnerability scanning attempts targeting web applications |
| SSH | Abuse of the SSH service (mostly combined with brute-force) |
| IoT Targeted | Attacks targeting IoT (Internet of Things) devices |
| User Blacklist | The IPs added manually to Blacklist Content |
| External | The IPs retrieved from the defined External Sources |
Button Details
INFO
Edit
By clicking the Edit button, a closable editing tab in which the update settings are edited is opened.
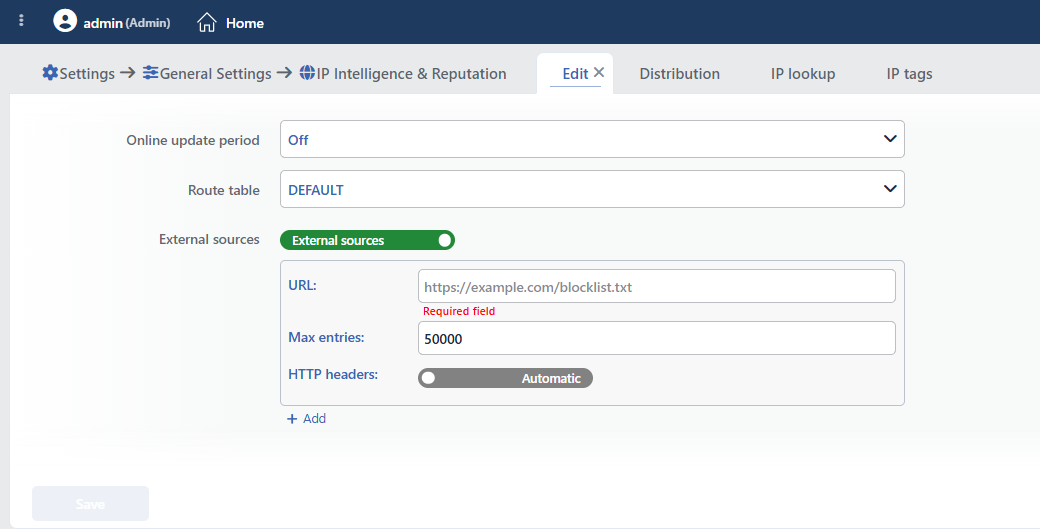 The Edit Tab
Online Update Period
Determines how often the blacklist database will be updated online. The default value is Off. The options:
| Period | Schedule |
|---|---|
| Off | The scheduled online update is off; the update is done only manually |
| Daily | Every day at 02:00 |
| Weekly | Every Monday at 03:00 |
| Monthly | The 1st of every month, at 04:00 |
The scheduled update refreshes the defined external sources as well together with the blacklist database. In a cluster setup the scheduled online update runs only on the primary device (device 1); the updated database is transferred automatically to the other TR7 device.
Route Table
Which route table the online update traffic (the database and the external source requests) will be made over is selected. The default value is DEFAULT.
External Sources
In addition to the built-in TR7 source, external IP reputation/blacklist sources are defined. At the beginning of the field there is an on/off switch: while the switch is off no external source is defined, and when it is turned on the first source card appears and new ones are added with the + Add entry below it. At most 10 sources can be added; the following fields are entered for each source:
URL
The address (URL) from which the external IP list will be fetched is entered. It is the only required field on the source card and must be a valid URL; when it is left blank, a Required field warning appears under the field and the Save button stays disabled.
The list is downloaded via GET over HTTP/HTTPS; IPv4/IPv6 addresses are expected line by line. The lines starting with # or // are counted as comments and are skipped; a CIDR block is not accepted in the external sources, only single IP addresses are read. A source that does not respond times out after 30 seconds; an HTTP answer that is not successful (2xx) or a source that returns no valid IP is marked as an error.
Max Entries
The maximum number of records (IPs) to be retrieved from this source is determined. The default is 50,000; at least 1 and at most 200,000 can be entered. The records after this limit are not read. The size of the answer is also limited according to the record limit (20 bytes per record); the part exceeding this size is not read.
HTTP Headers
Determines the headers to be sent in the GET request made to the source. The field is an on/off switch and in its off state it says Automatic: in this case the request is sent with TR7's own default headers. When the switch is turned on, a list consisting of name/value pairs appears; e.g. an API key/token header for authentication is added from here. On every row the name field is required.
Save
The changes made are saved by clicking the Save button.
INFO
Update Online
By clicking the Update Online button, the blacklist database is updated online from the TR7 reputation server. The device downloads the up-to-date database package and applies it to the local blacklist. This operation requires internet access to the TR7 reputation server over the selected route table. The button starts the operation after the confirmation question. In addition to the scheduled update, an update can also be started manually with this button.
INFO
Update Offline
By clicking the Update Offline button, the database is updated with a file, without internet access. From the screen that opens, the update file provided by the TR7 Support Team (.tar.gz or .zip, at most 200 MB) is selected and the blacklist IPv4/IPv6 addresses are applied to the device.
Distribution
On the Settings → General Settings → IP Intelligence & Reputation → Distribution tab, the geographic and network-type distribution of the merged blacklist is visualized. The distribution data is recalculated automatically every time the blacklist content changes; the Calculated stamp on the right below the summary cards shows the time of the last calculation. If the distribution has not been calculated yet or the blacklist is empty, the message "No blacklist distribution to show yet." is displayed on the screen.
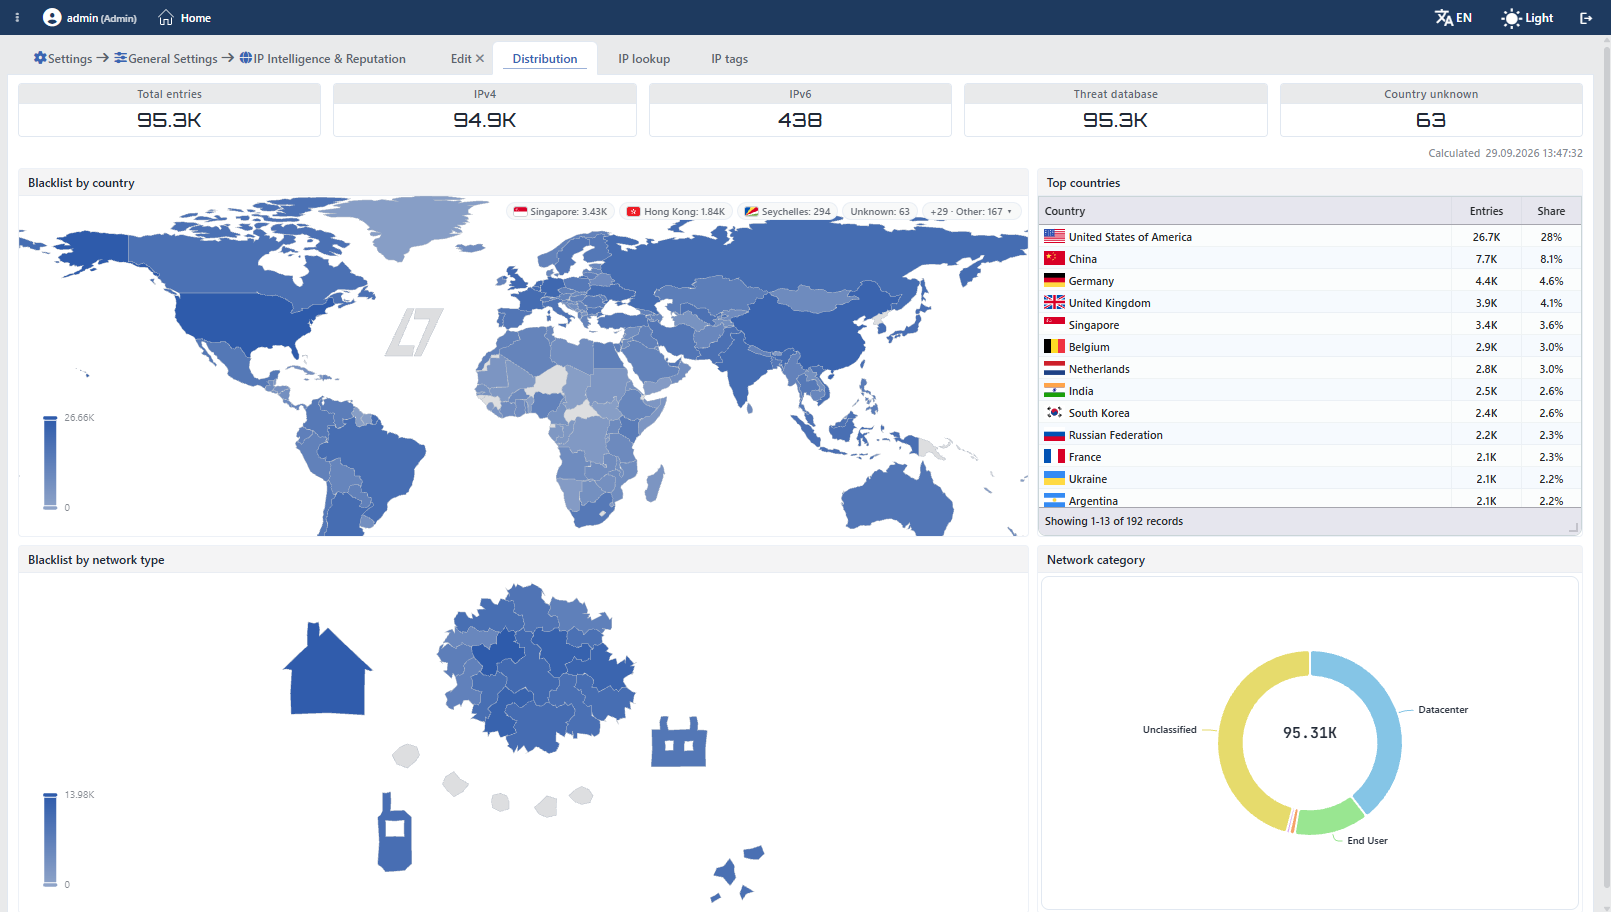 The Distribution Tab
INFO
Summary Cards
In the upper part of the screen there are the cards that summarize the composition of the blacklist. The numbers on the card are in abbreviated form (e.g. 67.6K); when they are hovered over, the full number and the description of the card are displayed.
The cards are conditional: every card appears only if its counter is greater than zero. For this reason the card set on the screen changes according to the blacklist content of the device; the table below is the full catalog of the possible cards:
| Card | Description | Visibility Condition |
|---|---|---|
| Total Entries | The total number of records on the blacklist; the records exempted with the Whitelist are not counted | If there is at least one record on the blacklist |
| IPv4 / IPv6 | The breakdown of the records according to the IP version | If there is a record in the related IP version |
| CIDR | The records that are a CIDR block; a block is counted as a single record, not as the number of addresses it covers | If at least one CIDR block has been entered manually into Blacklist Content (blocks on the Whitelist are not counted) |
| Threat Database | The records coming from the TR7 threat database | If an online or offline database update has been done |
| Added Manually | The records added manually on the device (Blacklist Content) | If there is at least one record in Blacklist Content |
| External Feed | The records retrieved from the defined external sources (External Sources) | If an IP has been retrieved from at least one external source |
| Local Networks | The local/private network addresses; they do not carry country information | If there is a local/private network address on the blacklist |
| Country Unknown | The addresses that have no equivalent in the country database and cannot be placed on the map | If there is an address whose country cannot be resolved |
INFO
Blacklist by Country
It is the world map that shows the density of the blacklist records by country. The density is shown with a color scale; the map can be zoomed in and panned. The countries that cannot be drawn on the map (small countries, local networks, addresses whose country is unknown) are shown with badges at the top edge of the map: the four with the most records as separate badges, and the rest collected in the Other badge that opens when clicked (e.g. +29 · Other: 167).
INFO
Top Countries
It is the table of the countries that host the most blacklist records. It consists of the Country (the flag and the country name), Entries (the number of records) and Share (the percentage share in the total) columns; the table is sorted according to the number of records.
INFO
Blacklist by Network Type
It is the thematic map that shows the distribution of the blacklist records according to the network type groups (e.g. hosting, ISP, mobile). For details about the network type groups, the Network Type Group page can be looked at.
INFO
Network Category
It is the donut chart that shows the distribution of the records according to the network category; the total number of records is written in the middle of the ring. The records that cannot be classified in the network type database are shown as a separate Unclassified slice; the chart does not give the impression that the whole of the blacklist is classified. For details about the network categories, the Network Type Category page can be looked at.
IP Lookup
By following the path Settings → General Settings → IP Intelligence & Reputation → IP Lookup, the location, the blacklist status and the other reputation information of an IP address can be queried.
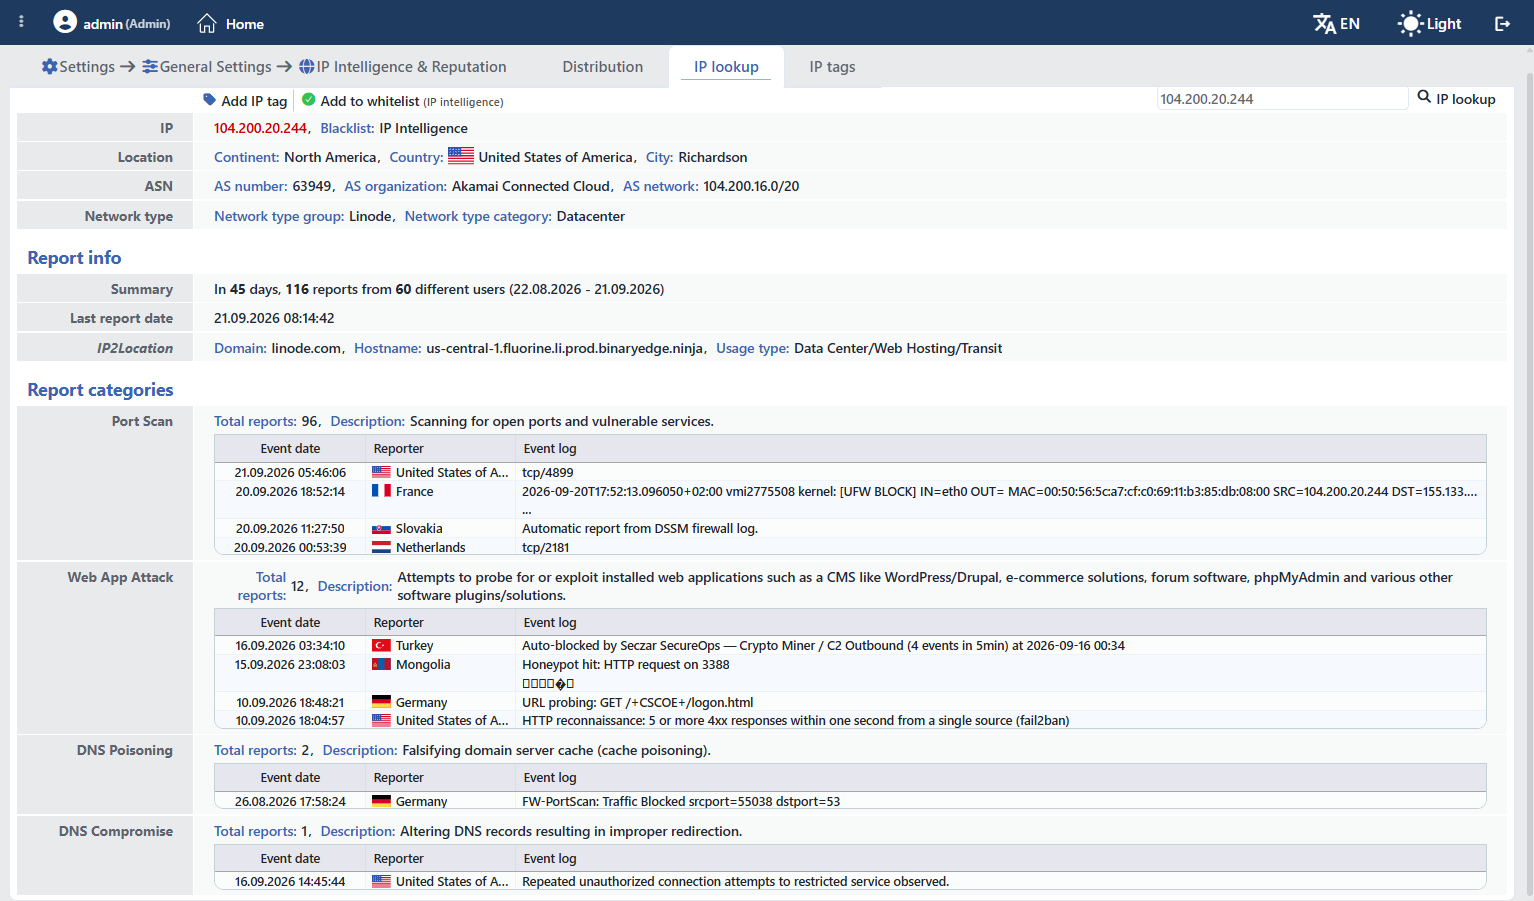 The IP Lookup Tab
INFO
IP Lookup
The IP address to be queried is entered into the box that reads Enter IP and the IP Lookup button is clicked or the Enter key is pressed; while typing, at most 25 autocomplete suggestions from the records on the blacklist that start with the typed text are offered. A CIDR block can also be entered into the search box; the block is opened address by address (at most 128 addresses) into separate result cards.
In the result, the geographic location information (continent / country / city), the ASN information, the network type, the blacklist status and its source (IP Intelligence / User) of the related IP and, if there are any, the threat categories are displayed. In the query, an exact IP match is looked for first; if it is not found, the most specific CIDR record that covers the address is taken into account; the result is exactly the same as the decision applied to the traffic.
With the buttons on the result card, the related IP is added to the Blacklist / Whitelist or removed from the list, according to its state. The buttons are named Add to Blacklist (IP Intelligence), Remove from Blacklist (IP Intelligence), Add to Whitelist (IP Intelligence) and Remove from Whitelist (IP Intelligence); the note in parentheses states that the operation is written to the general list applied to all vServices. An address added to one list is removed from the other list. Every operation is applied after a confirmation question with the IP address: <ip> (<country>) line below it:
| Button | Confirmation Question |
|---|---|
| Add to Blacklist (IP Intelligence) | "Add this address to the blacklist on every service?" |
| Remove from Blacklist (IP Intelligence) | "Remove this address from the blacklist?" |
| Add to Whitelist (IP Intelligence) | "Add this address to the whitelist, ahead of every blacklist?" |
| Remove from Whitelist (IP Intelligence) | "Remove this address from the whitelist?" |
The records coming from the TR7 threat database cannot be removed from the list; these addresses can only be exempted by being added to the Whitelist. In this case the Add to Whitelist (IP Intelligence) entry appears at the top of the card and the note next to it states which list the exemption will be written to.
The first of the buttons at the top of the card is Add IP Tag. The same button is also found in the information window that opens when an IP address is clicked on the log screens; on vService-scoped screens it comes after the Blacklist/Whitelist buttons of the vService. When the button is clicked, the IP Tag add form opens in a window with the queried address already written in the Address field; the cursor is placed directly in the Tag field and only this field is filled in. If a tag that belongs exactly to the queried address already exists, the button is named Edit IP Tag and opens the edit form of that tag; a tag of a network block that only covers the address does not change this. Since a tag does not affect the traffic, the button does not ask a confirmation question.
INFO
The Top Part of the Result Card
The identity information of the queried address is summarized in the following rows:
| Row | Its content |
|---|---|
| IP | The queried address and, if there is one, the Blacklist source (e.g. IP Intelligence) |
| Tags | The IP Tags that match the address; each tag is shown in a separate pill with its name and address, the most specific one first. Displayed only if at least one tag matches the address |
| Location | The continent, the country (with its flag) and the city |
| ASN | The AS number, the AS organization and the AS network the address belongs to |
| Network Type | The network type group and the network category (e.g. Datacenter) |
INFO
Report Info
It is the summary of the reports collected about the address. The Summary row gives in how many days, how many reports, from how many different users came and the date range these reports cover. The Last Report Date shows the time of the last report, and the IP2Location row shows the domain name, the host name and the usage type (e.g. Data Center/Web Hosting/Transit) information of the address.
This section is displayed only when there is a report record about the address.
INFO
Report Categories
It is the section where the reports are separated according to the threat category. For every category the total number of reports (Total Reports) and the description of the category are written; in the table below it the reports are listed one by one:
| Column | Its content |
|---|---|
| Event Date | The date and time the report was received |
| Reporter | The country of the party that sent the report (with its flag) |
| Event Log | The free-text description left by the party that sent the report |
Event Log content is written by the party that sends the report; its format changes from source to source and it is not verified data. An address may have been reported in more than one category; the categories are sorted according to the number of reports.
IP Tags
IP Tags defines the names that the operator gives to single IP addresses and network blocks (CIDR) (e.g. Admins, Servers, VPN Pool). The tags are displayed next to the address in the logs and on every screen that shows IP information; in this way, who a source IP in a log row belongs to is understood without having to know the address by heart, and the logs are filtered by tag.
Tags are for display only: the traffic processing engine does not read the tags. Defining or deleting a tag does not change whether any request is blocked or allowed or whether a rule matches; it is independent of the blacklist and the whitelist.
How to Add an IP Tag?
A new IP Tag is added via the TR7 web management interface with the following steps:
- The Configuration Menu is opened by clicking the TR7 logo at the bottom left.
- The steps Settings → General Settings → IP Intelligence & Reputation → IP Tags → Add are followed.
- A unique and descriptive name is entered for the tag.
- The single IP address or network block to be tagged is entered.
- The tag is added by clicking the
Addbutton.
The same form also opens with the Add IP Tag button on the IP Lookup result card; in this case the address field comes already filled in.
The created tag is used on all the log and monitoring screens where the address is displayed (see IP Tags Usage).
IP Tags Listing Screen
By following the path Settings → General Settings → IP Intelligence & Reputation → IP Tags, the list of all IP tags defined on the TR7 device is reached. Tag add, edit and delete operations are performed from this screen.
 IP Tags Listing Screen
By default the table opens with these columns:
| Column | Description |
|---|---|
| Tag | The name of the tag. |
| Address | The single IP address or network block that the tag covers; shown in the standard notation it was converted to while saving. |
| Description | The description of the tag; the full text of a long description is displayed when hovering over the cell. If no description is entered, the cell shows -. |
There is no column hidden by default; these three columns are in the column selector. Clicking a row does not open a preview panel.
The items on the toolbar are placed from left to right in the following order; the last two items (Page Information and Page Size) are in the information strip below the table.
Columns
Which columns are shown in the table is selected; all three columns are open by default. In the same panel the columns are reordered by dragging and an alignment is selected per column; with the Fit rows to the page button the row height is fitted to the page, and with the Reset button the column layout is set back to the default. When the width badge next to a manually widened column is clicked, the column returns to automatic width.
Export
By clicking the Export button, the table is exported as Excel, CSV or PDF. In the window that opens, the Filename, Format and Data Source and the Columns to export are set; the remaining fields are displayed according to the format: CSV Separator for CSV, Excel Sheet Name for Excel, Page Orientation and Page Size for PDF.
Add
By clicking the Add button, the form to create a new tag opens in the New IP Tag tab.
Edit
By clicking the Edit button, the edit form of the selected tag opens in a separate tab whose title contains the name of the tag (e.g. Edit "Admins"). The button is enabled only when a single tag is selected. The edit tabs of different tags can be kept open at the same time.
Delete
When one or more tags are selected and the Delete button is clicked, the related tags are deleted. Before deleting, the "Are you sure?" confirmation is requested.
WARNING
Tags are not written into the log records; when the log screens are opened they are resolved against the tag list of that moment. For this reason a deleted tag is no longer displayed in the past log rows either; in the same way, when the name or address of a tag is changed, the old log rows are shown according to the new definition. The delete operation is written to the user operation log.
Search
Used to search in all the information in the table.
RegExp Search
Used to search in all the information in the table with a regular expression (RegExp).
Column Based Search
Used to search column by column in the information in the table.
Page Information
Contains information about the total number of defined tags and the number of tags displayed in the list: Showing N-M of T records and the number of selected tags (N selected, Nothing selected when there is no selection).
Page Size
The maximum number of tags to be displayed on the page is selected. The default is 100; the options are 5, 10, 20, 50, 100, 200, 500 and All.
Right-Click Menu
When a row is right-clicked, a menu opens whose title contains the name of the tag. Both operations in the menu apply only to the right-clicked tag; a selection made in the list does not affect the menu.
| Operation | What it does |
|---|---|
| Edit | Opens the edit form of the tag in a separate tab; it is the same form that the Edit button on the toolbar opens. |
| Delete | Deletes the right-clicked tag; the same confirmation question as the delete on the toolbar is displayed. |
IP Tag Add Form
By following the steps Settings → General Settings → IP Intelligence & Reputation → IP Tags → Add, a new IP tag is added on the TR7 device.
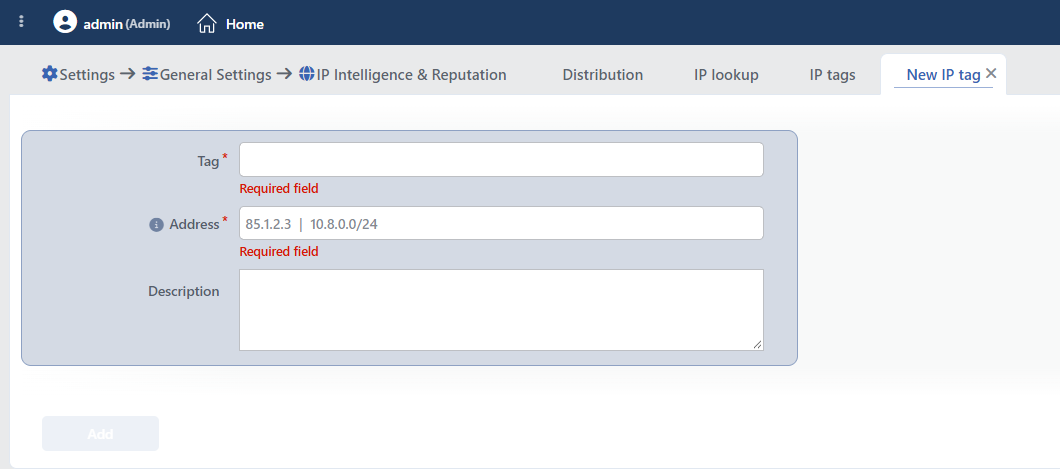 IP Tag Add Form
INFO
Tag Required
The name of the tag to be displayed in the logs and on the IP information cards is entered. While the field is empty, the "Required field" warning is displayed below it. It can be at most 128 characters; when this limit is exceeded, the "At most 128 characters" warning appears below the field. There is no character restriction for the name.
The tag name must be unique. The comparison is case-insensitive and leading/trailing spaces are ignored: while Admins is defined, the name admins is not accepted and the "Name is used" warning is displayed below the field.
INFO
Address Required
The address the tag will cover is entered. When hovering over the icon next to the field name, the description "A single address (85.1.2.3) or a network (10.8.0.0/24)" is displayed; the same description is also shown when the field is clicked. The empty field shows the 85.1.2.3 | 10.8.0.0/24 example and, while the field is empty, the "Required field" warning is displayed below it. IPv4 and IPv6 are supported; a single address (85.1.2.3) or a network block in CIDR notation (10.8.0.0/24) is entered. One address is entered per tag; an address range (a-b) or an address list is not accepted. For an invalid value, the "Enter an IPv4/IPv6 address or a network in CIDR form" warning appears below the field.
While saving, the address is converted to the standard notation: an address with a /32 (/128 in IPv6) prefix is stored as a single address, IPv6 addresses are brought to the compressed lowercase form, and a host address entered with a prefix is converted to the start address of the network (10.8.0.5/24 → 10.8.0.0/24).
An address is used in only one tag; since the comparison is made on the standard notation, 10.0.0.1 and 10.0.0.1/32 count as the same address. Nested network blocks, on the other hand, are free: 172.16.0.0/16 and the 172.16.101.0/24 inside it are defined with separate tags, and an address inside these blocks carries both tags.
WARNING
The form does not flag in place prefix lengths greater than 32 for IPv4 and 128 for IPv6 (e.g. 10.0.0.0/99) or an address used in another tag; these values are rejected when the Add button is clicked and the tag is not saved. If the same address is used in another tag, the "<address> is already tagged as "<tag>"" error is displayed.
INFO
Description
A description is entered for the tag. It can be at most 512 characters; when this limit is exceeded, the "At most 512 characters" warning appears below the field. The description is displayed when hovering over the tag pill in the logs; if no description is entered, the address of the tag is shown on the pill.
INFO
Add
The tag add operation is completed by clicking the Add button. The button stays disabled as long as the form has an invalid or empty required field. After saving, the form tab closes and the IP Tags list is shown again. In the edit form the button is named Edit.
How It Works
INFO
- Matching: For an IP address, first the exact address tag and then all the network block tags covering the address are found. If the address matches more than one tag, all of them are shown; the order is from the most specific to the widest (a
/24tag comes before a/16tag). IPv4 tags apply only to IPv4 addresses, IPv6 tags only to IPv6 addresses. - Resolution at display time: Tags are not written into the log records; they are matched against the tag list of the moment the screen is opened. A newly defined tag immediately appears in the past log rows too; a deleted or changed tag is reflected in the past rows as well.
- No effect on traffic: Tags are not used in blocking, the whitelist, conditions, WAF rules or notifications; they are only for display and log filtering.
- Cluster: The tag list is automatically synchronized with the other TR7 device.
- Logging: Add, edit and delete operations are written to the user operation log in the form
IP tag "<name>" (<address>) is created,… is editedand… is deleted.
Scope and Limits
INFO
- At most 1000 tags are defined on the device; when the limit is exceeded, the save is rejected with the "At most 1000 IP tags can be defined (N given)" error.
- The tag name can be at most 128 characters and the description at most 512 characters.
- Each tag covers a single address or a single network block; the same address cannot be used in two tags.
- Tag add, edit and delete operations are performed by users that have modify permission in the Settings area.
IP Tags Usage
Tags are used on the screens where the IP address is shown with its information cell. The icon is displayed next to a tagged address; when hovering over the icon, the tag names are listed. If the address does not carry a Blacklist or Whitelist status color, it is written in the tag color. In the information window that opens when hovering over the address, the Tags row shows each tag in a separate pill with its name and address. When the address is clicked, a window that contains the same information and also holds the Add IP Tag button opens.
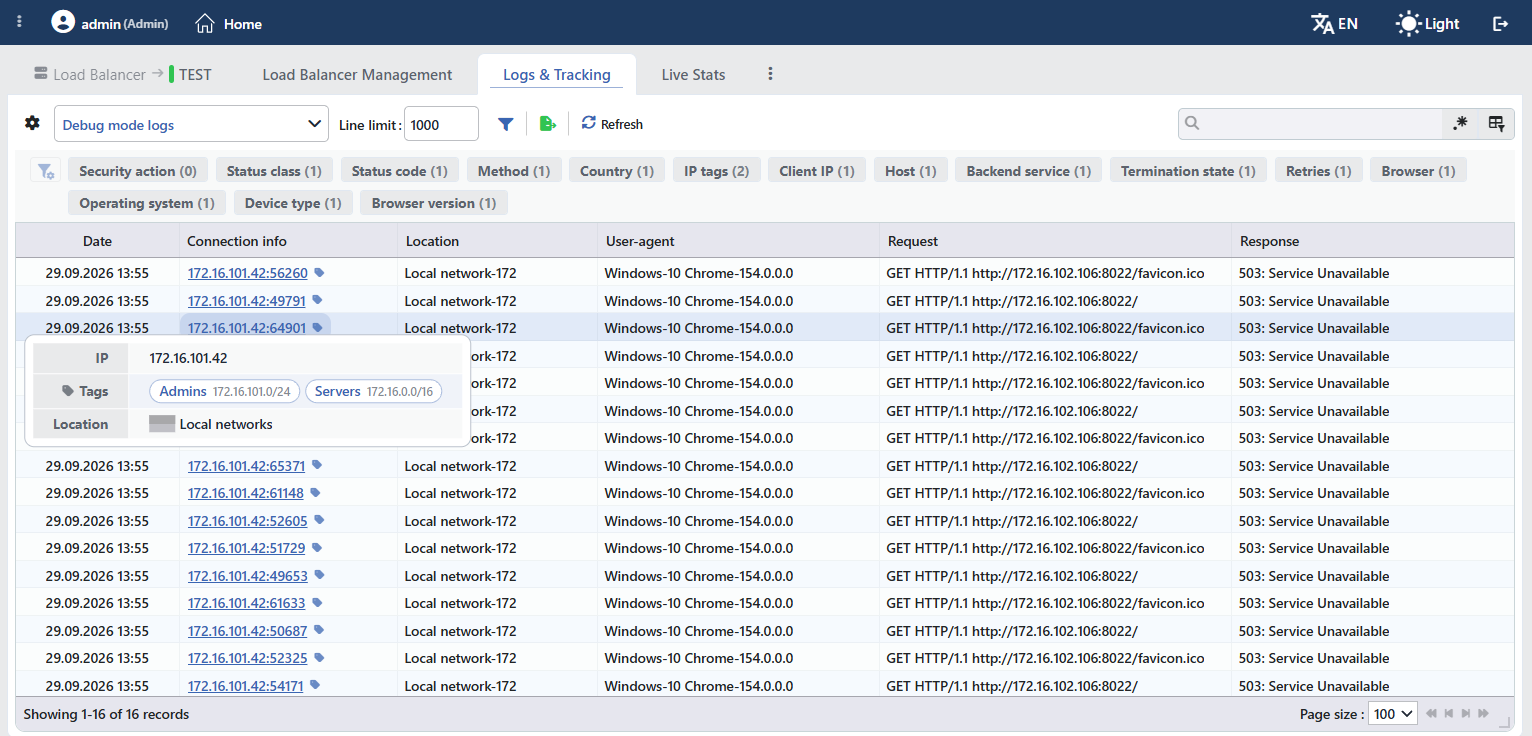 IP Tags on the Load Balancer Logs & Tracking Screen
The filter strip of the log screens has the IP Tags card. The card lists not all defined tags but the tags that match the addresses in the rows loaded on the screen; if the loaded rows contain an untagged address, the No Tags option is added too. For this reason the number next to the card can be lower than the number of defined tags. When a tag is selected, all rows whose address matches that tag are shown; in nested blocks, when the tag of the wide block (e.g. /16) is selected, the rows that also carry the tag of a narrower block stay in the list.
The main screens where the tags are displayed:
| Screen | Tag Display | IP Tags Filter |
|---|---|---|
| Load Balancer vService Logs & Tracking (Access and Debug Mode Logs) | Yes | Yes |
| WAF Event Logs | Yes | Yes |
| Bot/DDoS Event Logs | Yes | Yes |
| L4 DDoS Dashboard quarantine table and Quarantine history | Yes | Yes |
| Load Balancer Live Stats source list | Yes | No |
| User Logs (the IP the user connected from) | Yes | Yes |
| AGS session, audit and lockout records | Yes | Yes |
| Load Balancer vService Sessions | Yes | No |
| WAF AI Learning & Teacher Tracking preview | Yes | No |
| L4 DDoS Whitelist & Known Peers lists | Yes | No |
| Device Users session list | Yes | No |
