
Smarter by Design.Simpler for Business
Express Profiles (DNS Integration)
What Is an Express Profile?
Express Profile is a reusable client configuration that makes it possible for a zone on an existing DNS server to be pulled to TR7 GTM with Zone Transfer (AXFR): the master DNS server addresses from which the records will be taken and an optional record name pattern (IDENTIFIER PATTERN). The profile works with every DNS server that offers a standard zone transfer; it does not contain an API integration specific to the cloud DNS providers.
A profile does nothing on its own. When it is assigned to a data center row in the domain name form, the record management of that data center turns from Local (the records are entered manually on TR7) to Express: TR7 pulls the zone from the master and creates the incoming records as DNS records under the domain name. The management of the records stays on the master server; TR7 refreshes them with the NOTIFY notification coming from the master or with the Sync via Express operation.
AXFR
Transfer method
A standard zone transfer; it is used without the existing DNS server being changed
NOTIFY
Refresh trigger
When the master sends a notification or with Sync via Express; there is no timer
10
Master address
The addresses are tried in order; the first successful transfer is used
Pattern
IDENTIFIER PATTERN
Selecting according to the record name and removing the suffix; one master, many data centers
Data center
Assignment level
Every data center row of the domain name can be Express or Local separately
Cluster
The place of work
Only the primary device makes the transfer; the profiles are transferred to the peer device
How does it work?
- The profile is bound to the domain name by marking and selecting the EXPRESS box of a data center row in the Domains form.
- The transfer starts when the master server makes a change in the zone and sends a NOTIFY to TR7 (only the notifications coming from the addresses in the profile are accepted) or when the operator clicks Sync via Express on the record tab.
- In Sync via Express the master addresses in the profile are tried in order and the first successful transfer is taken; in NOTIFY the transfer is made only from the master that sent the notification. The record names are selected and converted with the IDENTIFIER PATTERN.
- The record list of the data center is rewritten according to the zone on the master; the additions, changes and deletions are written into the Express Logs.
The precondition
The master DNS server must allow the zone transfer request coming from the front-end IP address of the TR7 DNS service; the transfer is made from the service front-end address in the same network as the master, and if there is no such address, from the first cluster VIP. The master must send a NOTIFY to one of the front-end addresses of the service in the changes; if no NOTIFY is sent, TR7 does not refresh the zone by itself and the refresh is done only with Sync via Express.
When Is It Used?
- In the structures in which the DNS records must continue to be managed over an existing DNS server (Active Directory DNS, BIND, etc.),
- When it is desired that the health scenario and data center based routing capabilities of TR7 GTM are added to the existing zone,
- When more than one data center must pull its own record subset from the same master zone with the IDENTIFIER PATTERN,
- When some of the data centers in the same domain name must be managed as Express and some as Local.
Operational Best Practices
- The transfer permission and the NOTIFY must be configured together on the master server. Without the transfer permission, the synchronization fails with AXFR failed; without the NOTIFY, the changes are not reflected to TR7 by themselves.
- More than one master address must be defined. The addresses are tried in the order in which they were defined and it is stopped at the first successful transfer; when the primary master becomes inaccessible, the next address comes into play.
- The record changes must be made on the master server. Every synchronization rewrites the record list of the data center according to the zone on the master; the record changes made on TR7 are corrected according to the master at the next transfer.
- The IDENTIFIER PATTERN must be used in the multi-data-center structures. The sub-labels such as
dc1./dc2.in the same master zone are selected with a separate pattern in the profile of every data center and reduced to a common record name. A token in the pattern takes only the matching records; the rest of the zone (the apex records, NS, MX, etc.) is not taken to that data center. - The references must be reviewed before deleting a profile. The deletion returns the data centers that use the profile to Local management without a warning; the pulled records stay in place but are no longer refreshed.
- The results and the errors must be monitored from the Express logs. The start, the success, the failure of the transfer and the record changes are listed in the Express Logs window on the record tab of the domain name; the own Log tab of the profile shows only the adding / editing / deleting operations.
How to Add?
A new Express Profiles profile is added through the TR7 web management interface with the steps below:
- The Configuration Menu is opened by clicking the TR7 logo at the bottom left.
- The GTM → Express Profiles (DNS Integration) → Add steps are followed.
- A unique and descriptive name is entered for the profile.
- The servers on which the zone transfer will be made are written into the Master Addresses list; if necessary, the IDENTIFIER PATTERN pattern is entered.
- The profile is added by clicking the
Addbutton.
TIP
Reaching the page via quick search
Instead of navigating the menu step by step, the related page is reached directly by using the search bar in the bottom left corner of the screen. The search bar opens with the Alt + T shortcut on Windows and Opt + T on macOS; typing the name of the feature being searched for is then sufficient.
The created profile can be used in the data center row of one or more domain names. The same form is also opened in a separate window from the Add option of the profile selector in the domain name form; the saved profile is assigned directly to that data center row.
Express Profiles Listing Screen
By following the GTM → Express Profiles (DNS Integration) path, the list of all the Express profiles added on the TR7 device is reached. Profile adding, editing and deleting operations are performed through this screen.
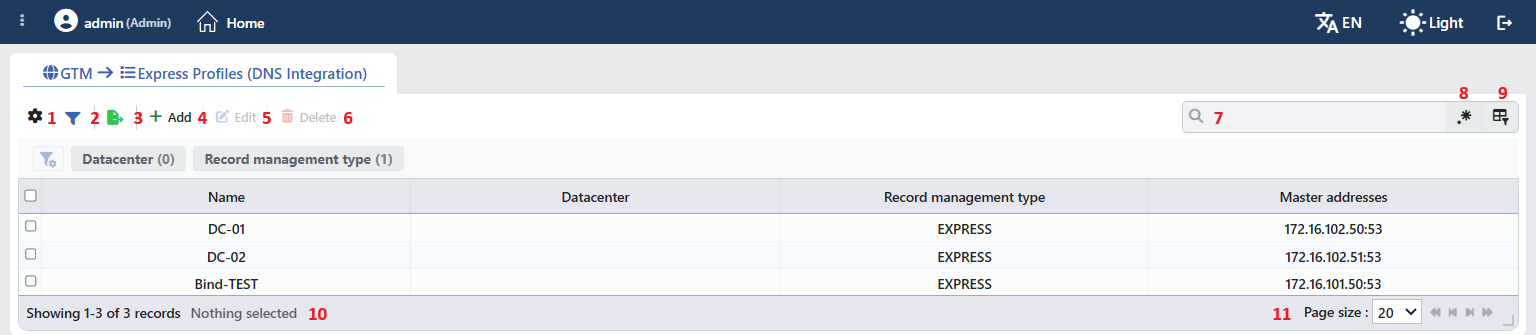 Express Profiles Listing Form
The table opens with the following columns by default:
| Column | Description |
|---|---|
| Name | The name of the profile. |
| Datacenter | It appears empty. The profile is assigned to a data center not here but in the data center row in the domain name form. |
| Record Management Type | The record management type: EXPRESS. |
| Master Addresses | The master addresses in the ip:port, ip:port form. |
There is no column hidden by default; these four columns are in the column selector. The table is not sorted by default (the profiles are listed in the order in which they were added); when a column header is clicked, descending sorting is applied first, then ascending, and on the third click the sorting is removed. The profiles do not have a working status; there is no status column or status circle on this screen.
The items in the toolbar are arranged from left to right in the following order; the last two items (Page Information and Page Size) are located in the information strip below the table.
Columns
Which columns are shown in the table is selected; all four columns are on by default. In the same panel, columns are reordered by dragging and alignment is selected per column; the row height is fitted to the page with the Fit rows to the page button, and the column layout is reset to default with the Reset button. When the width badge next to a manually widened column is clicked, the column returns to the automatic width. The layout is stored per user.
Filter
The Filter button is used to filter the profiles shown in the list according to certain criteria. When the button is clicked, the filter strip above the table opens and closes; the strip comes open when the screen opens and the button shows the number of active filters with a badge. There are two cards in the strip: Datacenter and Record Management Type; the number in the parentheses in the card title shows not the number of selected filters but the number of distinct values that have at least one row in the list. In the cards the values seen in the list are listed with their row counts and more than one value can be selected together; the Datacenter card stays empty since the profiles do not have a data center value. The card layout is stored per user and the cards are sorted by being dragged.
Export
The table is exported as Excel, CSV or PDF by clicking the Export button. In the window that opens, the Filename, Format and Data Source, together with the Columns to be exported, are determined; the remaining fields are displayed according to the format: CSV Separator for CSV, Excel Sheet Name for Excel, and Page Orientation and Page Size for PDF.
Add
By clicking the Add button, the form for creating a new profile opens in the Add tab.
Edit
By clicking the Edit button, the editing form of the selected profile opens in the Edit tab. The button becomes enabled only when a single profile is selected. The editing form is the same as the add form; all the fields can be changed and the change is saved without asking for confirmation. The data centers that use the profile use the new addresses and the pattern at the next transfer; the NOTIFY senders that the domain names accept are also updated according to the new addresses.
Delete
When one or more profiles are selected and the Delete button is clicked, the related profiles are deleted. Before deleting, the "Are you sure?" confirmation is asked. The button is passive while there is no selection.
WARNING
A profile that is in use can also be deleted and the confirmation window does not show in which domain names the profile is used; before deleting, the Used in tab on the preview panel must be checked.
The data centers that use the deleted profile return to the Local management without a warning: the EXPRESS box of that row stays marked in the domain name form and the selector shows the Select an option warning until a new profile is selected. The records pulled before stay in place in the domain name and can now be edited manually; however, they are not refreshed and the NOTIFY notifications coming from the old master are not accepted. The deletion is written into the user operation record as a separate line for every profile.
Search
Used to search all information in the table.
RegExp Search
Used to search all information in the table with a regular expression (RegExp).
Column Based Search
Used to perform a column-based search on the information in the table; a separate search line opens for every column and next to every box there are the Negate button that reverses the result and its own RegExp switch.
Page Information
Contains information about the total number of defined profiles and the number of profiles displayed in the list: Showing N-M of T records and the number of selected profiles (N selected, or Nothing selected when there is no selection). While a filter is active, the number of applied filters and the number of shown rows are also written.
Page Size
The maximum number of profiles to be displayed on the page is selected. The default is 20; the options are 5, 10, 20, 50, 100, 200, 500 and All. With the arrow icons next to it, the pages are switched between.
Right-Click Menu
When a row is right-clicked, a menu with the profile's name in its title opens. Both operations in the menu apply only to the right-clicked profile; a selection made in the list does not affect the menu.
| Operation | What it does |
|---|---|
| Edit | Opens the editing form of the profile in the Edit tab; it is the same as the form opened by the Edit button in the toolbar. |
| Delete | Deletes the right-clicked profile; the same confirmation question as the deletion in the toolbar is displayed. |
Preview of the Selected Profile
When a row in the list is clicked, the preview of the profile opens on the right of the screen; when the selected row is clicked again, the panel closes. In the title there are the name of the profile and the Express Profile subtitle, and at the top right there are two operations; a status circle does not take place.
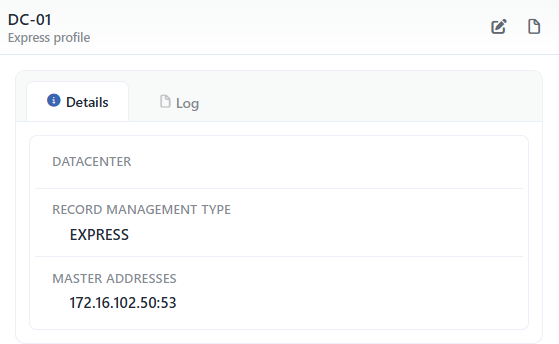 Preview of the Selected Profile
| Operation | What it does |
|---|---|
| Edit | Opens the editing form of the profile in the Edit tab. The same form is also opened with the Edit button in the toolbar and with Edit in the right-click menu of the row. |
| Log | Opens the user operations (adding, editing, deleting) that belong to the profile in a window, without leaving the page. |
The panel has three tabs; the last one is displayed only if there is a definition that uses the profile:
Details
Lists the configuration lines of the profile (the table below).
Log
Lists the user operations performed on the profile as a timeline. The transfer events appear not here but in the Express logs window of the domain name.
Used in
Lists the domain names that select the profile in a data center row; the badge next to the tab name shows the number of usages. When a row is clicked, it is passed to the related definition.
The rows in the Details tab are as follows, in order:
| Row | Description | Visibility condition |
|---|---|---|
| Datacenter | It appears empty. | Always |
| Record Management Type | EXPRESS. | Always |
| Master Addresses | The master addresses in the ip:port, ip:port form. | Always |
| IDENTIFIER PATTERN | The record name pattern. | If the pattern is filled |
The same preview also opens when the EXPRESS badge in the DNS record form of the records that change according to the data center is hovered over (only if a profile is assigned to the row).
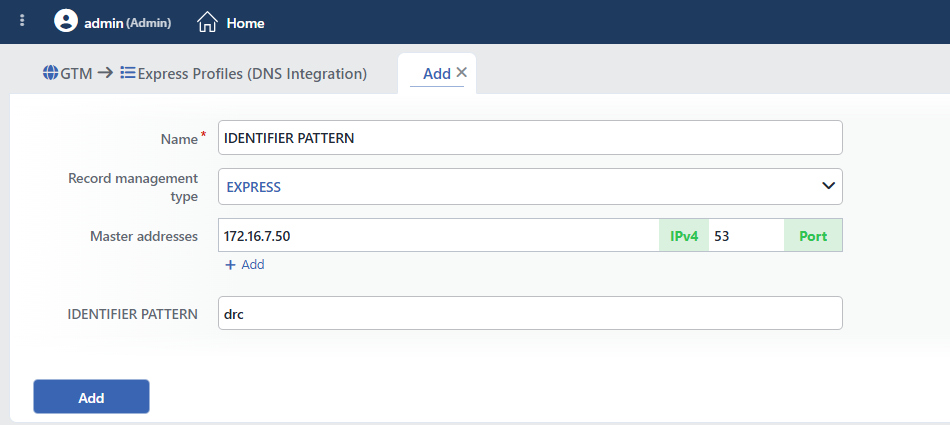
Profile Add Form
A new Express profile is added on the TR7 device by following the GTM → Express Profiles (DNS Integration) → Add steps.
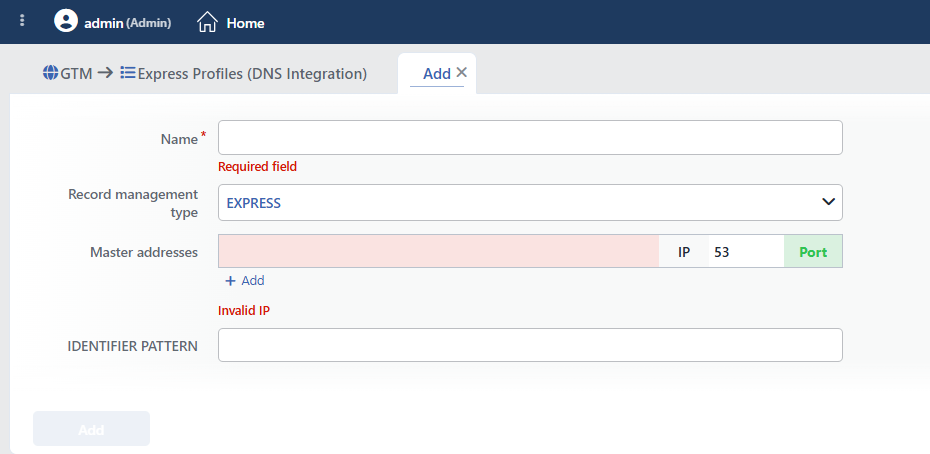 Express Profile Add Form
INFO
Name Required
The name of the profile is entered. The name identifies the profile in the list, in the profile selector in the domain name form (in the <name> (EXPRESS) form) and in the user operation record. The same name can be used in more than one profile; giving a distinctive name is recommended.
INFO
Record Management Type Default: EXPRESS
The record management type; there is a single option in the list and it comes selected: EXPRESS (pulling the records from the master with a zone transfer).
INFO
Master Addresses
The master DNS servers on which the zone transfer will be made are defined. The list opens with one empty row whose port is 53; in every row there are the IP address box of the server (IPv4 or IPv6; a domain name is not accepted) and next to it the badge that says IPv4 / IPv6 when a valid address is entered, and then the port box and the Port badge. With the Add button with the plus icon, at most 10 rows are added (at the limit the button becomes passive); while there is more than one row, the rows are sorted by being dragged from their handle and the last row cannot be removed. The same address and port pair cannot be defined more than once; an invalid address or port prevents the form from being saved.
In the Sync via Express and Zone Transfer operations the addresses are tried in the order in the list and it is stopped at the first successful transfer; the next addresses are used only when the previous ones fail (sequential redundancy). The transfer triggered with NOTIFY, on the other hand, is made only from the master that sent the notification. A domain name accepts the NOTIFY notifications coming from the master addresses of all the Express profiles bound to that domain name; changing the addresses in the profile changes this list as well.
INFO
IDENTIFIER PATTERN
The pattern that makes it possible for the records pulled from the master to be selected according to their name and for their names to be converted; it does not limit the transfer itself, the zone is always pulled in its entirety and the pattern is applied to the incoming records. When it is left empty, all the records are taken without their names being changed. The SOA record is not affected by the pattern. The record names are relative to the domain name (www.dc1.example.com → www.dc1) and the tokens are compared with the name exactly; the comparison distinguishes between uppercase and lowercase.
One or more comma-separated tokens are entered; the tokens are applied in order and the evaluation ends at the first token that drops a record:
| Token | Effect |
|---|---|
dc1 | Only the records whose name is dc1 or that end with .dc1 are taken and the .dc1 suffix is removed from the name (www.dc1 → www; dc1 → the domain name itself). All the records that do not match are not taken (including the apex records, NS, MX and the other names). |
!dc2 | The records whose name is dc2 or that end with .dc2 are not taken; the other records pass without their names being changed. |
In a pattern that consists only of ! tokens, the records that are not excluded are taken without their names being changed.
An example: one master, two data centers
In the master zone there are the www.dc1.example.com and www.dc2.example.com records. When the dc1 pattern is entered into the profile of DC1 and the dc2 pattern into the profile of DC2, every data center takes only its own record with the name www; TR7 answers these two records for www.example.com on a data center basis. Since the other names in the zone such as mail and ftp do not carry the .dc1 / .dc2 suffix, they are not taken to these data centers; when it is desired that a data center takes everything except a certain sub-label, only an exclusion token such as !dc2 is used.
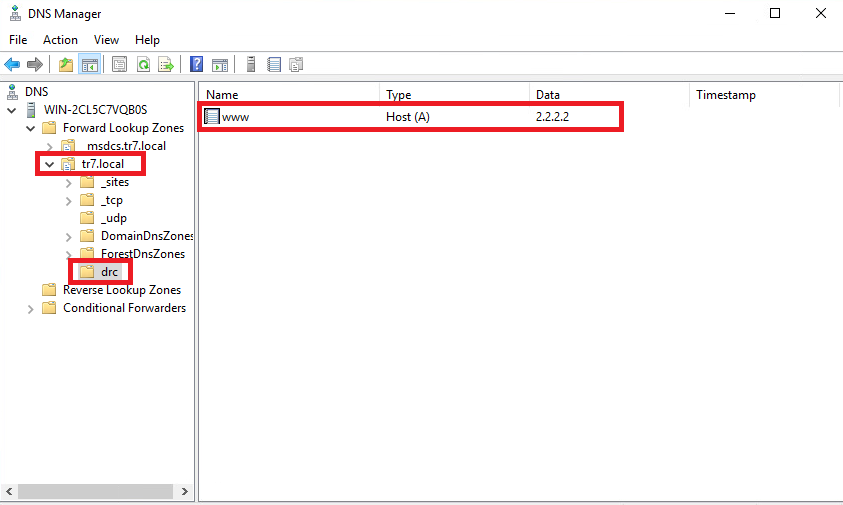 Identifier Pattern - Microsoft DNS
 Identifier Pattern - TR7
INFO
Add
The profile adding process is completed by clicking the Add button. While there is an erroneous field in the form, the button is passive; the adding does not ask for confirmation and when the record is completed, the Add tab closes. The profile does not make any transfer until it is assigned to a data center row of a domain name.
Operating Mechanism
INFO
- The triggers. There are two ways: the NOTIFY coming from the master and the Sync via Express button on the record tab. The first NOTIFY starts the transfer immediately; the following notifications that arrive within 5 seconds for the same domain name are combined and processed once more within 10 seconds at the latest. A transfer that starts with NOTIFY is made only from the master that sent the notification. There is no refreshing with a timer; if the master does not send a notification, the refreshing is done only manually.
- The cluster. In a single-device installation the device itself makes the transfer. In a cluster only the primary device makes it; if the peer device remains inaccessible for longer than one hour, the other device takes over. A transfer triggered on a device that is not the primary one is rejected with the
<hostname>is not master of GTM error. The profiles are stored together with the GTM configuration and can be used in all the DNS services without a domain name or data center distinction. - The transfer. For every Express data center of the domain name the addresses in the profile are tried in order and it is stopped at the first successful transfer; every attempt is written into the record separately. As the source address, the DNS service front-end IP in the same network as the master is used, and if there is none, the first cluster VIP; if the port is other than 53, it is specified. The answer must arrive within 10 seconds and must contain a SOA record; otherwise that address is considered AXFR failed (at most 15 seconds per address, and a total of 300 seconds is waited for Sync via Express). The records of a data center all of whose addresses fail are not touched and an error line appears in the result window.
- The application. Every incoming record name is selected and converted with the IDENTIFIER PATTERN (except the SOA). The record list of the data center is cleared and rewritten according to the zone on the master (overwriting); all the record types are taken and the SOA record of the master takes the place of the stored SOA. The mode of every record that is touched is pulled to the default mode of the domain name; the TTL of the existing records that have a TTL value is preserved, and the records that do not have a TTL and the new records are created with the TTL in the transfer (if there is more than one Express data center, that of the last processed data center); the new records are added with the All Records distribution algorithm. The records that have no content left in any data center are deleted; the SOA record is never deleted.
- The result. At the end of Sync via Express a warning window that contains one line per data center is shown: green if all of them are successful, orange if they are partially successful and red if all of them fail.
- The record (Express logs). The
<domain name><master IP>notified AXFR, for every master attempt the<domain name>-<data center>AXFR transfer initiated / succeded / failed and the<record>/<type>added / edited / deleted via AXFR lines are written with the domain name and data center information; they do not appear in the own Log tab of the profile.
Scope and Limits
INFO
- The screen requires a GTM license and full GTM authorization. The GTM tab is visible with the display authorization; this screen opens only on the users who have full authorization in the GTM area, and if there is no GTM module in the license, the Not covered by your license card is displayed.
- There is no status. The profile is only a configuration; there is no status column or circle in the list and in the preview. The transfer results are monitored from the Express Logs window of the domain name.
- Only a standard zone transfer. There is no API integration specific to the cloud DNS providers; the master is any DNS server that offers AXFR.
- The collision and record type selection are not in the profile. The profile-based synchronization always overwrites and takes all the types; these options are offered only for the Local data centers in the Zone Transfer window.
- There is no name uniqueness. A second profile that carries the same name can be saved.
- The deletion does not clean the dependencies. The data centers that use the profile silently return to the Local management; the related domain names must be reviewed after the deletion.
- The logs. The user operations are monitored in the Log window on the preview panel and on the GTM Logs screen; the transfer events are monitored in the Express Logs window of the domain name and on the GTM Logs screen.
Usage Location
The profile is assigned from the record configuration of the domain name on a data center basis; in the same domain name some data centers can be Express and some Local. The steps are done on the Domains screen:
1
Step 1 The domain name form
The related DNS service is selected in the GTM → GTM Services path; the domain name is edited on the Domains tab.
2
Step 2 EXPRESS in the data center row
The EXPRESS box in the row of the data center that will be fed with Express is marked; next to the box the profile selector appears.
3
Step 3 The profile selection
In the selector the profiles are listed in the <name> (EXPRESS) form; one of them is selected. The Add option at the end of the list lets a new profile be defined in a separate window and assigns the saved profile to the row.
4
Step 4 The save
When the domain name is saved, the data center passes to the Express management. In the DNS record form the badge next to the row says EXPRESS instead of Local Management. The first record set is pulled when a NOTIFY arrives from the master or with Sync via Express.
On the record tab, two buttons are visible for a domain name that has an Express data center:
| Button | Function |
|---|---|
| Sync via Express | It starts the transfer immediately; the result is shown in a warning window with success / failure lines per data center. |
| Express Logs | It lists the notification, transfer and record change events. |
In a domain name all of whose data centers are Express, the Add, Delete and Zone Transfer buttons on the record tab are not visible; the records belong to the master. The record editing stays open; however, a change made manually is rewritten according to the master at the next synchronization.
A one-time transfer (Zone transfer)
For a data center that is managed as Local, the Zone Transfer button on the record tab makes a one-time transfer without a profile being defined. In the window there are the Datacenter (only the Local data centers), Master Addresses, IDENTIFIER PATTERN, Collision Decision (Keep Current Records [the default] / Overwrite / Combine Records) and Record Types to Retrieve fields. In the profile-based synchronization these two options are not present: the profile always overwrites and takes all the record types.
