
Smarter by Design.Simpler for Business
RADIUS
What Is RADIUS?
RADIUS is the Authentication Providers type that verifies the username and the password the user writes in the login form on a RADIUS server (such as Microsoft NPS, FreeRADIUS and multi-factor authentication servers). The connection settings (the address, the port, the shared secret) are taken from a RADIUS server profile on the Authentication Servers screen.
How does it work?
- A server profile with the RADIUS protocol is defined on the Authentication Servers screen; TR7 is registered as a client on the RADIUS server.
- RADIUS is selected as the Provider Type on this screen; the server and the verification type are entered.
- The profile is added to the access flow as an Authentication Provider step after the login form.
- The username and the password are sent to the RADIUS server; if the server accepts them the flow continues from the success transition, and if it rejects them, from the fail transition.
Operational Best Practices
- The verification type the same as the server. RADIUS Authentication Type must be selected the same as the method allowed on the RADIUS server.
- The attributes are mapped manually. There is no automatic attribute mapping in this type; the No automatic mapping for this provider - every attribute has to be mapped below information is displayed in the User Attribute Mapping section in the form. If information such as the e-mail or the group is required, it must be mapped with Custom User Attribute Mapping.
- The lockout. In this type, which verifies a password, Account Lockout Policies must be assigned.
How to Add?
A new RADIUS provider is added through the TR7 web management interface with the following steps:
- The Configuration Menu is opened by clicking the TR7 logo at the bottom left.
- The AGS → Authentication → Authentication Providers → Add steps are followed.
- A unique and descriptive name is entered for the profile; RADIUS is selected as the Provider Type.
- The Authentication Server and the RADIUS Authentication Type are selected.
- The profile is added by clicking the
Addbutton.
Profile Add Form
When the AGS → Authentication → Authentication Providers → Add steps are followed and RADIUS is selected in the Provider Type field, the form opens with the following fields.
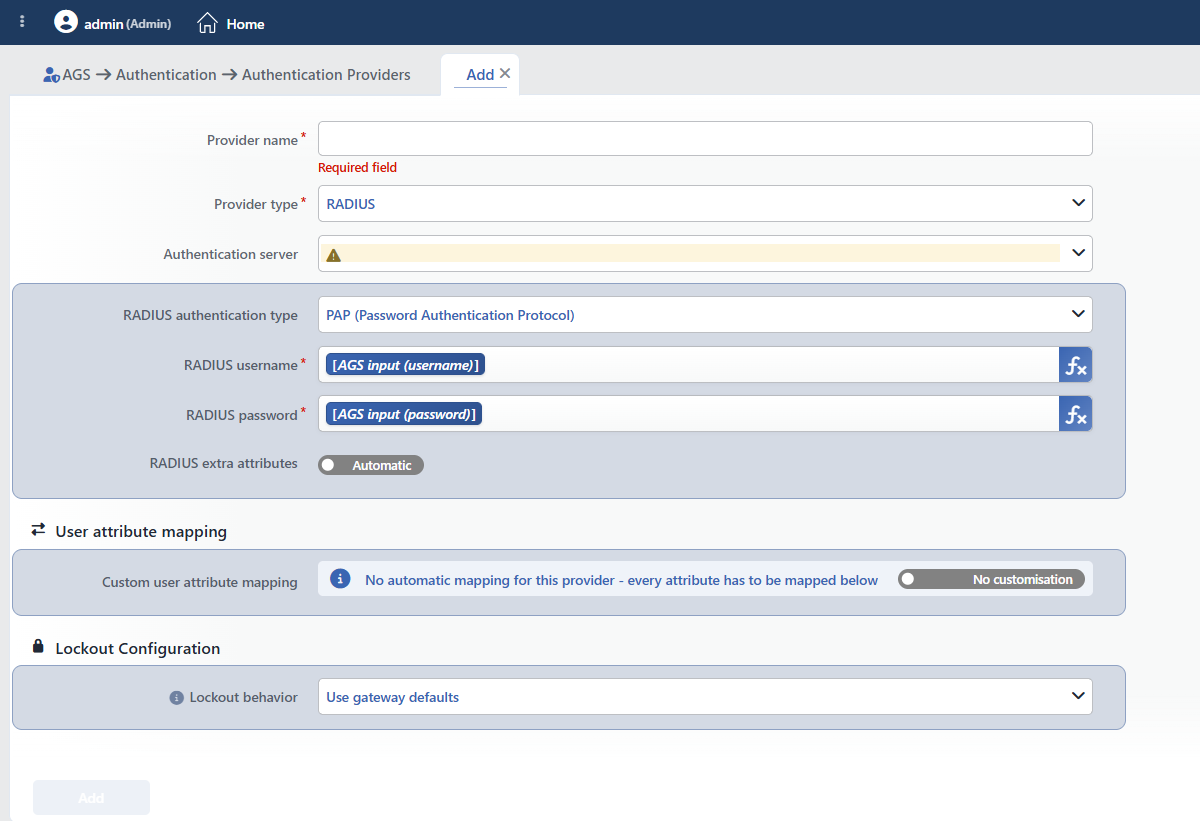 The Form While RADIUS Is Selected
INFO
Provider Name Required
The name of the profile; it identifies the profile in the list, in the step selection in the flowchart, in the session list and in the logs. The name must be unique on the device; a second profile with the same name is not saved and the Name is used warning is displayed. When it is left empty, the Required field warning is displayed.
INFO
Provider Type Required
The provider type; RADIUS is selected on this page. When the type is changed, only the fields of the new type are displayed and saved; the type is changed in the edit form as well.
INFO
Authentication Server
The server profiles on the Authentication Servers screen are listed; a profile with the RADIUS protocol must be selected. The selector does not filter by protocol, a profile outside RADIUS can also be selected and the record is accepted. If there is a defined profile, the first profile in the list comes selected; if no profile is defined at all, the field opens empty and a warning icon is displayed in the field. The field is required in the schema, but the required mark and the Required field warning are not displayed in the form. With the + Add row at the top of the list that opens, a new profile is defined without leaving the page and comes selected in the field. The route table from which the request goes out comes from the Route Table setting of the server profile selected in this field; there is no separate route table field in the form in this type.
INFO
RADIUS Authentication Type Default: PAP (Password Authentication Protocol)
How the password is carried to the RADIUS server is selected:
| Option | Meaning |
|---|---|
| PAP (Password Authentication Protocol) | The password is sent hidden with the shared secret; most RADIUS servers and directory-based back ends support it. |
| CHAP (Challenge Handshake) | A challenge-response digest is sent instead of the password itself; the server has to keep the password in a recoverable form. |
INFO
RADIUS Username Required
The username expression to be sent to the server. The field comes filled with the AGS input (username) variable (%AGS_USER_INPUT(username)), which carries the value coming from the login form; another smart variable is selected with the ƒx icon.
INFO
RADIUS Password Required
The password expression to be sent to the server. The field comes filled with the AGS input (password) variable (%AGS_USER_INPUT(password)), which carries the value coming from the login form; another smart variable is selected with the ƒx icon.
INFO
RADIUS Extra Attributes Default: Automatic
The additional RADIUS attributes to be added to the request. While the switch is in the Automatic position, no attribute list is given and the request is sent with the access engine's own defaults; when it is moved to the Choose position, the Attribute Name and Attribute Value table opens (e.g. NAS-Identifier). In the table Attribute Name is required, Attribute Value is not required and accepts a smart variable with the ƒx icon. In the Choose position the record can be saved without any row being added as well.
User Attribute Mapping
INFO
Custom User Attribute Mapping Default: No customisation
How the fields in the provider response are mapped to the session attributes is managed. There is no automatic mapping in this type; No automatic mapping for this provider - every attribute has to be mapped below is written on the information bar to the left of the field and every required attribute is mapped manually in this field.
When the switch on the right is moved to the Customised position, the AGS Attribute and Source Attribute table is displayed: the session attribute (with a suggestion list) is entered in the left column and the JSONata expression that is evaluated on the provider response in the right column. When the switch is turned on, the + Add link that adds a row appears on the right of the bar. When a name outside the standard attributes of AGS is entered, this attribute is defined as a custom user field on the vService; names that start with _ are considered hidden fields and do not produce a custom user field.
Lockout Configuration
INFO
Lockout Behavior Default: Use gateway defaults
With which lockout policies the failed attempts on this provider are counted is selected:
| Option | Meaning |
|---|---|
| Use Gateway Defaults | The policies in the Default Lockout Policies list of the vService are used. |
| Replace Defaults | Only the policies selected in the Lockout Policies field are used. |
| Add to Defaults | In addition to the default policies of the vService, the ones selected in the Lockout Policies field are used as well. |
| No Lockout | Failed attempts are not counted on this provider, no lockout is performed. |
Lockout Policies
Displayed while Replace Defaults or Add to Defaults is selected; the built-in and defined policies on the Account Lockout Policies screen are selected.
INFO
Add
The profile is added by clicking the Add button; the tab closes and the profile is displayed in the list.
