
Smarter by Design.Simpler for Business
Service Management
What Is a DNS Service?
DNS Service is an authoritative listener that meets the DNS queries on TR7. Every service accepts the queries over UDP and TCP from the defined Frontend IP addresses, on the selected vDevice and within the selected Route Table, produces an answer for the domain names it hosts and optionally offers caching, DNS forwarding (forwarder), resource limiting (QOS) and query logging.
Every DNS service is an isolated listener: its own addresses, domain names, records, cache, QOS limits and log setting belong only to itself. More than one service works side by side on one device; with QOS the processor and memory resource of every service is separated from the others.
Service Management is the screen on which these services are created, listed, edited and deleted. The domain names and the records of a service, on the other hand, are managed from the own screen of the service (the Domains and Records tabs).
Multiple Listeners
Frontend IP · Port
UDP/TCP DNS queries are met over more than one IP:Port
Forwarding
DNS Forwarder
The queries for which the service is not authoritative are forwarded to the selected forwarder profile
Cache
Cache TTL
The repeating queries are answered from the cache
Resource Separation
QOS
The services are separated from each other with the core, priority, processor and memory limits
How does it work?
- The service listens to the UDP/TCP DNS queries from the defined Frontend IP addresses.
- If the query belongs to a domain name that the service hosts, it is answered from the local records; if Cache is on, the repeating queries return from the cache.
- If the query is outside the hosted domain names and a DNS Forwarder profile is assigned to the service, the query is forwarded to the servers in the profile. If no profile is assigned, no forwarding is done.
- If Log is on, the queries are recorded; if QOS is on, the resource usage of the service is kept within the defined limits.
The Basic Features of the DNS Service
| Feature | Description |
|---|---|
| vDevice / Route Table | The virtual device on which the service will work and the route table that it will listen to. |
| Frontend IP / Port | One or more addresses on which the queries will be listened to; the default port is 53. |
| DNS Forwarder | The DNS Forwarder Profiles profile for the queries for which the service is not authoritative; it can be skipped per address with DIRECT. |
| Cache | The answers being taken into the cache; the TTL and the maximum number of records. |
| QOS | The core selection, the processor priority, the processor limit and the memory limit. |
| Log | The service writing its DNS queries to its own process record being turned on and off. |
| Meta Data | The key-value pairs attached to the service. |
The GTM Services Card and the Service Screen
In the GTM tab in the Configuration Menu, the GTM Services card lists the number of the DNS services on the device (Manage N GTM services; route traffic to the optimal target with DNS-based load balancing.) and, in its bottom line, the name of every service together with Service Management; the number on the right is the number of sub-items (the total of Service Management and the services; the number in the card text, on the other hand, is only the number of services). When the card is clicked, the page does not change; the menu goes one level in and the sub-items of the card are listed:
- Service Management opens the list screen explained on this page.
- The service names open the own screen of the related service. This screen comes with the Dashboard tab that carries the name of the service; the domain names and the records are managed from the Domains and Records tabs next to it (see GTM).
The same screens are also reached from the GTM tab on the Left Monitor Panel: the tab lists the DNS services with a status bar and the selected metric; when a row is clicked, the screen of the service opens, and with the link in the tab title, this list opens.
Its Place in the GTM Architecture
The DNS service is the entry point of GTM: the listener layer to which the clients send their queries is defined here; every domain name and record is bound to a service. The domain names on the service work in the Standalone, Disaster Recovery or Datacenter mode; the records are answered according to the Remote Devices metrics and the Health Scenarios results. In this way the service becomes, beyond being a static resolver, a routing layer that is sensitive to the real-time health of the data centers.
Operational Best Practices
- A distinctive name must be given to the service. The name identifies the service in the Configuration Menu, in the Left Monitor Panel and in the logs; since this screen does not prevent the same name from being used a second time, the uniqueness is observed by the administrator.
- vDevice and Route Table must be selected first. The Frontend IP list is established from the addresses of the selected route table and is deleted completely when the vDevice is changed; the addresses are added after these two fields are finalized.
- More than one Frontend address must be defined. More than one address is added in order to meet the queries coming from different network segments; when the VIP addresses are selected in a cluster, the service answers from the active device.
- Caching must be enabled. In the environments that receive heavy queries, Cache is turned on; Cache TTL is adjusted according to the update frequency of the records.
- Resource separation must be provided with QOS. When more than one service is run, the core, processor and memory limit of every service is determined and the services affecting each other is prevented.
- The DNS Forwarder must be assigned only if it is necessary. When no profile is assigned, the queries for which the service is not authoritative are not forwarded; when a profile is assigned, the addresses that must not be forwarded are marked with DIRECT.
- Query logging must be decided per service. In order to avoid an unnecessary log load in production, Log is turned on only on the services on which a query record must be kept.
- The domain names must be reviewed before deleting. When the service is deleted, its domain names and records are deleted as well; the confirmation window does not list this effect separately.
How to Add?
A new DNS service is added through the TR7 web management interface with the steps below:
- The Configuration Menu is opened by clicking the TR7 logo at the bottom left.
- The GTM → GTM Services → Service Management → Add steps are followed.
- A unique and descriptive name is entered for the service.
- vDevice and Route Table are selected, the addresses on which the queries will be listened to are added to the Frontend IP table; if necessary, DNS Forwarder, Cache, QOS, Log and Meta Data are set.
- The service is added by clicking the
Addbutton.
TIP
Reaching the page via quick search
Instead of navigating the menu step by step, the related page is reached directly by using the search bar in the bottom left corner of the screen. The search bar opens with the Alt + T shortcut on Windows and Opt + T on macOS; typing the name of the feature being searched for is then sufficient.
The domain names and the records are added to the created service from the Domains and Records tabs on the own screen of the service.
Service Management Listing Screen
By following the GTM → GTM Services → Service Management path, the list of all the DNS services defined on the TR7 device is reached. Service adding, editing and deleting operations are performed through this screen.
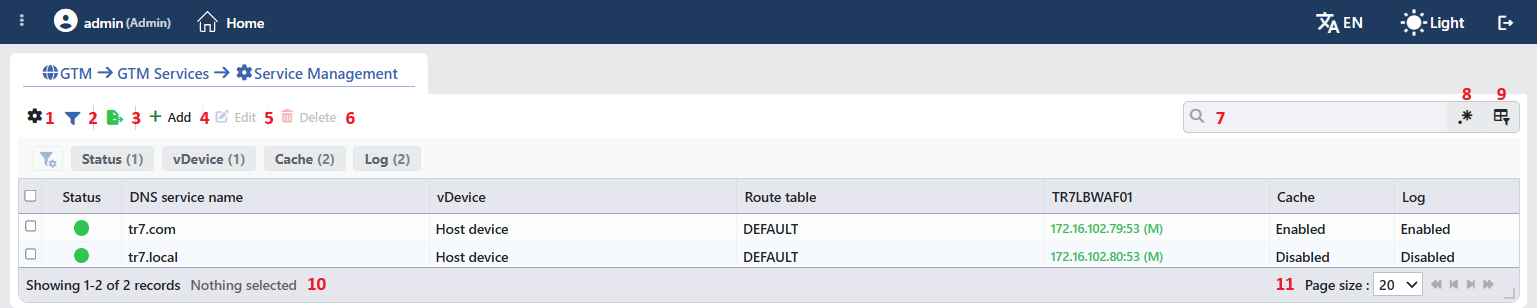 DNS Services Listing Screen
The table opens with the following columns by default:
| Column | Description |
|---|---|
| Status | The working status of the service is shown with a colored circle; when it is hovered over, the status text appears (see The Status Values). In a cluster a separate circle is shown for every device. |
| DNS Service Name | The name of the service. |
| vDevice | The name of the virtual device on which the service works; on the services that work on the main device it says Host Device. |
| Route Table | The name of the route table that the service listens to. |
| IP | The addresses that the service listens to are listed in a separate sub-line for every Frontend IP in the ip:port form and with the status color of the address in the interface; the row height grows according to the number of addresses. In a cluster the column header is the name of this device (e.g. TR7LBWAF01) and the role of the device ((M) / (S)) is written at the end of the VIP addresses. |
| Cache | If caching is on, Enabled; if it is off, Disabled. |
| Log | If query logging is on, Enabled; if it is off, Disabled. |
There is no column hidden by default; these seven columns are in the column selector. The table is not sorted by default; when a column header is clicked, descending sorting is applied first, then ascending, and on the third click the sorting is removed. The IP column cannot be sorted. The list updates by itself as the configuration and the status change.
The items in the toolbar are arranged from left to right in the following order; the last two items (Page Information and Page Size) are located in the information strip below the table.
Columns
Which columns are shown in the table is selected; all seven columns are on by default. In the same panel, columns are reordered by dragging and alignment is selected per column; the row height is fitted to the page with the Fit rows to the page button, and the column layout is reset to default with the Reset button. When the width badge next to a manually widened column is clicked, the column returns to the automatic width. The layout is stored per user.
Filter
The Filter button opens and closes the filter strip above the table; the button shows the number of active filters with a badge. The strip is visible when the screen opens and contains four cards: Status, vDevice, Cache and Log. The number in the parentheses next to the card title is the number of values listed in that card; when the card is clicked, the values open as labels together with their row counts and more than one value can be selected together. The selections are displayed under the strip as labels in the Title = Value form (e.g. Status = OK) and are removed with the close icon on the label. The Status card counts only the status on this device; in a cluster the status of the peer device does not enter the card counts. The layout of the cards is stored per user.
Export
The table is exported as Excel, CSV or PDF by clicking the Export button. In the window that opens, the Filename, Format and Data Source, together with the Columns to be exported, are determined; the remaining fields are displayed according to the format: CSV Separator for CSV, Excel Sheet Name for Excel, and Page Orientation and Page Size for PDF.
Add
By clicking the Add button, the form for creating a new DNS service opens in the Add tab.
Edit
By clicking the Edit button, the editing form of the selected service opens in the Edit tab. The button becomes enabled only when a single service is selected; every service opens in its own editing tab. The editing form is the same as the add form; no field is locked and the change is saved without asking for confirmation. When vDevice is changed, the Frontend IP table is emptied. The effect of the change on the running service is explained in the Operating Mechanism section; the domain names and the records are not affected by these changes.
Delete
When one or more services are selected and the Delete button is clicked, the related services are deleted. Before deleting, the "Are you sure?" confirmation is asked. The button is passive while there is no selection.
WARNING
The confirmation window does not list the name of the service, the number of selected services or the side effects of the deletion. All the domain names and DNS records of the service are deleted together with the service and cannot be recovered; the automatic firewall rules added for the addresses of the service are removed, and the service and, if there is one, the bound forwarder process are stopped on the device. In a cluster installation the deletion is reflected to the peer device as well and the operation is written into the user operation record (DNS service "<name>" is deleted). The service being in use does not prevent the deletion.
Search
Used to search all the information in the table; the IP column is searched with the ip:port text of the addresses.
RegExp Search
Used to search all information in the table with a regular expression (RegExp).
Column Based Search
Used to perform a column-based search on the information in the table; a separate search line opens for every column and next to every box there are the Negate button that reverses the result and its own RegExp key.
Page Information
Contains information about the total number of defined services and the number of services displayed in the list: Showing N-M of T records and the number of selected services (N selected, or Nothing selected when there is no selection).
Page Size
The maximum number of services to be displayed on the page is selected. The default is 20; the options are 5, 10, 20, 50, 100, 200, 500 and All.
Right-Click Menu
When a row is right-clicked, a menu with the service's name in its title opens. Both operations in the menu apply only to the right-clicked service; a selection made in the list does not affect the menu.
| Operation | What it does |
|---|---|
| Edit | Opens the editing form of the service in the Edit tab; it is the same as the form opened by the Edit button in the toolbar. |
| Delete | Deletes the right-clicked service; the same confirmation question as the deletion in the toolbar is displayed. |
Preview of the Selected Service
When a row in the list is clicked, the preview of the service opens on the right of the screen; when the selected row is clicked again, the panel closes. In the title there are the status circle (in a cluster one circle for every device), the name of the service and the DNS Service subtitle, and at the top right there are four operations.
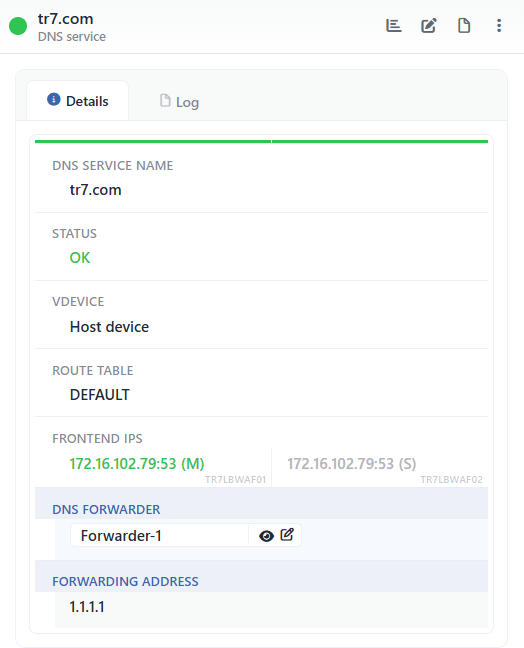 Preview of the Selected Service
| Operation | What it does |
|---|---|
| Dashboard | Opens the own screen of the service with the Dashboard tab that carries the name of the service. |
| Edit | Opens the editing form of the service in the Edit tab. |
| Log | Opens the GTM event records and the user operations that belong to the service in a window, without leaving the page. |
| Restart Service | It is the only operation in the menu. The moment it is clicked, without asking for confirmation separately, the service is restarted only on this device; in a cluster installation the service on the peer device is not affected. If there is a forwarder bound to the service, it is restarted as well; the operation does not produce a log record. |
The panel has two tabs:
Details
Lists the configuration and status lines of the service (the table below).
Log
Lists the operations performed on the service in the past and the GTM events that belong to the service as a timeline.
The rows in the Details tab are as follows, in order. In a cluster the table is shown with two columns that carry the machine name of every device: Frontend IPs separately for every device, Status separately only if the two devices are different, and the other rows are written once in a way that covers the two columns.
| Row | Description | Visibility condition |
|---|---|---|
| DNS Service Name | The name of the service. | Always |
| Status | The status of the service, with the status color (see The Status Values). | Always |
| vDevice | The virtual device on which the service works. | Always |
| Route Table | The route table that the service listens to. | Always |
| Frontend IPs | The addresses that are listened to; every address with its own status color, in a cluster listed separately for every device. | Always |
| DNS Forwarder | The name of the assigned forwarder profile; the next to it opens the preview of the profile and the opens the editing form. | While a profile is assigned |
| Forwarding Address | The forwarding addresses in the profile. | While a profile is assigned |
| Domain Based Forwarding | The domain-name-based forwarding rules in the profile (domain name -> addresses). | While they are defined in the profile |
The Status Values
The status circle in the list and the preview panel show the status of the service with the values below; the status is refreshed every 5 seconds:
| Status | Color | Meaning |
|---|---|---|
| OK | green | The service is working. |
| Error | red | The service is present on the device but is not working. |
| Absent | red | The service has not been created on the device yet. |
| Forwarder error | red | The service is working, the bound forwarder is not working. |
| Forwarder absent | red | The service is working, the bound forwarder has not been created. |
| Host is off | gray | There is no connection with the device. |
| vDevice is off | gray | The vDevice of the service is inaccessible. |
DNS Service Add Form
A new DNS service is added on the TR7 device by following the GTM → GTM Services → Service Management → Add steps.
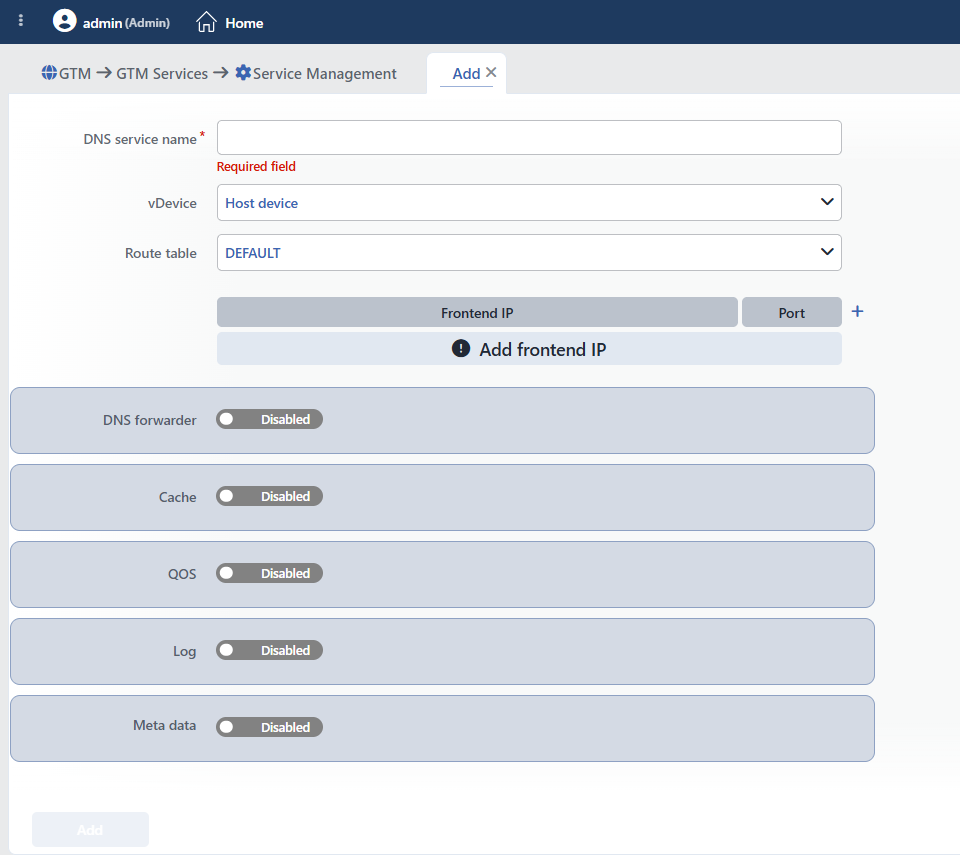 DNS Service Add Form
INFO
DNS Service Name Required
The name of the DNS service is entered. The name identifies the service in the Configuration Menu, in the Left Monitor Panel, in the preview title and in the logs. No length or format check is made for the name and this screen does not prevent the same name from being used in a second service; giving a distinctive name is recommended.
INFO
vDevice Default: Host Device
The virtual device on which the service will work is selected. In the first place of the list there is Host Device (the main device) and it comes selected by default; afterwards the defined vDevices are listed. In the cloud client accounts only the own vDevice of the account is listed.
When the vDevice changes, the address list is deleted
When the value of the field is changed, all the rows in the Frontend IP table are deleted; the addresses are added again according to the new vDevice. The same behavior is valid in the editing form as well.
INFO
Route Table Default: DEFAULT
The route table that the service will listen to is selected. In the Frontend IP table only the addresses that belong to the selected route table are offered. The list shows the route tables of the main device independently of the selected vDevice.
INFO
Frontend IPs
The addresses on which the service will listen to the DNS queries are defined in a table with the Frontend IP and Port columns; the field does not have its own label, the two names are the column headers of the table. The field is not required: the form is saved without an address being added as well, but a service for which no address is defined does not meet queries. While the table is empty, the Add frontend IP warning is displayed; the plus icon in the Port header adds a new row, and the trash can icon at the end of the row deletes the row. The new row opens with the port 53.
Frontend IP
One of the IP addresses in the selected route table is selected (the placeholder is Select IP; if there is no suitable address in the table, No IP to select). In every option in the list there are the INT or VIP badge that shows the type of the address, the IP address, the address of the peer device in a cluster and the @interface information. The Add IP entry inside the drop-down list opens the form for adding a new IP address on the users who have change authorization in the Network area. When no address is selected in the row, the IP not selected warning is given and the form cannot be saved.
Port
The port on which the address will be listened to; the default is 53. On an invalid value the Invalid port warning is given. The same address and port being used by another service or vService is shown with the Port collision warning before the form is saved.
DIRECT
The moment the DNS Forwarder switch is turned on, even while a profile has not been selected yet, the DIRECT checkbox appears above the address selector in every row. The queries coming to the marked address are answered directly by the service itself without passing by the forwarder; on the unmarked addresses the queries for which the service is not authoritative are forwarded to the servers in the profile.
The authorization to edit the Frontend IP table
The table is displayed read-only on the users who do not have full authorization or menu display authorization in the Load Balancer area.
INFO
DNS Forwarder Default: Disabled
The DNS Forwarder Profiles profile to be used for the queries for which the service is not authoritative is turned on with the Enabled / Disabled switch and selected from the list. The moment the switch is turned on, the field gives the Select an option warning until a profile is selected and the form cannot be saved. The Add button next to the selector opens the form for adding a new forwarder profile; the saved profile is assigned to the field automatically. When the switch is turned on, the DIRECT option appears per address in the Frontend IP table.
If the assigned profile is deleted from the DNS Forwarder Profiles screen, the record of the service does not change; when the editing form is opened, the field gives the Select an option warning and the form cannot be saved until a new profile is selected.
INFO
Cache Default: Disabled
The DNS answers being taken into the cache is turned on with the Enabled / Disabled switch. While the switch is off, the two fields below are not displayed at all and are not included in the record; when it is turned on, they are displayed:
 The Cache Fields
Cache TTL Required Default: 60 seconds
The period for which the answers in the cache are kept is entered; in the unit selector next to the number there are seconds, minutes and hours.
Max. Cache Entries Required Default: 1,000,000
The maximum number of records to be kept in the cache; an integer between 1,000 and 5,000,000. On a value outside the range the Max. cache entries must be in range 1000-5000000 warning is given.
INFO
QOS Default: Disabled
The resource limits of the service are turned on with the Enabled / Disabled switch. While the switch is off, the fields below are not displayed at all and are not included in the record; when it is turned on, they are displayed:
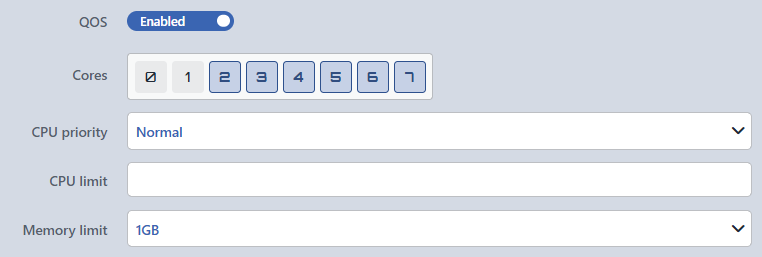 The QOS Fields
Cores
The processor cores that the service will use are marked among the cores of the selected vDevice; by default all the cores except the cores numbered 0 and 1 come selected. At least one core must be selected; otherwise the At least one core must be selected warning is given. If the number of cores of the vDevice does not exceed two, the field comes empty and the core must be marked manually.
CPU Priority Default: Normal
The processor priority is selected:
| Option | Meaning |
|---|---|
| Low | A low processor priority. |
| Normal | The default processor priority. |
| High | A high processor priority. |
CPU Limit
The maximum processor share (percentage) that the service can use on every selected core; a value between 1 and 100 that accepts decimals. On a value outside the range the CPU limit must be in range 1-100 warning is given. The field can be left empty; while it is empty, no limit is applied.
Memory Limit Default: 1GB
The maximum memory that the service can use is selected from the list: 1, 2, 3, 4, 6, 8, 12, 16, 24, 32, 48, 64, 128 or 256 GB.
INFO
Log Default: Disabled
The DNS query logging is turned on with the Enabled / Disabled switch. When it is turned on, the service writes the incoming DNS queries to its own process record; these lines are not listed on the GTM Logs screen or in the Log window on the preview panel. On these two screens the GTM events of the service and the user operations are monitored.
INFO
Meta Data Default: Disabled
The key-value pairs to be attached to the service are turned on with the Enabled / Disabled switch. When the switch is turned on, one empty row occurs in the two-column table without a header; the placeholder of the first box is Variable name and that of the second is Value. A new row is added with the Add button under the table; when the switch is turned off, the list is saved empty. The rows are added to the configuration of the service in the key=value form; the rows whose key is left empty are skipped.
Operating Mechanism
INFO
- Creation. The adding does not ask for confirmation; the service is created in the background on the selected vDevice. In the list the row appears with the Absent status and passes to the OK status within a few seconds when the service starts working. For every address of the service, UDP and TCP rules are reproduced among the automatic rules on the Firewall screen. The operation is written into the user operation record together with the user name (DNS service "
<name>" is created) and appears in the Log window on the preview panel. - The effect of the editing. When only the name is changed, the running service is not touched; in the Cache, Log and Meta Data changes the service is restarted; when the Route Table, vDevice or the Cores, CPU Limit and Memory Limit settings of QOS are changed, the service is removed and created again.
- While QOS is off. The service does not work unlimited; it is created with the default cores and a 4 GB memory limit.
- The forwarder. When a DNS Forwarder is assigned or removed, the service itself is not restarted; the forwarding process that works next to the service is created or removed and the address rules are updated accordingly.
- The status. The service status is refreshed every 5 seconds; the list and the preview reflect this value. Until the first evaluation arrives, the status circle appears in the interface accent color (blue).
- The cluster. Adding, editing and deleting are reflected to the peer device automatically; Restart Service restarts only the service on the device on which it is clicked.
Scope and Limits
INFO
- The screen requires full GTM authorization. The GTM tab is visible with the display authorization; however, this screen and the other GTM screens open only on the users who have full authorization in the GTM area. A user who has only display authorization sees the menu entry and encounters the You don't have access to this page card on the page.
- A GTM license is required. The GTM tab is not shown if there is no module in the license; when the screen is opened directly, the Not covered by your license card is displayed.
- The vDevice scope. The service works only on the selected vDevice and listens to the addresses of that device; while the vDevice is in an inaccessible state, the status of the service appears as vDevice is off and the changes are applied when the device connects again.
- The name uniqueness is not enforced. A second service that carries the same name can be saved; distinctive naming is the responsibility of the administrator.
- The logs. The GTM events of the service and the user operations performed on it are monitored in the Log window on the preview panel and on the GTM Logs screen.
Usage Location
The defined DNS service is used on the screens below:
| Screen | Where it is used |
|---|---|
| Domains | The domain names are added in this tab on the own screen of the service; every domain name is bound to a single service. |
| Records | The DNS records are managed in this tab under the domain names of the service. |
| Dashboard | The traffic and answer dashboards of the service are monitored in the first tab of the service screen. |
| Left Monitor Panel | In the GTM tab the services are listed with a status bar and the selected metric. |
