
Smarter by Design.Simpler for Business
File Forwarding
What Is File Forwarding?
File Forwarding is the screen that automatically sends the backup files TR7 generates to an external destination. The structure is profile-based: every profile defines a transport type (E-mail, FTP or SCP), a destination and the file/backup types to be sent. By adding more than one profile, the backups can be forwarded to different destinations at the same time.
The forwarding works at the moment of the event (push): when a backup is created, the related profiles are triggered automatically and send the generated file to the destination. This is not a live stream but a transfer done as the file is generated.
Transport Type
Transport type
E-mail · FTP · SCP
Sources
Kaynaklar
The file types to be sent (the backups)
Backup Types
Yedek tipleri
The automatic and/or the user backups
Mode
Delivery mode
Sync or single file (FTP/SCP)
Automatic triggering and manual running
The profiles run by themselves when a backup is created. In addition, by selecting a profile from the list screen, the Test (destination access attempt) and Sync (manual synchronization; only for the FTP/SCP profiles in the Sync mode) operations can also be carried out manually.
Cluster Behavior
In the TR7 installations running as a cluster (two devices), when the File Forwarding settings are changed on one device, they are automatically synchronized with the other TR7 device; there is no need to set them separately. Every TR7 device sends its own backups independently; in order to prevent a conflict on the FTP/SCP destination, every device writes to a subfolder belonging to its own server name (hostname) under the remote directory.
What Is It For?
Sending the backup files TR7 generates automatically to an external destination (E-mail / FTP / SCP) provides the backups to be stored safely off the device. This approach provides the following:
- Off-device backup: the backups are not kept only on the device; in the case of a device loss or failure, the risk of data loss decreases,
- Disaster recovery (DR): the configuration backups can be restored quickly from a remote location,
- Centralized archiving: the backups of all the devices can be collected at a single FTP/SCP destination,
- Automation: the moment the backup is generated, it is forwarded to the destination without manual intervention (push),
- Compliance with the backup policies: the regular and off-device backup requirements are met.
How Does It Work?
The forwarding works at the moment of the event (push): when a backup is created, the related profiles are triggered automatically and send the file to the destination.
01 · BackupA backup is createdAn automatic or a user backup is generated
02 · TriggerThe profiles are triggeredThe related profiles come into play instantly (push)
03 · SendIt is delivered to the destinationE-mail · FTP · SCP
How to Add?
A new File Forwarding profile is added via the TR7 web management interface with the steps below:
- The Configuration Menu is opened by clicking the TR7 logo at the bottom left.
- The steps Settings → General Settings → File Forwarding → Add are followed.
- A unique and descriptive name is entered for the profile.
- The related fields are configured according to the requirements; for the details of the fields, the File Forwarding Add Form section can be looked at.
- The profile is added by clicking the
Addbutton.
TIP
Reaching the page via quick search
Instead of navigating the menu step by step, the related page is reached directly by using the search bar in the bottom left corner of the screen. The search bar opens with the Alt + T shortcut on Windows and Opt + T on macOS; typing the name of the feature being searched for is then sufficient.
File Forwarding Listing Screen
By following the path Settings → General Settings → File Forwarding, the list of the File Forwarding profiles defined on the TR7 device is reached. The profile adding, editing, deleting and manual Test / Sync Now operations are done from this screen.
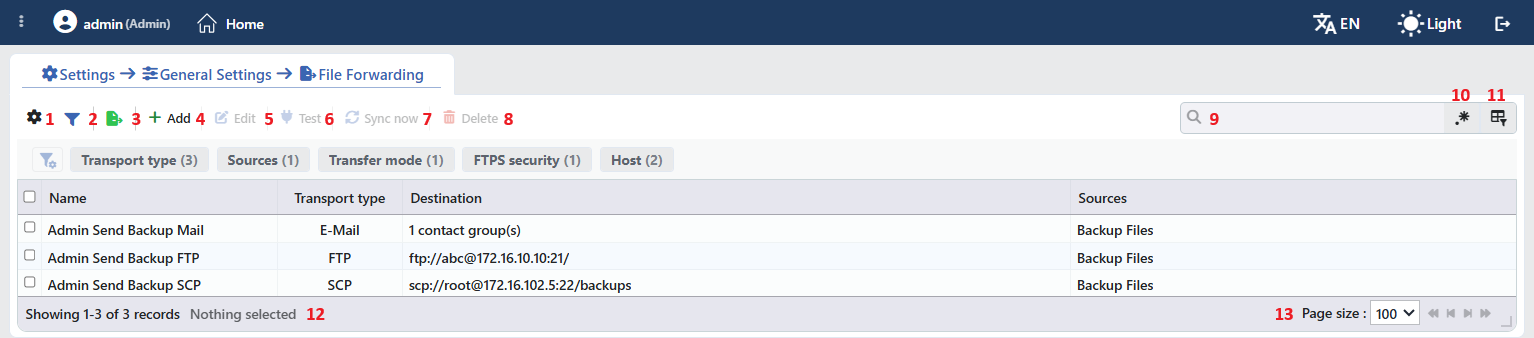 The File Forwarding Listing Screen
The table opens with the following columns by default:
| Column | Description |
|---|---|
| Name | The name given to the profile. |
| Transport Type | By which way the file will be sent: E-Mail, FTP or SCP. |
| Destination | The summary of the destination. On the E-Mail profiles the number of selected contact groups (e.g. 1 contact group(s)), and on the FTP/SCP profiles the connection address in the protocol://user@server:port/directory format is written. |
| Sources | The file sources the profile sends; if more than one source is selected, they are written separated by a comma. |
There is no column hidden by default; these four columns take place in the column selector.
The items in the toolbar are arranged from left to right in the following order; the last two items (Page Information and Page Size) are located in the information strip below the table.
Columns
Which columns will be shown in the table is selected; all four columns are on by default. In the same panel the columns are reordered by dragging, the alignment is selected per column, a manually set column width is returned to automatic sizing by clicking, and with the Reset button the column layout is returned to the default. The layout is stored per user.
Filter
The Filter button is used to filter the profiles shown in the list according to certain criteria. The filter criteria offered come dynamically, specific to the related type. The filtering view can be customized: which filters will be shown can be selected, the position (order) of the filters can be changed and the view can be arranged according to the need.
Export
By clicking the Export button, the table is exported as Excel, CSV or PDF according to the desired data columns.
Add
By clicking the Add button, the form for creating a new File Forwarding profile is opened.
Edit
When a profile is selected from the list and the Edit button is clicked, the editing form of that profile is opened.
Test
It attempts the access of the selected profile to the destination; the button label changes according to the type of the selected profile (e.g. Test FTP). On the e-mail profiles the Send Test E-mail window opens: a test address is entered (the addresses resolved from the groups of the profile are offered as a suggestion) and a test e-mail is sent. On the FTP/SCP profiles, on the other hand, the connection and the authentication are attempted without a file being uploaded. The result is shown separately for each device in a cluster setup and with an understandable error reason (authentication, DNS, unreachable, timeout, TLS, remote server refusal, e-mail not configured); while the operation is in progress, the button is locked.
Sync Now
It manually synchronizes the local backup folder to the remote destination; it provides the existing backups to be mirrored to the remote destination without waiting for a backup to be created. The button always appears in the toolbar; it becomes enabled only while an FTP/SCP profile in the Sync mode is selected. When it is clicked, the "Start the Sync Now?" confirmation is requested; the operation runs on both devices in a cluster and on the SCP profiles the result is reported with the transfer counters (N sent · N already present).
Delete
When one or more profiles are selected and the Delete button is clicked, the related profiles are deleted on the TR7 device.
Search
Used to search all information in the table.
RegExp Search
Used to search all information in the table with a regular expression (RegExp).
Column Based Search
Used to perform a column-based search on the information in the table.
Page Information
Information about the total number of defined profiles and the number of profiles displayed in the list takes place. When a profile is selected from the left side in order to delete it, the number of selected profiles is also shown here.
Page Size
The maximum number of profiles to be displayed on the page is selected. The arrow icons are used to navigate between the pages.
Preview of the Selected Profile
When a row in the list is clicked, the preview of the profile opens on the right of the screen; when the selected row is clicked again, the panel closes. In the title there are an icon that shows the transport type, the name of the profile and, as a subtitle, the transport type. The icon changes according to the type: an envelope on the E-Mail profiles, a folder on the FTP profiles and a lock on the SCP profiles.
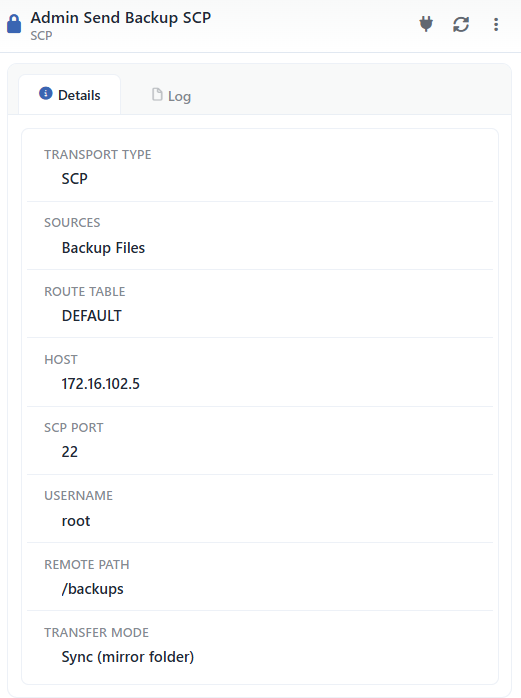 Preview of the Selected Profile
On the right of the title two operations appear directly, and two of them are under the menu:
| Operation | What it does | Visibility condition |
|---|---|---|
| Test | Attempts the access of the profile to the destination. The button label changes according to the type (e.g. FTP Test). While the attempt is in progress, the icon spins and the button is locked. | Always |
| Sync Now | Manually synchronizes the local backup folder to the remote destination. While the transfer is in progress, the icon spins and the button is locked. | Only on the FTP/SCP profiles in the Sync mode |
| Edit | Opens the editing form of the profile. The same form is also opened with the Edit button in the toolbar. | In the ⋮ menu |
| Delete | Deletes the profile. Confirmation is requested before deleting. | In the ⋮ menu |
The panel has two tabs:
Details
Lists the definition of the profile row by row (the table below).
Log
Lists the user actions on the profile and the delivery/transfer records as a timeline.
The rows in the Details tab change according to the transport type:
| Row | Description | Visibility condition |
|---|---|---|
| Transport Type | The forwarding method: E-Mail, FTP or SCP. | Always |
| Sources | The file sources the profile sends. | Always |
| Backup Types | Which backups are sent: Automatic (nightly) and/or User (created manually). | Always |
| Contact Groups | The contact groups the file will be sent to. | While it is E-Mail |
| Email Language | The language of the e-mail content. | While it is E-Mail |
| Route Table | The route table the transfer traffic goes out of. | While it is FTP or SCP |
| Host | The address of the destination server. | While it is FTP or SCP |
| FTP Port / SCP Port | The port of the destination server; the default is 21 in FTP and 22 in SCP. | In the related type |
| Security | The security mode of the FTP connection. | While it is FTP |
| Username | The user name used for the authentication on the destination server. The password is not shown in the preview. | While it is FTP or SCP |
| Remote Path | The remote directory the files will be written to. | While it is FTP or SCP |
| Transfer Mode | Sync (mirror folder) mirrors the local folder to the remote, Single sends only the generated file. | While it is FTP or SCP |
| Sync Window | States that only the backups newer than this period will be synchronized; the default is 90 days. If it is empty, the whole history is mirrored. | In FTP/SCP and in the Sync mode |
File Forwarding Add Form
A new File Forwarding profile is created by following the steps Settings → General Settings → File Forwarding → Add.
The Name, Transport Type, Sources and Backup Types fields are common to every transport type. According to the selected Transport Type, in addition to these common fields, the destination fields in the E-Mail, FTP or SCP section below are displayed. The destination fields are grouped in the form under the Recipients (E-Mail) and the Connection Settings and Transfer Settings (FTP / SCP) section headings.
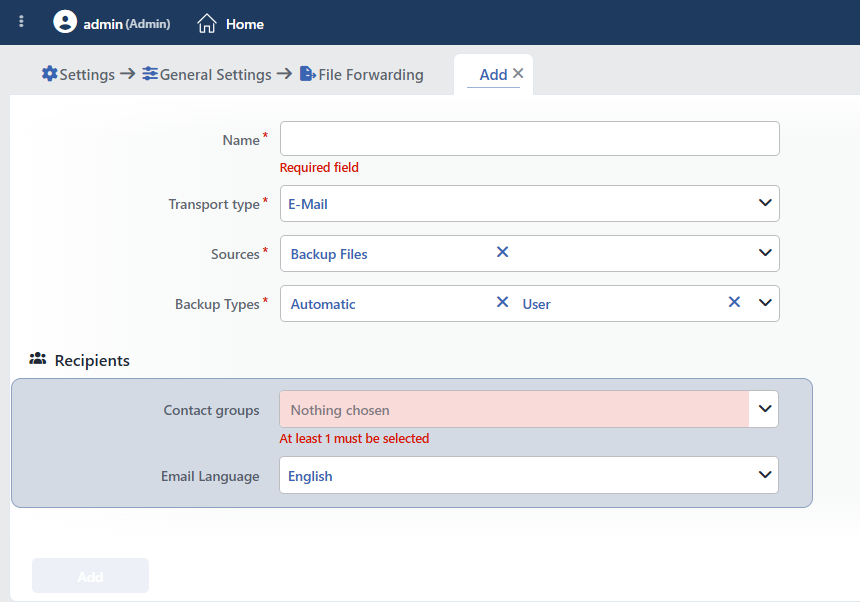 The File Forwarding Add Form
INFO
Name Required
A unique name is entered for the profile to be created. The same name cannot be used in another profile.
INFO
Transport Type Default: E-Mail
With which method the files will be forwarded is selected. According to the selection, the destination fields in the form change:
| Type | Destination |
|---|---|
| The file is sent as an e-mail attachment to the addresses in the contact groups. | |
| FTP | The file is uploaded to an FTP/FTPS server. |
| SCP | The file is copied to the remote server over SSH (SCP/rsync). |
INFO
Route Table Transport Type = FTP / SCP Default: default
Through which route table (network) the transfer will be made is selected; the transfer is run in the related network environment and the packets are provided to go out of the correct network. The field is displayed in this (upper) section of the form when Transport Type = FTP or SCP is selected; it is not displayed in the E-Mail type; the e-mail delivery uses the route table of the global SMTP settings. For the details, the Route Tables page can be looked at.
INFO
Sources At least one source
The file type to be sent is selected. At the moment only Backup Files (the backup files) is supported; it comes selected by default. At least one source must be selected.
INFO
Backup Types At least one type
Which backups will be sent is selected. At least one type must be selected; both types come selected by default:
- Automatic: the backups taken automatically on a nightly basis.
- User: the backups created manually by the user.
The type of the backup is encoded in the file name; the profile sends only the backups that match the selected type(s).
E-Mail
They are the recipient settings displayed when Transport Type = E-Mail is selected.
INFO
Contact Groups At least one group
The contact groups the e-mail will be sent to are selected; the recipients are resolved from the e-mail addresses of these groups. At least one group must be selected. With the Add in the selection field, a new contact group can also be created. For the groups, the Notification Management → Contact Groups section can be looked at.
The backup file is sent as an attachment to the e-mail and the delivery uses the global SMTP settings of the device (Notification Management → E-mail Settings); for this reason there is no separate Route Table field in the E-Mail type; the delivery is made over the route table in the SMTP settings. In the body of the e-mail there is summary information belonging to the backup: Host, the trigger (Trigger), the reason (Reason), the user who did the operation (User), the changed databases (Changed Databases), the date, the file size and the file name.
Warning
For the e-mail delivery to work, the global E-mail Settings (SMTP) must have been configured first. Very large backup attachments may fail by exceeding the e-mail delivery window; FTP or SCP is recommended for large backups.
INFO
Email Language Default: English
In which language the labels in the e-mail content will be displayed is selected: English or Türkçe.
FTP
They are the connection and transfer settings displayed when Transport Type = FTP is selected. The file is uploaded to an FTP/FTPS server.
INFO
Host Required
The IP address or the domain name of the remote FTP server the files will be sent to is entered.
INFO
FTPS Security Default: FTPS (Explicit)
The security method to be used in the FTP connection is selected:
| Option | Description |
|---|---|
| None (plain FTP) | An unencrypted, plain FTP connection. |
| FTPS (Explicit) | An encrypted connection with explicit TLS over FTP. |
| FTPS (Implicit) | A connection encrypted from the beginning with implicit TLS. |
INFO
Username Required
The user name to be used for the authentication on the remote server is entered.
INFO
Password Required
The password to be used for the authentication on the remote server is entered.
INFO
Remote Path Required
The destination directory on the remote server the files will be written to is entered. If the directory does not exist, it is created during the transfer.
The subfolder in a cluster
In a cluster setup, in order to prevent a conflict, every TR7 device writes its files to a subfolder belonging to its own server name (hostname) under this directory.
INFO
Transfer Mode Default: Sync
How the files will be transferred to the remote destination is selected:
| Mode | Behavior |
|---|---|
| Sync (mirror folder) | It mirrors the local backup folder to the remote destination. The transfer is additive (the existing remote files are not deleted); in this way the remote history is preserved and the missing files are completed at the next run. |
| Single file | It sends only the single file generated at that moment to the remote destination. |
INFO
Sync Window (Recent Only) Default: 90 days Transfer Mode = Sync
It appears only in the Sync mode. It provides only the backups newer than this period to be synchronized; in this way the transfer of the whole of a large history spread over years is prevented. When it is left blank, the whole history is mirrored to the remote destination. The period can be entered in days, weeks or months.
SCP
They are the connection and transfer settings displayed when Transport Type = SCP is selected. The file is copied to the remote server over SSH (SCP/rsync).
INFO
Host Required
The IP address or the domain name of the remote SSH server the files will be sent to is entered.
INFO
Username Required
The user name to be used for the authentication on the remote server is entered.
INFO
Password Required
The password to be used for the authentication on the remote server is entered.
INFO
Remote Path Required
The destination directory on the remote server the files will be written to is entered. If the directory does not exist, it is created during the transfer.
The subfolder in a cluster
In a cluster setup, in order to prevent a conflict, every TR7 device writes its files to a subfolder belonging to its own server name (hostname) under this directory.
INFO
Transfer Mode Default: Sync
How the files will be transferred to the remote destination is selected:
| Mode | Behavior |
|---|---|
| Sync (mirror folder) | It mirrors the local backup folder to the remote destination. The transfer is additive (the existing remote files are not deleted); in this way the remote history is preserved and the missing files are completed at the next run. |
| Single file | It sends only the single file generated at that moment to the remote destination. |
INFO
Sync Window (Recent Only) Default: 90 days Transfer Mode = Sync
It appears only in the Sync mode. It provides only the backups newer than this period to be synchronized; in this way the transfer of the whole of a large history spread over years is prevented. When it is left blank, the whole history is mirrored to the remote destination. The period can be entered in days, weeks or months.
