
Smarter by Design.Simpler for Business
Device Users
What Is Device Users?
Device Users is the screen that defines the administrative users of TR7. Every user is authorized with a user type (role); this role determines which areas (LB, WAF, network, GTM, settings, certificate…) and at which level (managing / changing / read-only) the user can access.
The identity of the users can be authenticated locally (TR7) or from an external source (LDAP / RADIUS / TACACS). A client certificate login with mutual TLS (mTLS) and command line (CLI) access (SSH and/or Web CLI) can also be defined for the users. The screen also contains the monitoring of the active sessions (User Sessions / CLI Sessions) and the settings such as automatic user creation and the session limit per user.
Users
Administrative users
Adding, editing and deleting users
Auth Source
Authorization source
Local · LDAP · RADIUS · TACACS
Client Cert
Client certificate
Generating / revoking a certificate for mTLS
Sessions
Session management
The User and CLI sessions
Cluster Behavior
In the TR7 installations running as a cluster (two devices), when a device user operation is done on one device, it is automatically synchronized with the other TR7 device; there is no need to do it separately.
The management permission
The operations on this screen (adding, editing, deleting, generating/revoking a certificate, terminating a session) are open only to the users of the Admin type; a Read-Only User can view the screen but cannot perform an operation. The built-in admin user is protected: it cannot be deleted and its user type cannot be changed.
Core Concepts
The Device Users screen is shaped around five basic concepts. The details of every concept are reached from the related card.
User Type (Role)
The role that determines which areas and at which level (full permission / can change / read-only) the user will access; role-based access control (RBAC).
→
Authorization Source
Where the identity will be authenticated: locally (TR7) or on an external LDAP / RADIUS / TACACS server. In the external authentication the password is not stored on the device.
→
Client Certificate (mTLS)
Mutual TLS authentication with a client certificate; a strong identity layer in addition to the password.
→
CLI Access
The command line access: the permission to connect over SSH and/or over the browser with the Web CLI.
→
Session Management
The monitoring and the termination of the active interface (User Sessions) and CLI (CLI Sessions) sessions.
→
The Authorization and Access Model
The TR7 authorization is based on the role-based access control (RBAC) and the least privilege principle: every user is given only the permission required to carry out their duty. The role of a user determines which menus and operations they will access, and the authorization source determines how their identity will be authenticated. The roles can also be narrowed down further by being limited to specific vDevice, vService, certificate or Backend Service sets.
Thanks to this model:
- Every user sees and changes only the areas they are authorized for; the menus outside the permission are hidden,
- The identity can be authenticated locally (TR7) or from a central directory (LDAP / RADIUS / TACACS); in the external authentication the password is not stored on the device,
- With the client certificate (mTLS), a strong authentication layer can be added in addition to the password,
- The permission is limited with specific vDevice / vService / certificate sets and the lateral access is minimized,
- All the operations the users perform can be audited on the User Logs screen,
- All the user definitions are synchronized automatically in a two-device cluster.
User Types
One of the roles below is assigned to a device user. The role determines which areas and at which level (full permission / can change / read-only) the user will access:
The types, in the order in the selection list in the form:
| User Type | Scope and permission |
|---|---|
| Admin | Full permission in all the areas (vDevice, network, LB, WAF, GTM, settings, users, certificate) |
| Read-Only User | Read-only viewing in all the areas; can be limited with specific vServices |
| Monitor User | LB/WAF monitoring (read-only); its menu is hidden; can be limited with specific vServices |
| Network Manager | Full permission on the network |
| Network User | Can change the network; can be limited with specific vDevices |
| Traffic Manager | Full permission on the LB and the certificate |
| Traffic User | Can change the LB; can be limited with specific vServices, the certificate selection and the Backend Service right |
| WAF Manager | Full permission on the WAF |
| WAF Read-Only | WAF read-only |
| WAF User | Can change the WAF; can be limited with specific vServices |
| Traffic+WAF Manager | Full permission on the LB + WAF + certificate |
| Traffic+WAF User | Can change the LB + WAF; can be limited with specific vServices, the certificate selection and the Backend Service right |
| Certificate Manager | Full permission on the certificate |
| GTM User | Full permission on the GTM |
Narrowing down the permission scope
The Network, Traffic, WAF and read-only (Read-Only / Monitor) roles can be limited with specific vDevice, vService, certificate or Backend Service sets. In this way the user performs operations only on the objects assigned to them. For the details, see the Authorization / Scope Fields section in the Add Form.
How to Add?
A new device user is added via the TR7 web management interface with the steps below:
- The Configuration Menu is opened by clicking the TR7 logo at the bottom left.
- The steps Settings → User Management → Device Users → Add are followed.
- A unique user name is entered for the user, and the user type and the authorization source are selected.
- The related fields are configured according to the requirements; for the details of the fields, the Device Users Add Form section can be looked at.
- The user is added by clicking the
Addbutton.
TIP
Reaching the page via quick search
Instead of navigating the menu step by step, the related page is reached directly by using the search bar in the bottom left corner of the screen. The search bar opens with the Alt + T shortcut on Windows and Opt + T on macOS; typing the name of the feature being searched for is then sufficient.
Device Users Listing Screen
By following the path Settings → User Management → Device Users, the list of the users defined on the TR7 device is reached. The user adding, editing, deleting and certificate operations are done from this screen.
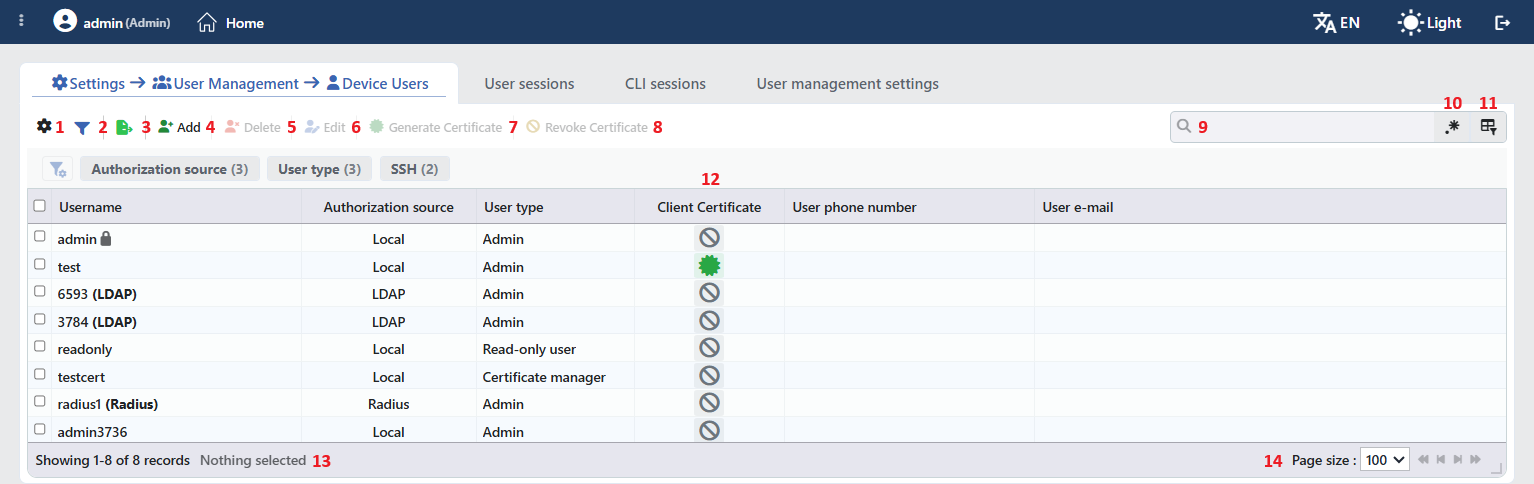 The Device Users Listing Screen
The table opens with the following columns by default:
| Column | Description |
|---|---|
| Username | The user name. On the users with an external source, the source is also written next to the name in parentheses (e.g. 6593 (LDAP)). Next to the built-in account that cannot be deleted there is a lock icon. |
| Authorization Source | From which source the user is authenticated: Local, LDAP, Radius or TACACS. |
| User Type | The role of the user (e.g. Admin, Read-only user, Certificate manager). |
| Client Certificate | The client certificate status of the user. On the users for which a certificate has been generated a green seal icon, and on the ones for which it has not been generated a crossed-out gray icon is displayed. |
| User Phone Number | The phone number of the user. |
| User E-Mail | The e-mail address of the user. |
The Creation Date column is hidden by default; it is opened from the column selector.
When it is right-clicked on a row, a context menu that contains the Edit, Generate Certificate, Revoke Certificate and Delete operations is opened.
The items in the toolbar are arranged from left to right in the following order; the last two items (Page Information and Page Size) are located in the information strip below the table.
Columns
Which columns will be shown in the table is selected. In the same panel the columns are reordered by dragging, the alignment is selected per column, a manually set column width is returned to automatic sizing by clicking, and with the Reset button the column layout is returned to the default. The layout is stored per user.
Filter
The Filter button is used to filter the users shown in the list according to certain criteria. The filter panel comes open by default and the number of active filters is shown with a badge on the button. The criteria offered: Authorization Source, User Type and SSH (Enabled / Disabled). The filtering view can be customized: which filters will be shown can be selected and their order can be changed.
Export
By clicking the Export button, the user list is exported as Excel, CSV or PDF.
Add
By clicking the Add button, the form for creating a new device user is opened.
Delete
When one or more users are selected and the Delete button is clicked, the related users are deleted on the TR7 device.
Edit
When a user is selected from the list and the Edit button is clicked, the editing form of that user is opened.
Generate Certificate
It generates a client certificate for the selected user for the purpose of a certificate-based (mTLS) login. In the window that opens, two fields are requested:
- Passkey: the optional password that will protect the certificate file (P12).
- Expiry Days: the validity period of the certificate (days); in the 1 – 365 range, the default 365.
When the generation is completed, the certificate is downloaded as the username_cert.p12 file and the SHA1 fingerprint of the certificate is shown. When the administrator generates a certificate from this screen, the Client Certificate Authentication setting of the user is turned on automatically. In the certificate generation for the own account of the user, on the other hand, the setting must be on and a 24-hour waiting period is applied between consecutive generations (the administrator generation is not subject to this waiting).
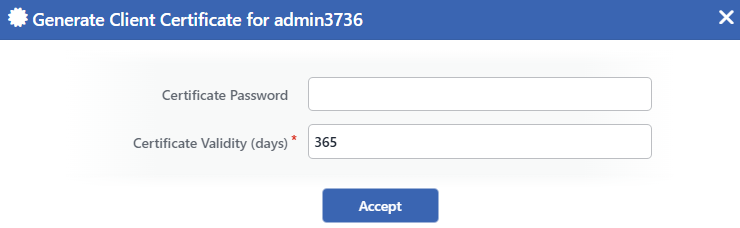 The Generate Client Certificate Window
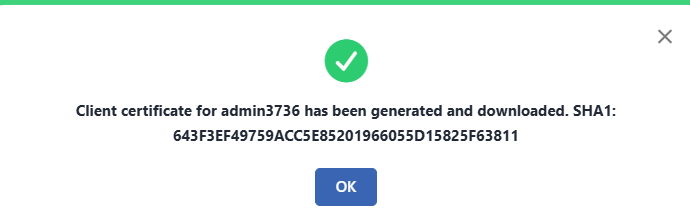 The Certificate Generation Result
Revoke Certificate
It revokes the client certificate of one or more selected users. A login can no longer be made with the revoked certificate.
Search
Used to search all information in the table.
RegExp Search
Used to search all information in the table with a regular expression (RegExp).
Column Based Search
Used to perform a column-based search on the information in the table.
Client Certificate
It is the column that shows the client certificate status of the user: disabled (the certificate usage is off), no certificate (it has not been generated yet or it has been revoked), valid or expired.
Page Information
Information about the total number of defined users and the number of users displayed in the list takes place. When a user is selected from the left side in order to delete it, the number of selected users is also shown here.
Page Size
The maximum number of users to be displayed on the page is selected. The arrow icons are used to navigate between the pages.
Device Users Add Form
A new device user is created by following the steps Settings → User Management → Device Users → Add. According to the selected User Type and Authorization Source, the fields in the form change dynamically.
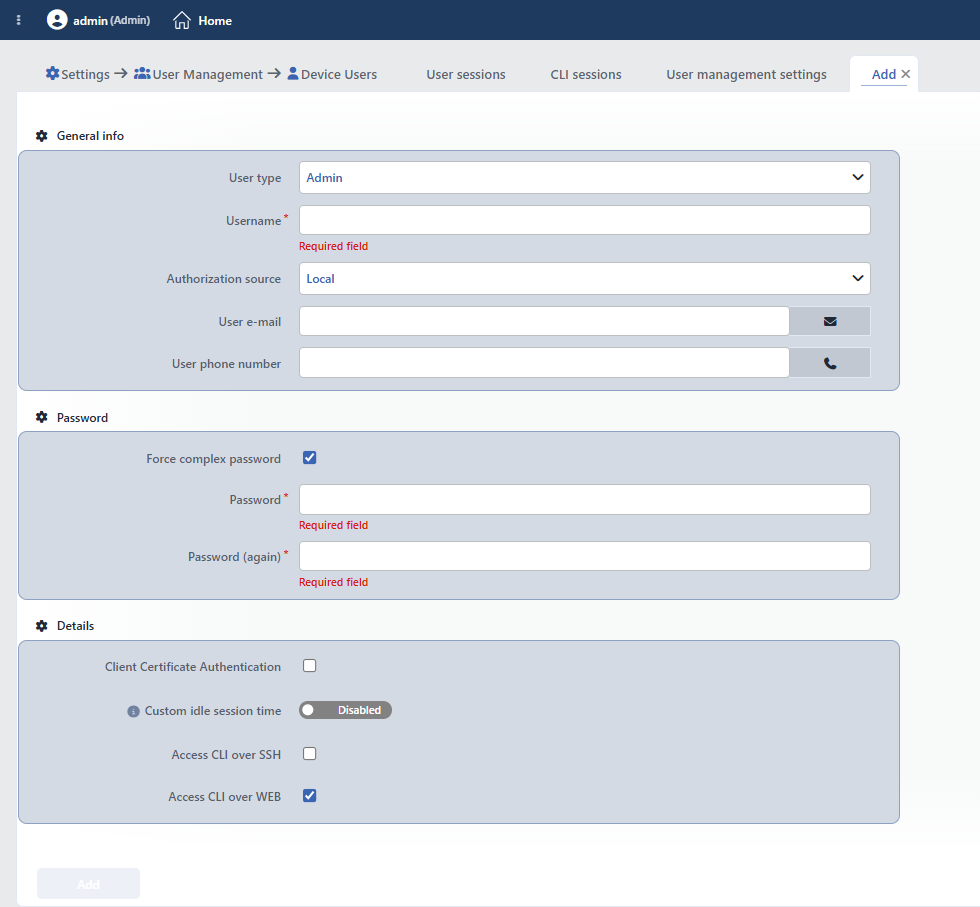 The Device Users Add Form
General Info
INFO
User Type Required
It determines the role of the user (default Admin); which areas and at which level they can access is defined by this selection. The permission levels: full permission (manages), can change and read-only. For all the roles and their scopes, see the User Types section at the beginning of the page.
INFO
Username Required
The unique user name of the user is entered (3 – 32 characters; lowercase letters, digits and the . _ - characters are accepted). The names reserved for the system such as root, tr7 and setup cannot be used. It cannot be changed during the editing.
INFO
Authorization Source Default: Local
Where the identity of the user will be authenticated is selected:
| Source | Authentication |
|---|---|
| Local | The password is stored on the device; the authentication is done locally. |
| LDAP | The password is authenticated on the external LDAP server; the password is not stored on the device. |
| RADIUS | The password is authenticated on the external RADIUS server. |
| TACACS | The password is authenticated on the external TACACS+ server. |
The external sources (LDAP/RADIUS/TACACS) are configured from the related LDAP Settings, RADIUS Settings and TACACS Settings screens. The password field is displayed only on the Local users. The authorization source cannot be changed in the editing form after the user has been created.
INFO
User E-mail
The e-mail address of the user is entered (in a valid e-mail format; more than one address can be defined by separating them with a comma). It is used in the notifications and in the delivery of the 2FA verification code. On the LDAP users, the addresses synchronized from the directory are displayed in the field as a suggestion.
INFO
User Phone Number
The phone number of the user is entered. It is used in the notifications and in the delivery of the 2FA verification code by SMS. On the LDAP users, the numbers synchronized from the directory are displayed in the field as a suggestion.
Password
INFO
Force Complex Password Local Default: On
It appears only on the Local users. While it is on, the password is required to comply with the complexity rules: 8 – 32 characters; at least one lowercase letter, one uppercase letter, one digit and one special character. The switch can be turned off on a user basis; while it is off, complexity is not required.
INFO
Password Required in Local
The password is entered for the Local (TR7) user. It is required while creating a new user; in the editing it is requested only when Give new password is selected. It is not displayed on the users with an external source (LDAP/RADIUS/TACACS).
INFO
Password (Again)
The password is entered again for it to be verified; the two fields must be exactly the same.
INFO
Authorization / Scope Fields According to the User Type
According to the selected user type, additional fields that narrow down the access of the user are displayed:
- User vDevices: the vDevices the user is authorized for (in the types with a vDevice scope).
- User vServices: the vServices the user is authorized for (in the types with a vService scope).
- Backend Service Permission: whether a permission will be given on the Backend Services or not.
- Certificate Management: the certificate management permission.
- Certificate Selection: the certificate selection permission.
Which fields will appear depends on the scopes the user type supports; the unsupported fields are not shown. When the vDevice/vService selection fields are left blank, they are displayed as No Restriction; in the read-only types (Read-Only, Monitor) the selection can be left completely blank, and in the other types at least one object must be selected.
Shared objects: a user restricted to vServices edits a shared object (profile, rule, condition, Backend Service, certificate) only while every vService using it is within their scope. For this reason a restricted user cannot use an object managed by another restricted user on their own vService; doing so would leave the managing user unable to edit it. The save is refused with this message: "… is used only on the vServices of another restricted account, which manages it. Using it on your vService would stop that account from editing it. Create your own with the same settings and use that instead." In that case a new object with the same settings is created and used instead. Objects that nobody manages alone (those already used across different scopes, unused ones and built-in objects) are used freely.
Details
INFO
Client Certificate Authentication
It enables the user to log in with a client certificate (mTLS). After it is enabled, a certificate must be generated for the user with Generate Certificate on the listing screen (when the administrator generates a certificate, this setting is turned on automatically).
INFO
Custom Idle Session Time Optional Default: Off
When it is turned on, the idle session of this user closes at the end of the period given here instead of the general HTTP(s) TR7 Idle Session Time setting on the Management Access screen; if it is left off, the general setting applies. The period is entered in the 1 minute – 30 days range, in the minute / hour / day unit (when it is turned on, the suggested value is 3 hours).
INFO
Access CLI over SSH Default: Off
When it is enabled, the user has command line (CLI) access by connecting to the device over SSH.
INFO
Access CLI over WEB Default: On (new user)
When it is enabled, the user can use the Web CLI interface inside the browser. While creating a new user it comes on by default.
User Sessions
It is the section in which the users that have logged in to the web interface are listed.
 The User Sessions Screen
The table opens with the following columns by default:
| Column | Description |
|---|---|
| Connection Date | The date and time the session was opened. The table is sorted according to this column by default. |
| Username | The name of the user who opened the session. |
| Device | The Server Name value of the TR7 device on which the session was opened. In a cluster setup the sessions of both devices are collected in the same list. |
| IP | The client IP address the user connected from. |
| User-Agent | The browser and the operating system the connection was made from (e.g. Chrome 152 - Windows 10). |
There is no column hidden by default.
The items in the toolbar are arranged from left to right in the following order; the last two items (Page Information and Page Size) are located in the information strip below the table.
Columns
Which columns will be shown in the table is selected; all five columns are on by default. In the same panel the columns are reordered by dragging, the alignment is selected per column, a manually set column width is returned to automatic sizing by clicking, and with the Reset button the column layout is returned to the default. The layout is stored per user.
Export
By clicking the Export button, the session list is exported as Excel, CSV or PDF.
Kick User
When one or more sessions are selected and the Kick User button is clicked, the active web session of the related users is terminated and they have to log in again.
Search
Used to search all information in the table.
RegExp Search
Used to search all information in the table with a regular expression (RegExp).
Column Based Search
Used to perform a column-based search on the information in the table.
Page Information
Information about the number of sessions in the list takes place.
Page Size
The maximum number of sessions to be displayed on the page is selected. The arrow icons are used to navigate between the pages.
CLI Sessions
It is the section in which the sessions opened over the Web CLI inside the browser are listed. The sessions close by themselves when the connection ends; on this screen there is no manual termination (Kick).
 The CLI Sessions Screen
The table opens with the same columns as User Sessions:
| Column | Description |
|---|---|
| Connection Date | The date and time the session was opened. The table is sorted according to this column by default. |
| Username | The name of the user who opened the session. |
| Device | The Server Name value of the TR7 device on which the session was opened. |
| IP | The client IP address the user connected from. |
| User-Agent | Since the browser information is not carried in the CLI sessions, this column usually comes as -. |
There is no column hidden by default.
The items in the toolbar are arranged from left to right in the following order; the last two items (Page Information and Page Size) are located in the information strip below the table. The Kick User button does not take place on this screen.
Columns
Which columns will be shown in the table is selected; all five columns are on by default. In the same panel the columns are reordered by dragging, the alignment is selected per column, a manually set column width is returned to automatic sizing by clicking, and with the Reset button the column layout is returned to the default. The layout is stored per user.
Export
By clicking the Export button, the session list is exported as Excel, CSV or PDF.
Search
Used to search all information in the table.
RegExp Search
Used to search all information in the table with a regular expression (RegExp).
Column Based Search
Used to perform a column-based search on the information in the table.
Page Information
Information about the number of sessions in the list takes place.
Page Size
The maximum number of sessions to be displayed on the page is selected. The arrow icons are used to navigate between the pages.
User Management Settings
It is the tab in which the general settings related to the user management are configured. The display screen is read-only; the Edit entry at the top opens a closable editing tab named Edit User Management Settings.
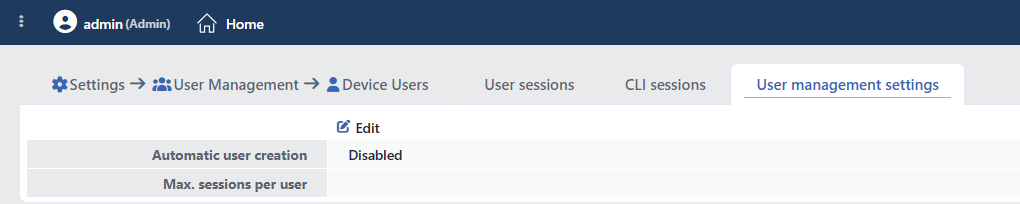 The User Management Settings Tab
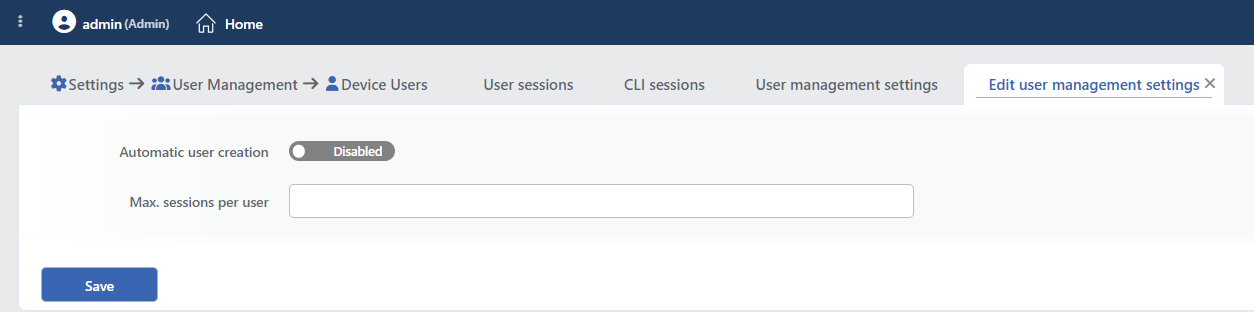 The Edit User Management Settings Tab
INFO
Automatic User Creation Default: Disabled
It is an on/off switch; while it is off, Disabled is written on it and the two fields below it are not displayed. When the switch is turned on, the User Creation Source and Default User Type to Create fields appear.
 While Automatic User Creation Is On
When it is enabled, a device user is created automatically on TR7 for a user who logs in successfully for the first time from an external source (LDAP/RADIUS/TACACS). In this way there is no need to add every user manually.
User Creation Source
Which external sources will trigger the automatic creation is selected (LDAP, RADIUS, TACACS). At least one source must be selected; when it is attempted to save without a selection being made, the field turns red and the "At least 1 must be selected" warning appears under it.
Default User Type to Create
The user type to be assigned to the automatically created users is selected. The default is Read-only user; in this way the users that come automatically start with the lowest permission.
INFO
Max. Sessions Per User
It limits the number of concurrent sessions a user can open at the same time (1 – 1,000,000). When it is left blank, the number of sessions is unlimited.
