
Smarter by Design.Simpler for Business
SAML 2.0
What Is SAML 2.0?
SAML 2.0 is the Authentication Providers type that has the identity of the user verified in an identity provider that supports SAML 2.0 (an IdP such as Microsoft Entra ID, ADFS, Keycloak and Okta). The user is directed to the single sign-on address of the IdP; the signed SAML response of the IdP is verified on TR7 and the user information is read from the assertion in the response. TR7 is the service provider (SP) in this flow.
How does it work?
- An application (SP) registration for TR7 is created on the IdP; the SP Entity ID and the Assertion Consumer Service URL are written into this registration.
- SAML 2.0 is selected as the Provider Type on this screen; the IdP information is entered with Import Metadata or manually.
- The profile is added to the access flow as an Authentication Provider step; the user is directed to the IdP.
- The signed response returned by the IdP is verified, the attributes are written to the session with the automatic mapping and the flow continues from the success transition; if the verification fails, the fail transition is taken.
Operational Best Practices
- Filling in with the metadata. The IdP information must be filled in with Import Metadata instead of being written manually.
- The signature verification on. At least one of the Require Signed Assertions and Require Signed Response options must stay on.
- Clock synchronization. The clocks of TR7 and the IdP must be kept equal with NTP; Clock Skew Tolerance covers only small differences.
- The ACS address registered. The Assertion Consumer Service URL must be registered on the IdP as the full address (
https://<domain name><path>). - The lockout on the IdP. The lockout is generally performed on the IdP side; No Lockout or Use Gateway Defaults must be selected for Lockout Behavior.
How to Add?
A new SAML 2.0 provider is added through the TR7 web management interface with the following steps:
- The Configuration Menu is opened by clicking the TR7 logo at the bottom left.
- The AGS → Authentication → Authentication Providers → Add steps are followed.
- A unique and descriptive name is entered for the profile; SAML 2.0 is selected as the Provider Type.
- The IdP information is filled in with Import Metadata; the SP information is entered.
- The profile is added by clicking the
Addbutton.
Profile Add Form
When the AGS → Authentication → Authentication Providers → Add steps are followed and SAML 2.0 is selected in the Provider Type field, the form opens with the following fields; the Namespace and Authentication Server fields are not present in this type.
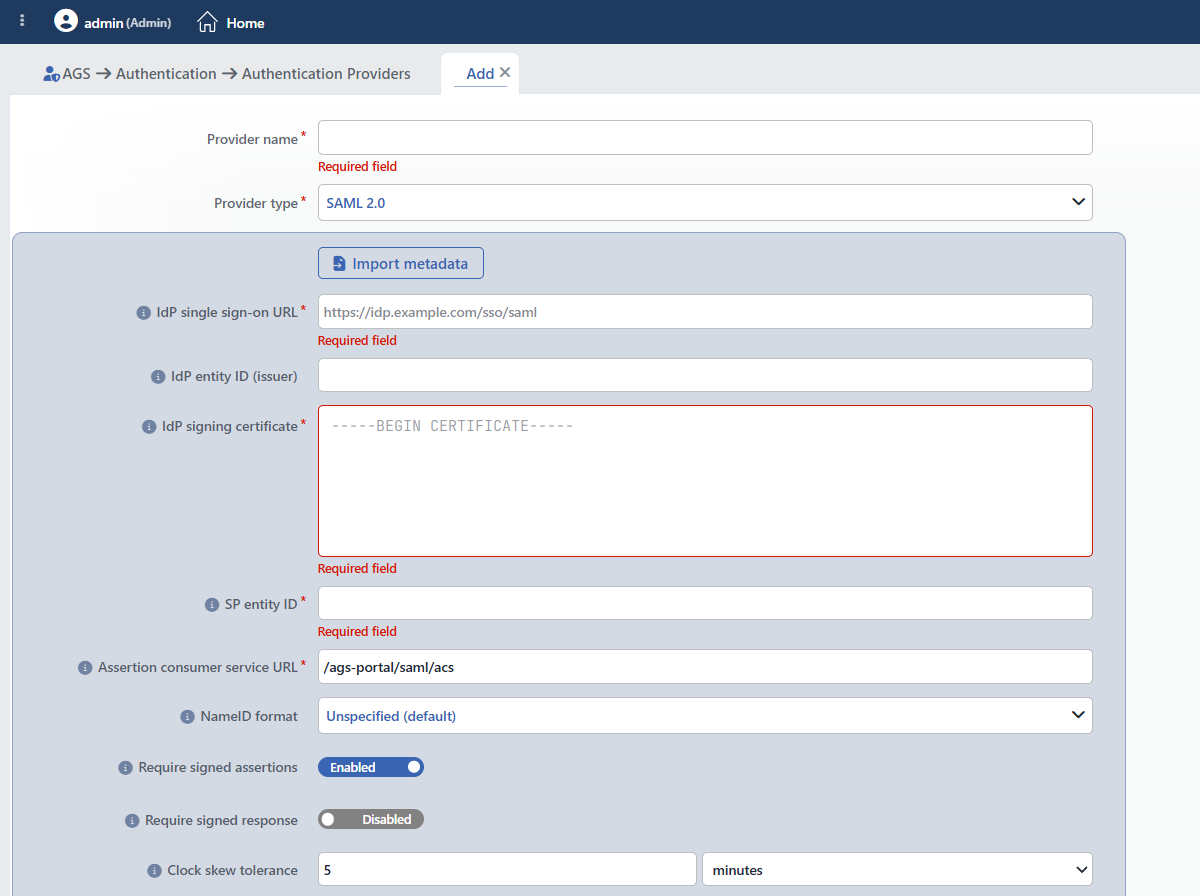 The Form While SAML 2.0 Is Selected
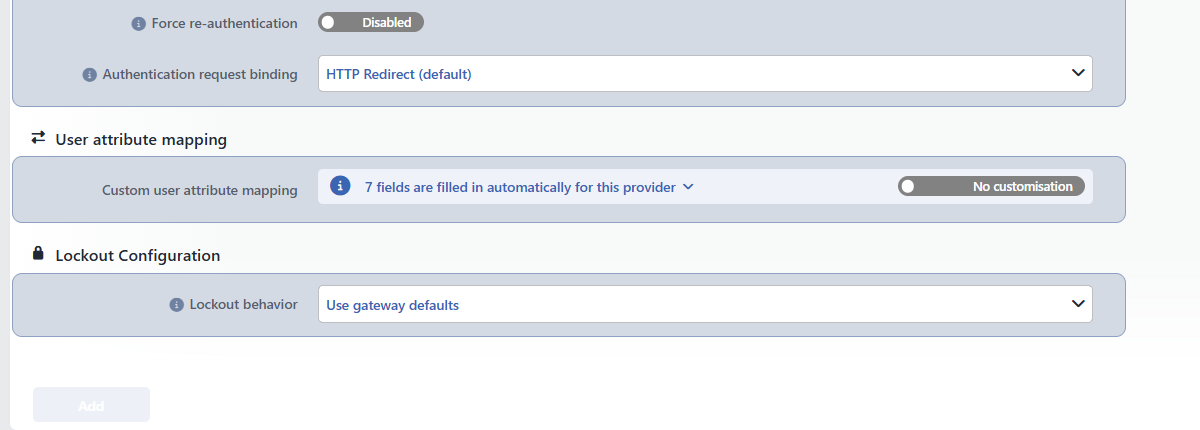 The Continuation of the SAML 2.0 Form
INFO
Provider Name Required
The name of the profile; it identifies the profile in the list, in the step selection in the flowchart, in the session list and in the logs. The name must be unique on the device; a second profile with the same name is not saved and the Name is used warning is displayed. When it is left empty, the Required field warning is displayed.
INFO
Provider Type Required
The provider type; SAML 2.0 is selected on this page. When the type is changed, only the fields of the new type are displayed and saved; the type is changed in the edit form as well.
INFO
Import Metadata
The button that fills in the fields from the metadata XML of the IdP (see Import Metadata).
INFO
IdP Single Sign-On URL Required
The IdP endpoint to which the user is directed for the login (SingleSignOnService; such as https://idp.example.com/sso/saml).
INFO
IdP Entity ID (Issuer)
The issuer expected in the SAML responses; when it is entered, responses coming from another issuer are rejected.
INFO
IdP Signing Certificate Required
The X.509 certificate used to verify the signatures of the IdP; it is pasted into the multi-line field in PEM form starting with -----BEGIN CERTIFICATE----- or in base64 form.
INFO
SP Entity ID Required
The identifier of this access service on the IdP; it is also used as the expected audience of the assertion.
INFO
Assertion Consumer Service URL Required Default: /ags-portal/saml/acs
The address to which the IdP sends the SAML response. When a path is entered, the address is completed with the scheme and the domain name the request came from; when the full address is entered, it is announced to the IdP as it is. If a path is used, it must be kept under the root path of the access service and the full address (https://<domain name><path>) must be registered on the IdP.
INFO
NameID Format Default: Unspecified (default)
The NameID format to be requested in the authentication request is selected:
| Option | Meaning |
|---|---|
| Unspecified (default) | The format is determined by the IdP; this option is used if the IdP does not require a particular format. |
| Email Address | The user is identified with the e-mail address. |
| Persistent | The user is identified with a persistent and unchanging id that the IdP produces for this SP. |
| Transient | The user is identified with a temporary id that changes in every session. |
INFO
Require Signed Assertions Default: Enabled
While it is on, responses that contain an unsigned assertion are rejected.
INFO
Require Signed Response Default: Disabled
While it is on, an unsigned SAML response document is rejected. Some IdPs (such as the default of Keycloak) sign the response instead of the assertion; in this case this option is turned on. At least one of the two signature options must stay on.
INFO
Clock Skew Tolerance Default: 5 minutes
The clock difference that is tolerated between the access service and the IdP while the assertion time windows are verified; it is entered as a value and a unit (seconds or minutes), and a duration between 0 seconds and 10 minutes is accepted.
INFO
Force Re-authentication Default: Disabled
While it is on, re-authentication is requested from the user even if the session on the IdP is open.
INFO
Authentication Request Binding Default: HTTP Redirect (default)
How the authentication request is carried to the IdP is selected:
| Option | Meaning |
|---|---|
| HTTP Redirect (default) | The request is carried in the address line, with a redirect. |
| HTTP POST | The request is carried inside a form that is submitted automatically; for large requests or for IdPs that accept only POST. |
User Attribute Mapping
INFO
Custom User Attribute Mapping Default: No customisation
How the fields in the provider response are mapped to the session attributes is managed. The information bar to the left of the field shows the number of fields mapped automatically for this type: 7 fields are filled in automatically for this provider. When the arrow icon on the bar is clicked, the 7 automatically mapped rows and the JSONata expression of each of them are listed.
When the switch on the right is moved to the Customised position, the AGS Attribute and Source Attribute table is displayed: the session attribute (with a suggestion list) is entered in the left column and the JSONata expression that is evaluated on the provider response in the right column. When the switch is turned on, the + Add link that adds a row appears on the right of the bar. A custom row that targets the same attribute as an automatic row overrides the automatic one (the replaced below badge) and the text of the information bar turns into the … fields are filled in automatically; you replace … of them form, which also says how many automatic rows are replaced. When a name outside the standard attributes of AGS is entered, this attribute is defined as a custom user field on the vService; names that start with _ are considered hidden fields and do not produce a custom user field.
Lockout Configuration
INFO
Lockout Behavior Default: Use gateway defaults
With which lockout policies the failed attempts on this provider are counted is selected:
| Option | Meaning |
|---|---|
| Use Gateway Defaults | The policies in the Default Lockout Policies list of the vService are used. |
| Replace Defaults | Only the policies selected in the Lockout Policies field are used. |
| Add to Defaults | In addition to the default policies of the vService, the ones selected in the Lockout Policies field are used as well. |
| No Lockout | Failed attempts are not counted on this provider, no lockout is performed. |
Lockout Policies
Displayed while Replace Defaults or Add to Defaults is selected; the built-in and defined policies on the Account Lockout Policies screen are selected.
INFO
Add
The profile is added by clicking the Add button; the tab closes and the profile is displayed in the list.
Import Metadata
The Import Metadata button in the form opens the Import identity provider metadata window with the Metadata XML field. The following fields are filled in from the pasted metadata: IdP Single Sign-On URL (first the HTTP-Redirect binding, if it is absent HTTP-POST, and if that is absent as well the first entry in the list), IdP Entity ID (Issuer) if there is an entityID in the metadata, IdP Signing Certificate (the signing certificates as PEM) and NameID Format if the first NameID format of the IdP is one of the four options in the list; Authentication Request Binding does not change.
The operation is performed in the browser, no network request goes out of the device. Success is reported with the SAML fields were filled from the identity provider metadata message; with content that cannot be parsed the window stays open.
