
Smarter by Design.Simpler for Business
Cache
What Is the Cache Profile?
Cache is a configuration profile that makes it possible, on the HTTP vServices running on TR7, for the responses received from the Backend Services to be stored temporarily and for the subsequent requests to the same content to be met directly from the cache.
In the TR7 architecture, cache management is designed on a profile basis. Thanks to this structure, the caching rules, the timeout values and the behavior parameters are defined centrally and applied by being assigned to the related vServices. Cache Profiles work at the vService level and are valid for Layer 7 (HTTP/HTTPS) traffic.
When a Cache Profile is defined, TR7 first searches for the requests coming from the client in the cache. If matching content is found (cache: HIT), the response is served directly from the cache and no request is sent to the Backend Service. If there is no match (cache: MISS), the request is forwarded to the Backend Service and the returning response is cached if it complies with the defined rules.
TR7 can perform the caching operation both statically and dynamically. Static caching targets the content with certain file extensions (CSS, JavaScript, images, etc.), while dynamic caching provides caching customized according to the client IP, the port or other parameters.
The benefits it provides
- The number of requests going to the Backend Services is reduced considerably.
- The response times are improved dramatically.
- The server resources are used more efficiently.
- Consistent and fast service performance is provided even under load.
The Importance of the Cache Profile
In modern web applications, caching is not only an optimization technique that provides a performance increase; it is a critical component that has a direct effect on the user experience, the backend service capacity and the operational costs.
In web traffic, the repeated requests to the same content (CSS files, JavaScript, images, API responses) take an important place. Going to the Backend Service for every request causes unnecessary network traffic, server load and latency. Especially under high traffic, this situation can lead to the capacity of the Backend Service being exceeded and the service quality dropping.
The caching mechanism makes it possible for the frequently accessed content to be stored temporarily on TR7. In this way, the subsequent requests to the same content are met directly by TR7 without reaching the Backend Service. This approach can lower the response times to millisecond levels.
The fact that caching can be defined on a profile basis and at the vService level on TR7 makes it possible for different applications to be managed according to their different caching requirements. A web site that is heavy on static content and an application that requires dynamic API responses can be optimized on the same system without affecting each other.
50-90%
Server load
The decrease in the requests going to the Backend Service
10-100×
Response speed
The improvement on the content served from the cache
↓ Cost
Bandwidth
The decrease in the outbound traffic cost
+ Resilience
Traffic spikes
Protection against DDoS and load increases
For this reason, Cache Profiles are one of the basic building blocks of offering high-performance and scalable services on TR7.
The Default Cache Profile Behavior
When the Cache feature is activated on a vService on TR7, the system starts to work with the default cache profile values. This profile offers balanced caching parameters for general use scenarios and makes it possible for the common static content types to be cached automatically. It can be used for standard web applications and content delivery scenarios without additional configuration.
The values applied within the scope of the default Cache Profile:
| Parameter | Value | Description |
|---|---|---|
| Cached(HIT) Header Name | TRCACHE | It states the name of the HTTP header added to the response in order to show that the response is served from the cache. |
| Max. Object Size (MB) | Automatic | The maximum size to be cached is determined automatically according to the vService memory capacity. |
| Cache Timeout | 1 hour | It determines for how long the content in the cache will remain valid. |
| Caching Rules | File extensions | It makes it possible for the content to be cached when the path ends with the specified static file extensions. |
| Ignore Host Header | Disabled | The Host information is included in the cache key; different domain names are cached separately. |
| Ignore Query | Disabled | The query parameters are included in the cache key; different parameters are cached separately. |
| Ignore Request Headers | Disabled | The caching directives in the request headers are taken into account. |
| Ignore Response Headers | Disabled | The caching directives in the response headers (Cache-Control, Expires, Set-Cookie) are taken into account. |
| Ignore HTTP Method Standards | Disabled | Only GET and HEAD requests are cached. |
| Dynamic Caching | Disabled | No additional information is added to the cache key. |
These default values make it possible for the static content to be cached safely for most web applications. They are sufficient for a quick start; however, when API responses, dynamic content, user-specific data or special caching requirements are in question, configuring the profiles specifically for the application is recommended.
Effects and Behavior
The rules defined within the scope of the Cache Profiles make it possible for the content to be cached and served in a controlled way during the traffic flow on TR7. The process exhibits critical behaviors in terms of both a performance increase and resource efficiency.
The sequence diagram below shows how the cache decision (HIT/MISS) is made during the passage of an HTTP request over TR7:
In the sections below, every behavior of the process is explained in detail.
INFO
The Cache HIT Situation
If the requested content is present in the cache and its validity period has not expired, TR7 serves the response directly from the cache. In this case, no request is sent to the Backend Service and the defined response header (default: TRCACHE) carries the HIT value.
INFO
The Cache MISS Situation
If the requested content is not present in the cache or has expired, the request is forwarded to the Backend Service. The response returning from the Backend Service is cached if it complies with the caching rules and is transmitted to the client at the same time.
INFO
Cache Timeout
The content in the cache remains valid for the defined timeout period. When the period expires, the content is considered invalid and is refreshed from the Backend Service on the next request.
INFO
Max. Object Size
The content that exceeds the defined size limit is not cached. This parameter prevents large files from consuming the cache capacity.
INFO
Dynamic Caching
When it is enabled, the cache key is created according to the selected parameters (source IP, port, etc.). In this way, separate cache entries can be kept for the requests coming to the same URL from different clients.
Recommended Values and Tuning Guide
The correct configuration of the cache parameters is critically important in terms of the performance and the resource efficiency of the services running on TR7. The default values offer a balanced starting point for general use scenarios; they may need to be adjusted depending on the application type and the content and traffic structure.
TIP
Web Sites That Are Heavy on Static Content
On the sites where CSS, JavaScript, images and font files are dense:
- The Cache timeout value can be kept long (hours or days).
- The Max. object size must be adjusted according to the largest static file size.
- Ignore query can be activated (on static files, the query parameters should usually not affect the caching behavior).
This approach makes it possible for the static content to stay in the cache for the maximum period.
TIP
API Services
In the caching of REST or GraphQL API responses:
- The Cache timeout must be kept short (seconds or minutes).
- Dynamic caching must be evaluated for client- or session-based responses.
- Ignore response headers must be used carefully (the
Cache-Controlheaders can be important).
In API caching, data consistency and currency are critically important.
TIP
E-Commerce and Dynamic Content
On the pages that contain product pages, price information or inventory status:
- The Cache timeout must be kept very short or the caching must be done carefully.
- User segmentation can be evaluated with Dynamic caching.
- Rule exceptions must be defined so that the critical dynamic data is not cached.
A wrong configuration can cause old price or stock information to be shown.
TIP
Media and Large File Delivery
In the delivery of video, audio or large files:
- The Max. object size must be adjusted to a sufficient size.
- The Cache timeout can be kept long (media content usually does not change often).
- Caching is critically important for bandwidth saving.
It must be made sure that the cache capacity is sufficient for large files.
The cache is kept in memory and is not persistent
The cache is kept only in memory; it is not written to disk. Since every change made on the profile requires the vService to be reconfigured, the cache is completely emptied and starts to fill again. The same situation is also valid when the service is restarted.
The space allocated to the cache is calculated automatically from the memory capacity defined for the vService (approximately one quarter of the capacity, at most 4095 MB) and cannot be configured separately.
There is no manual cache clearing
There is no operation in the interface that empties the cache manually. When the published content is updated, the old copy in the cache continues to be served until the defined period expires.
For the content that is updated frequently, the Cache Timeout value must be selected accordingly or version information must be used in the content addresses.
The ignore options carry a security risk
When Ignore Response Headers is turned on, the "do not cache this response" directives of the Backend Service are ignored. The responses that contain a session cookie or user-specific data can be cached and served to other users.
When Ignore HTTP Method Standards is turned on, the responses of the requests that change data, such as POST, also become cacheable.
These two options must be used only for the content that has been verified to be really static and together with a narrow caching condition.
INFO
Monitoring the Cache Performance
On the vService dashboard there are the cache hit ratio box (in this version it appears with the Cache git rate title) and the number of lookups (Cache lookups); in addition, the change of the hit ratio over time is monitored with the Frontend Cache Hit Ratio graph.
The responses served from the cache can also be distinguished in the conditions: with the ready If the response comes from cache condition, rules specific to only the responses returning from the cache can be defined.
Operational Best Practices
- Do not cache sensitive data. Caching the responses that contain user-specific data, session information, payment details or personal information creates a security risk; such content must be kept outside the caching rules.
- Determine the Cache Timeout values carefully. Values that are too short reduce the benefit of the cache, values that are too long lead to old content being served; determine a balanced value according to the content update frequency.
- No change is made without the "Used in" information being checked. In the live environment, a profile must not be updated without knowing on which vServices it is used; the change instantly affects the cache behavior of all the connected services.
- The cache HIT ratio is monitored. A low HIT ratio indicates that the caching rules or the timeout values need to be reviewed; the TR7 metrics are followed regularly.
- Dynamic Caching is used carefully. When it is configured correctly, it is a powerful tool; wrong use lowers the cache efficiency or causes wrong content to be served.
- Evaluate the cache during application updates. It must be taken into account that the old cached content can cause problems after an update.
Supported vService Types
HTTP
L7 TCP
Network
How to Add?
A new Cache Profile is added through the TR7 web management interface with the steps below:
- The Configuration Menu is opened by clicking the TR7 logo at the bottom left.
- The Load Balancer → Profiles → Cache → Add steps are followed.
- A unique and descriptive name is entered for the profile.
- The values suitable for the application and service requirements are configured.
- The profile is added by clicking the
Addbutton.
TIP
Reaching the page via quick search
Instead of navigating the menu step by step, the related page is reached directly by using the search bar in the bottom left corner of the screen. The search bar opens with the Alt + T shortcut on Windows and Opt + T on macOS; typing the name of the feature being searched for is then sufficient.
The created profile can be used on one or more vServices.
Profiles Listing Screen
By following the Load Balancer → Profiles → Cache path, the list of all the Cache Profiles added on the TR7 device is reached. Profile adding, editing and deleting operations are performed through this screen.
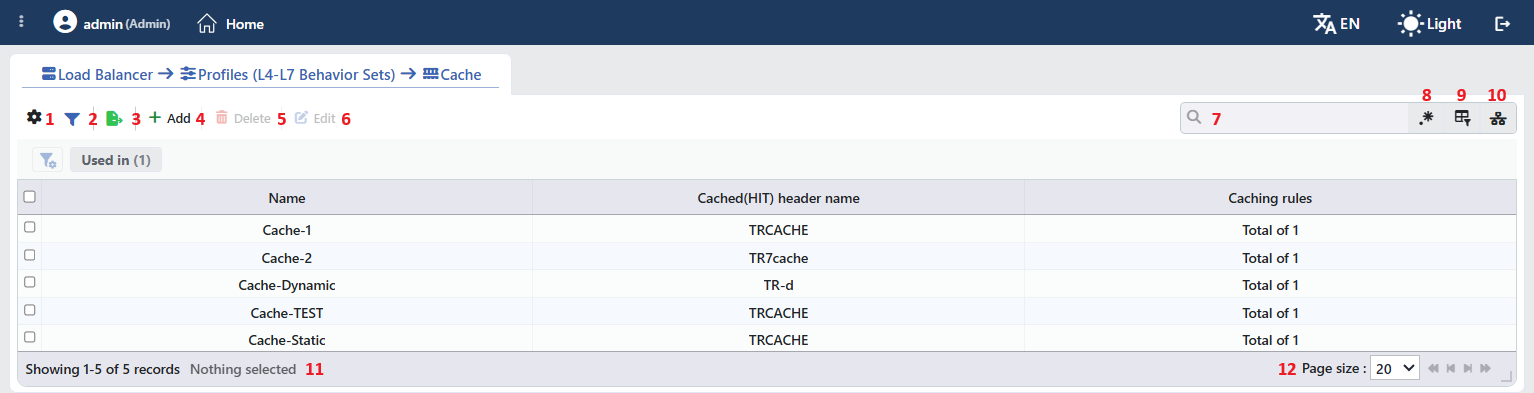 Cache Profiles Listing Form
The table opens with the following columns by default:
| Column | Description |
|---|---|
| Name | The name of the profile. |
| Cached(HIT) Header Name | The name of the header that marks the responses met from the cache (HIT). |
| Caching Rules | The number of caching rules in the profile, in the Total of N form. |
The built-in Default Profile is not in this list; it is offered only in the vService profile selector. There is no column hidden by default; these three columns are in the column selector. The table is not sorted when it opens; when a column header is clicked, descending sorting is applied first, then ascending, and on the third click the sorting is removed.
The items in the toolbar are arranged from left to right in the following order; the last two items (Page Information and Page Size) are located in the information strip below the table.
Columns
Which columns are shown in the table is selected; all three columns are on by default. In the same panel, columns are reordered by dragging and alignment is selected per column; the row height is fitted to the page with the Fit rows to the page button, and the column layout is reset to default with the Reset button. The layout is stored per user.
Filter
The Filter button is used to filter the profiles shown in the list according to certain criteria; the button shows the number of active filters with a badge. There is a single card in the strip: Used in. The card lists the names of the vServices on which the profile is used; for the profiles that are not used on any vService, the Unused Entries option is available. The selections are displayed as closable labels under the card strip, right above the table.
Export
The table is exported as Excel, CSV or PDF by clicking the Export button. In the window that opens, the Filename, Format and Data Source, together with the Columns to be exported, are determined; the remaining fields are displayed according to the format: CSV Separator for CSV, Excel Sheet Name for Excel, and Page Orientation and Page Size for PDF.
Add
By clicking the Add button, the form for creating a new profile opens in the Add tab.
Delete
When one or more profiles are selected and the Delete button is clicked, the related profiles are deleted.
WARNING
A profile that is in use can also be deleted and the confirmation window does not show the usage places. On the vServices that use the deleted profile, caching is silently turned off; there is no return to the default profile. Before deleting, the Used in tab on the preview panel must be checked.
Edit
By clicking the Edit button, the edit form of the selected profile opens in the Edit tab. The button becomes enabled only when a single profile is selected.
Search
Used to search all information in the table.
RegExp Search
Used to search all information in the table with a regular expression (RegExp). This button is hidden while column-based search or the usage filter is active.
Column Based Search
Used to perform a column-based search on the information in the table.
Usage Filter
Used to filter which vServices the profiles are bound to; the profiles used on the selected vService are listed, and there is an Unused Entries option for those not used on any vService. While the filter is active, the selector takes the place of the search box; when the icon is clicked again, the search box returns.
Page Information
Contains information about the total number of defined profiles and the number of profiles displayed in the list: Showing N-M of T records and the number of selected profiles (N selected, or Nothing selected when there is no selection). If a selection has been made in the filter strip, the number of applied filters and the shown/total row information are added to the same line.
Page Size
The maximum number of profiles to be displayed on the page is selected. The default is 20; the options are 5, 10, 20, 50, 100, 200, 500 and All.
Right-Click Menu
When a row is right-clicked, a menu with the profile's name in its title opens. Both operations in the menu apply only to the right-clicked profile; a selection made in the list does not affect the menu.
| Operation | What it does |
|---|---|
| Edit | Opens the editing form of the profile in the Edit tab; it is the same as the form opened by the Edit button in the toolbar. |
| Delete | Deletes the right-clicked profile; the same confirmation question as the deletion in the toolbar is displayed. |
Preview of the Selected Profile
When a row in the list is clicked, the preview of the profile opens on the right of the screen; when the selected row is clicked again, the panel closes. In the title there are the profile icon, the name of the profile and the Cache profile subtitle, and at the top right there is a single operation.
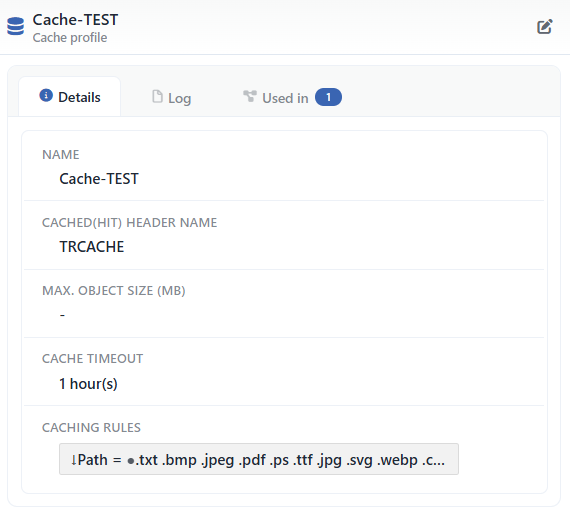 Preview of the Selected Profile
| Operation | What it does |
|---|---|
| Edit | Opens the editing form of the profile in the Edit tab. |
The panel has three tabs; the last one is displayed only if there is a vService that uses the profile:
Details
Lists the settings of the profile line by line (the table below).
Log
Lists the user operations on the profile (adding, editing, deleting) as a timeline.
Used in
Lists the vServices on which the profile is used. The badge next to the tab name shows the number of usages; if there is no vService that uses the profile, the tab is not displayed at all.
The rows in the Details tab are as follows, in order:
| Row | Description | Visibility condition |
|---|---|---|
| Name | The name of the profile. | Always |
| Cached(HIT) Header Name | The name of the HIT header. | Always |
| Max. Object Size (MB) | The largest object size to be cached, in the N MB form; if undefined, -. | Always |
| Cache Timeout | The cache period, with its value and unit (e.g. 1 hour(s)). | If a period is defined |
| Caching Rules | The caching rules in the form of a condition expression. | Always |
| Ignore Query | Shows that the option is on. | If the option is on |
| Ignore Host Header | Shows that the option is on. | If the option is on |
| Ignore Request Headers | Shows that the option is on. | If the option is on |
| Ignore Response Headers | Shows that the option is on. | If the option is on |
| Ignore HTTP Method Standards | Shows that the option is on. | If the option is on |
| Dynamic Caching | Shows that the option is on. | If the option is on |
| Key | The Dynamic Caching keys, comma separated; the smart variables are shown with their labels. | If at least one key is defined |
The "Used in" tab must be checked
The Used in tab shows on which vServices the profile is active. Since updates to the profile settings in a live environment will immediately affect all bound services, evaluating the possible service impacts before a change is critically important.
Profile Add Form
A new Cache Profile is added on the TR7 device by following the Load Balancer → Profiles → Cache → Add steps.
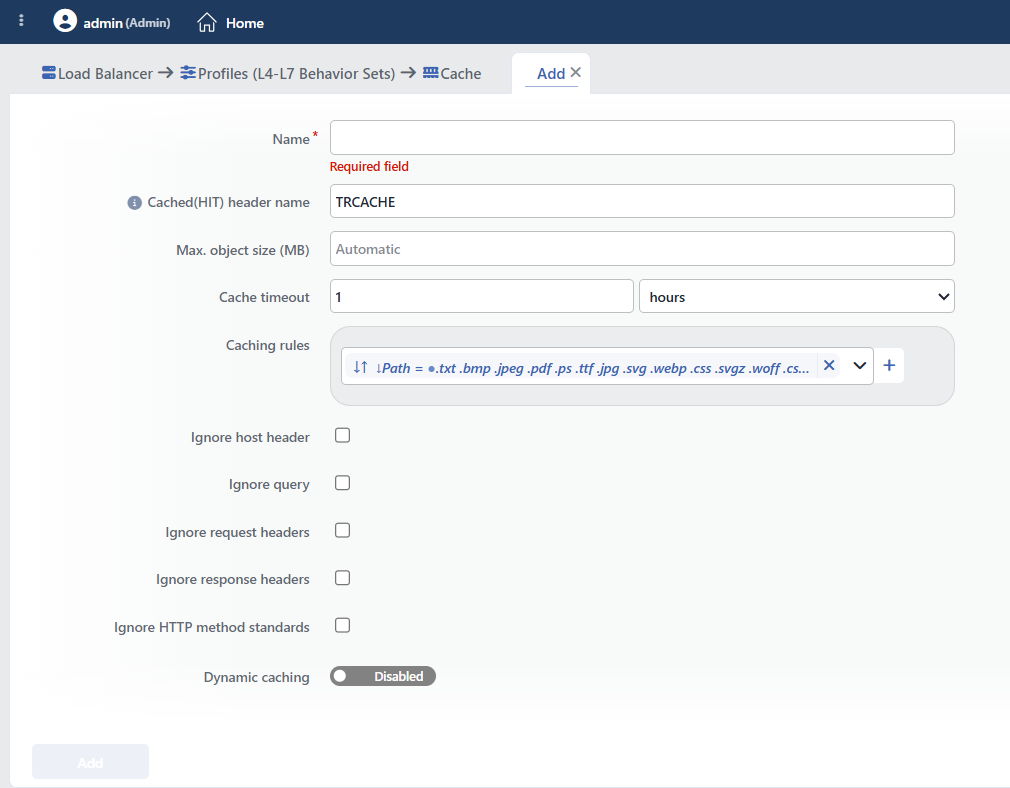 Cache Profile Add Form
INFO
Cached(HIT) Header Name Default: TRCACHE
It is the name of the response header that reports the cache status. This header is added to every response; if the content was served from the cache, its value is HIT, and if it was received from the Backend Service, MISS. The responses that TR7 produces itself without going to the Backend Service (such as blocking and redirection) also carry the HIT value in this header.
INFO
Max. Object Size (MB) Default: Automatic
The maximum content size that can be cached is defined in megabytes (MB). The content above this limit is not cached and is served from the Backend Service on every request.
The entered value is limited to half of the total cache space allocated to the vService; even if a larger value is entered, this ceiling is valid. At most 2048 MB can be entered.
If the field is left empty, no separate limit is defined for the object size and the engine’s own default is valid.
INFO
Cache Timeout Default: 1 hour
For how long the cached content will remain valid is defined. When the period expires, the content is considered invalid and is refreshed from the Backend Service on the next request. The period type is selected from the unit list:
- seconds: it is suitable for short-lived or frequently updated content.
- minutes: it is a balanced option for general use.
- hours: it is suitable for static content that changes rarely.
WARNING
The form accepts values as low as 1 second; in the definitions made over the API, at least 10 seconds is required.
INFO
Caching Rules
The condition rules that determine which requests will be cached are defined. By default, caching is performed when the path ends with the common static file extensions:
.txt .bmp .jpeg .pdf .ps .ttf .jpg .svg .webp .css .svgz .woff .csv .gif .mid .png .swf .woff2 .doc .midi .ppt .tif .xls .docx .pptx .tiff .xlsx .mp4 .flv .mov .wmv .avi .ogg .mkv .mpg
These rules can be customized by using the Conditions on TR7. Conditions can be defined according to the path, the header, the query parameter or other HTTP properties. There is a single rule row in the profile; there is no row adding or deleting button. By clicking the (+) button on the far right, a new condition group is added to the rule; at most three groups can be defined.
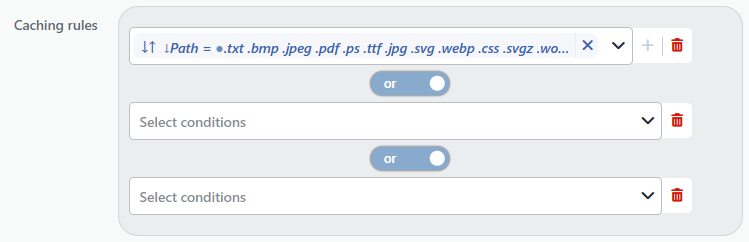 The Caching rules Selection
The selected conditions can be combined with the AND/OR logical operators and complex caching scenarios can be created.
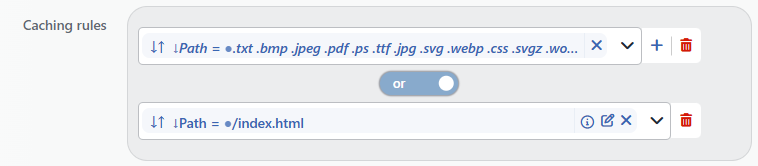 The OR Operator
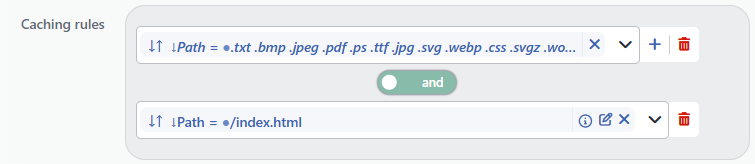 The AND Operator
Caching does not work without a condition being selected
The add form opens with the rule row filled with the common static file extensions condition above. If this condition is removed and a new one is not defined in its place, the profile does not cache any content even if it is assigned to a vService; the interface does not give a warning in this case.
INFO
Ignore Host Header Default: Disabled
When it is activated, the HTTP Host header is not taken into account while the cache key is being calculated. In this way, a single cache entry is used for the requests to the same path coming from different domains. It increases the cache efficiency in the scenarios where more than one domain serves the same content.
INFO
Ignore Query Default: Disabled
When it is activated, the query parameters in the URL are not included in the cache key calculation. A single cache entry is used for the requests made to the same path with different query parameters. It prevents the cache-busting parameters on static files (e.g. ?v=1.2) from affecting the cache.
INFO
Ignore Request Headers Default: Disabled
When it is activated, the HTTP request headers coming from the client are not taken into account in the cache evaluation. Normally, some request headers (Accept-Encoding, Accept-Language, etc.) can affect the caching decision; this option makes it possible for the headers in question to be ignored.
INFO
Ignore Response Headers Default: Disabled
When it is activated, the HTTP response headers returning from the Backend Service (Cache-Control, Expires, Pragma, etc.) do not affect the caching decision. Normally these headers determine whether the content will be cached or not; this option is used in order to override the caching directives of the Backend Service.
INFO
Ignore HTTP Method Standards Default: Disabled
When it is activated, the standard HTTP method rules are ignored and all the HTTP methods are evaluated for caching. Normally only GET and HEAD requests are accepted as cacheable; this option also allows POST or other methods to be cached.
INFO
Dynamic Caching Default: Disabled
It makes it possible for the cache key to be enriched with additional parameters beyond the standard URL-based structure.
Standard caching works only over the URL (host + path + query); a single cache entry is kept for all the requests coming to the same URL.
Dynamic caching, when it is activated, adds the selected parameters (the client IP, the port, etc.) to the cache key. In this way:
- Separate cache entries are created for the requests coming to the same URL from different clients.
- Different content based on client segmentation can be cached.
- Geographic or network-based content differentiation is supported.
When it is activated, the Key field opens in the form and the information to be added to the cache key is selected here. Selecting at least one piece of information is required and the same information cannot be added twice.
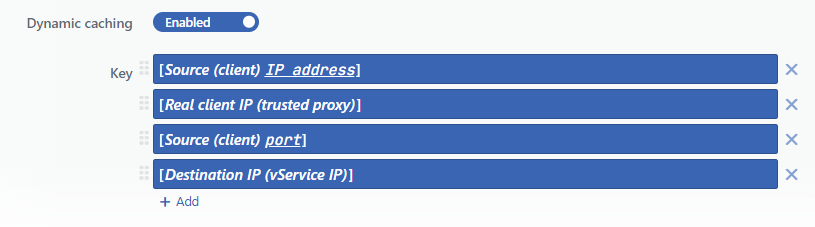 The Dynamic caching Options
The selection list offers all the smart variables that can be used at the request stage in a grouped form; the connection information, the time, the request line, the statistics, the request headers and cookies, the body, the WAF results, the client properties (country, browser, operating system, bot score), the TLS/fingerprint information, the traffic tracking values, the AGS session variables, the variable creators and the other helper variables are among these.
The commonly used selections:
- Client IP address: a separate cache entry is created for every client. It is suitable for caching user-specific content.
- Request header content: for example, a distinction is made according to a header that carries language or device information.
- Country: a separate cache is kept for the content that differs geographically.
- Request cookie: a distinction is made according to the session or segment information.
Warning
Dynamic caching can lower the cache efficiency. Especially when Source IP is selected, since a separate cache entry will be kept for every unique client, the cache size increases rapidly. This feature is used only when client-based differentiation is really needed.
How to Add to a vService?
A Cache Profile is assigned to a vService by following the steps below.
1
Step 1 Go to the vServices screen
The Load Balancer → Load Balancer vService List path is followed in the TR7 web interface.
2
Step 2 Open the editing screen of the vService
The vService to which the profile will be added is right-clicked and Edit is selected; or the vService is clicked and the Edit icon is clicked in the window that opens on the right.
3
Step 3 Enable the Cache feature
On the Details panel on the right of the editing screen of the vService, the feature is put into effect by marking the Cache option. On the first activation, Default Profile comes selected.
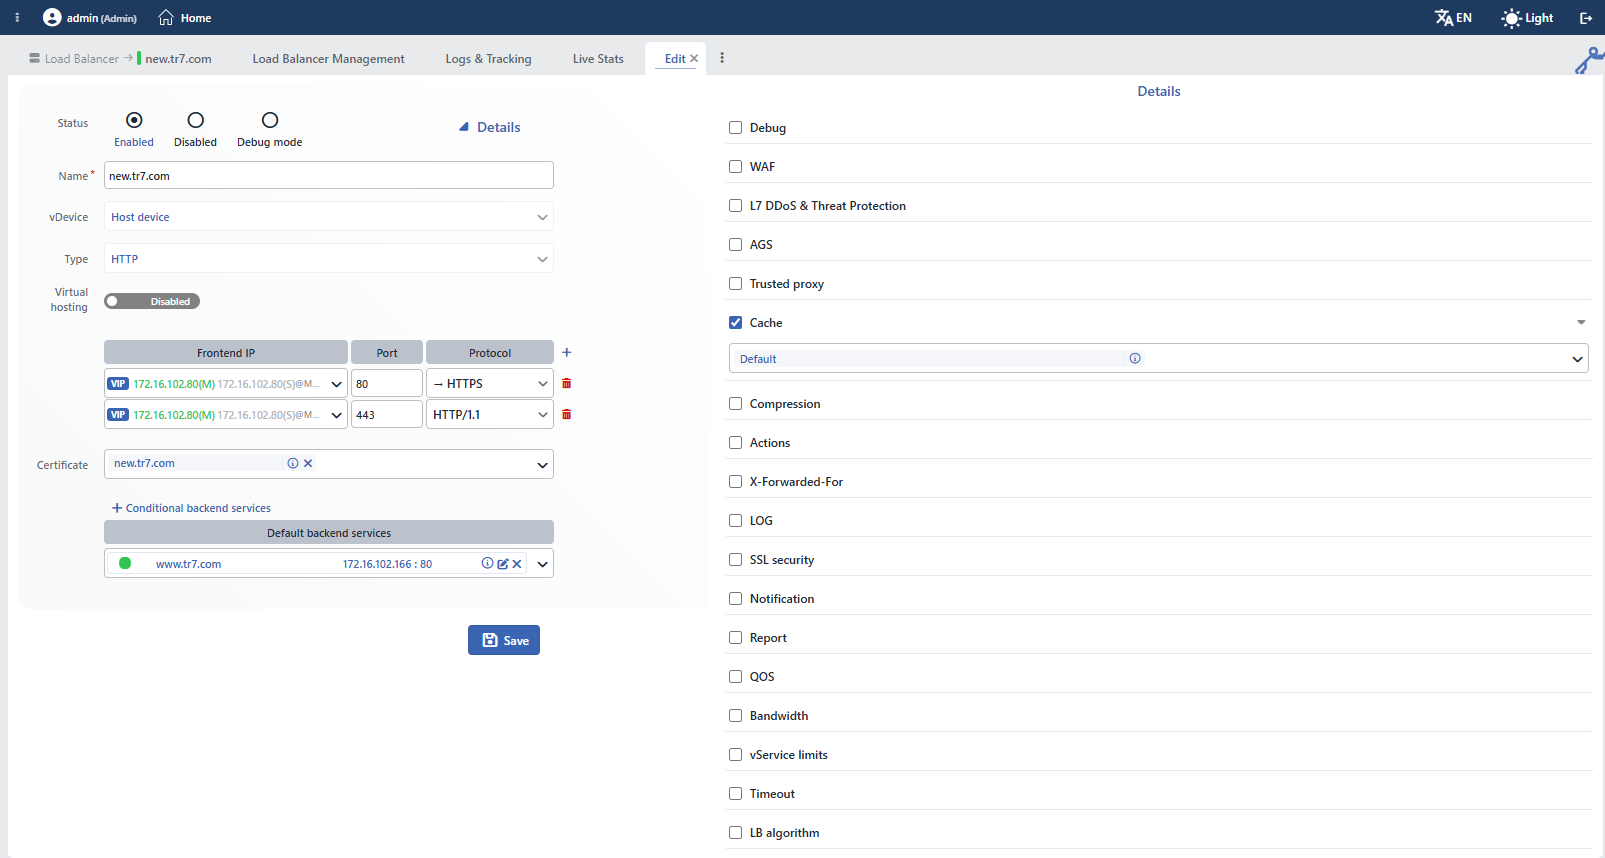 The Cache Selection on the vService Editing Screen
4
Step 4 Select a profile or add a new one
In order to use a profile other than Default Profile, the arrow sign next to the row is clicked and a selection is made from the added profiles in the list in the expanding section.
If desired, a new profile can also be added through the vService editing screen by clicking the Add button.
5
Step 5 Save
The changes are saved by clicking the Save button; while the configuration is being applied to the vService, the "vService is being edited" notification is displayed.
