
Smarter by Design.Simpler for Business
Private Key Library
What Is the Private Key Library?
Private Key Library is the list of the private keys that are stored independently of the certificates and that can be reused in more than one certificate request. An ordinary certificate record carries its key inside itself and every new signing request produces its own key; for this reason the public key of the certificate taken with a new request changes. A key in the library, on the other hand, is assigned with the Use a key from the library option to the new requests opened in the CSR (External CA) tab on the SSL/TLS Certificates screen; when the request is signed, the certificate that is created is bound to the key with a reference and every new request opened with the same key carries the same public key. The clients that pin the public key thus continue to work after the renewal.
The key enters the library in three ways: it is produced on TR7, it is imported as PEM, or the key of an existing certificate is taken into the library with the Take the key into the library operation in the certificate list. After the key enters the library it does not leave the device in raw form; it is downloaded only as a PFX together with its certificate, if the Allow Download switch of the certificate is on.
3
Source
Generated Here, Imported, Taken from a Certificate
5
Key algorithm
RSA 2048 / 3072 / 4096, ECDSA P-256 / P-384
SPKI
Fingerprint
The SHA-256 fingerprint of the public key; the key records that show the same value are the same key
CSR
Usage location
Use a key from the library in the certificate signing requests
Reference
The certificate bond
The certificate carries not a copy of the key but the library reference; the key is preserved when it is signed again
Off
Raw exporting
The key leaves only inside a PFX with its certificate
How does it work?
- The key is produced or imported on this screen, or the key of a certificate is taken into the library in the certificate list. The record shows the algorithm, the source and the public key fingerprint; the key content is not displayed on any screen.
- While a new request is being opened in the CSR (External CA) tab, Use a key from the library is selected in the Private Key field and the library key is determined; the CSR is signed with this key.
- When the certificate the external CA returns is uploaded to the request, the certificate record that is created carries not a copy of the key but the library reference. When the same request is had signed again with Re-issue: upload a newly signed certificate, the certificate content changes and the key stays the same (this is valid for the certificates that carry their key inside themselves as well).
- While the certificate file is being produced, in the PFX downloading, while the HTTPS certificate of the management interface is being uploaded and while the health check is offering a client certificate, the key is resolved from the library.
Operational Best Practices
- The library for the pinned keys. In a re-signing over an existing record the key is already preserved; when a new request needs to be opened for a certificate whose public key has been pinned, the key must be taken into the library with Take the key into the library and the subsequent requests must be opened with this key.
- A single purpose of use per key. The same library key can be used in more than one request; because which definitions use it is seen only in the Used in tab in the preview panel, the name must be chosen in such a way that it states the purpose of use.
- Checking before deleting. The deletion confirmation does not show the usage locations; the definitions in which the key is used must be checked from the Used in tab in the preview panel, the requests that use the key from the Private Key column in the CSR (External CA) tab, and the source certificate of a key taken from a certificate from the Taken from column on this screen, before deleting. A deleted key cannot be recovered.
- The supported algorithm in the importing. The library lists the RSA 2048/3072/4096 and ECDSA P-256/P-384 keys with a label; if a key other than these five labels (for example RSA 1024 or P-521) is imported, the raw value is seen in the algorithm column.
How to Add?
A new Private Key is added over the TR7 web management interface with the following steps:
- The Configuration Menu is opened by clicking the TR7 logo at the bottom left.
- The Certificates & PKI → Private Key Library → Add steps are followed.
- A unique and descriptive name is entered for the key.
- Generate a new key or Import an existing key is selected in the How to add field and the fields that are seen are filled in.
- The key is added by clicking the
Addbutton.
TIP
Reaching the page via quick search
Instead of navigating the menu step by step, the related page is reached directly by using the search bar in the bottom left corner of the screen. The search bar opens with the Alt + T shortcut on Windows and Opt + T on macOS; typing the name of the feature being searched for is then sufficient.
The created key can be used in one or more certificate signing requests.
The key of an existing certificate is taken into the library not from this form but from the right-click menu in the certificate list (see Taking the Key from a Certificate).
The Private Key Library Listing Screen
The list of all the library keys that are added on the TR7 device is reached by following the Certificates & PKI → Private Key Library path. The key adding, renaming and deleting operations are done through this screen.
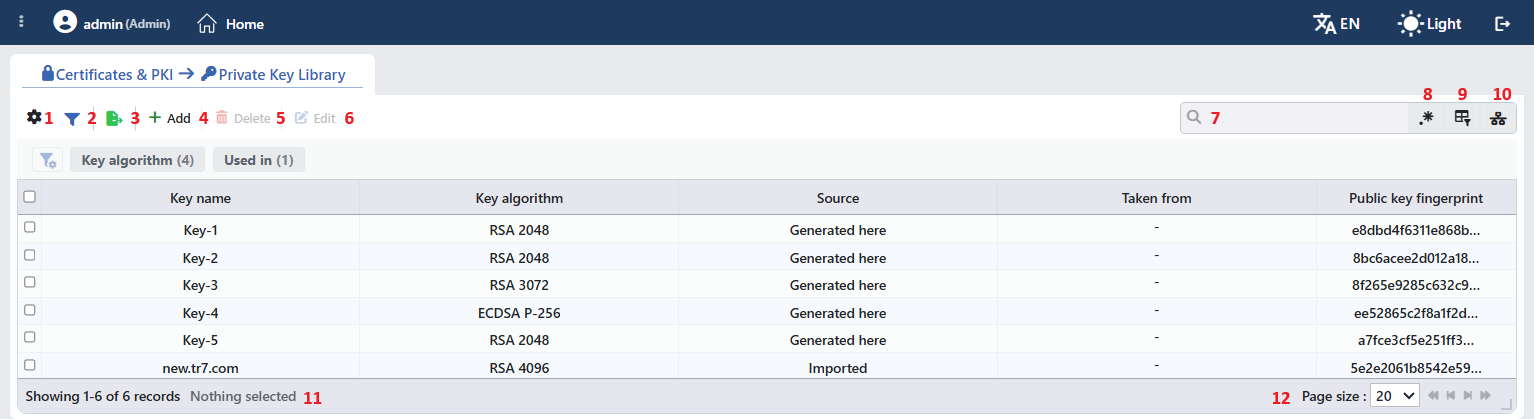 The Private Key Library Keys Listing Form
The table opens with the following columns by default:
| Column | Description |
|---|---|
| Key Name | The name of the key. |
| Key Algorithm | The algorithm of the key: RSA 2048, RSA 3072, RSA 4096, ECDSA P-256, ECDSA P-384; if a key other than these five labels has been imported, the raw value. |
| Source | How the key entered the library: Generated Here (it was produced on this screen), Imported (it was imported), Taken from a Certificate (it was taken from a certificate). |
| Taken from | In the keys taken from a certificate, the link to the source certificate record; in the others, -. |
| Public Key Fingerprint | The first 16 characters of the SHA-256 fingerprint of the public key are shown with … added at the end; the full 64 character value is seen in the tooltip when the cell is hovered over. The key records that show the same fingerprint are the same key; all the certificates signed with this key carry the same public key. |
There is no column hidden by default; these five columns take place in the column selector. The key content is not shown in any column. The table is not sorted when it is opened; when a column header is clicked, first a descending and then an ascending sorting is applied, and at the third click the sorting is removed.
The items in the toolbar are arranged from left to right in the following order; the last two items (Page Information and Page Size) are located in the information strip below the table.
Columns
Which columns will be shown in the table is selected. All five columns are on by default; the unwanted columns are hidden from here. In the window there are the sorting and alignment options by dragging and the Fit rows to the page and Reset buttons; the column layout is stored per user.
Filter
The Filter button is used in order to filter the keys shown in the list according to certain criteria; the button shows the number of active filters with a badge. In the strip there are two cards: Key Algorithm and Used in. In the cards the values seen in the list are listed with their row counts and more than one value can be selected together; the selections are displayed above the strip as closable labels.
In the Used in card there is only the Unused Entries value and the card does not produce a distinction on this screen: the card counts whether the record is bound to a vService, whereas the library keys are bound not to the vServices but to the certificates and the requests. Where the key is used is seen from the Used in tab in the preview panel, the requests that use the key from the Private Key column of the CSR (External CA) tab on the certificate screen, and the source of a key taken from a certificate from the Taken from column here.
Export
The table is exported as Excel, CSV or PDF by clicking the Export button. In the window that opens, the Filename, Format and Data Source, together with the Columns to be exported, are determined; the remaining fields are displayed according to the format: CSV Separator for CSV, Excel Sheet Name for Excel, and Page Orientation and Page Size for PDF.
There is no key content in the exported table.
Add
By clicking the Add button, a new key adding form is opened in the Add tab.
Delete
When one or more keys are selected and the Delete button is clicked, the related keys are deleted. Before the deletion the "Are you sure that you want to delete private key object?" (in a multiple selection "Are you sure you want to delete N private key objects?") confirmation is asked.
WARNING
A key that is in use can also be deleted and the confirmation window does not show the usage locations; before the deletion the Used in tab in the preview panel must be checked. A deleted key cannot be recovered; a copy of a key taken from a certificate does not stay in the certificate record.
The certificates that are bound to the key with a reference are left without a key: when the configuration is applied, the certificate file cannot be produced, the certificate is not offered in the vService, and PFX downloading and Re-issue cannot be done. The pending requests that select the key cannot be completed; a new request must be opened. The health checks that offer the certificate as a client certificate fall into an error state. The deletion operation is written to the user operation record.
Edit
By clicking the Edit button, the editing form of the selected key is opened in the Edit tab. The button becomes active only when a single key is selected.
In the editing form there are only the Key Name field and an information box with a lock icon: Only the name can be changed. The key material itself is sealed when it enters the library and never leaves the appliance in raw form — a private key still only comes out bundled with its certificate as a PFX. The key content, its algorithm and its source cannot be changed; the change is saved without confirmation being asked.
Search
Used to search all information in the table.
RegExp Search
Used to search all information in the table with a regular expression (RegExp).
Column Based Search
It is used in order to search the information in the table based on the column; next to every box there are the Negate switch that inverts the result and its own RegExp option.
Usage Filter
It is used in order to filter which vServices the keys are bound to. Because the keys in this collection are not bound to the vServices directly, in the selector there is only the Unused Entries option and it is selected by itself; the list is limited to the records that are not used in any definition.
Page Information
Contains information about the total number of defined keys and the number of keys displayed in the list: Showing N-M of T records and the number of selected keys (N selected, or Nothing selected when there is no selection).
Page Size
The maximum number of keys to be displayed on the page is selected. The default is 20; the options are 5, 10, 20, 50, 100, 200, 500 and All.
Right-Click Menu
When a row is right-clicked, a menu with the key's name in its title opens. Both operations in the menu apply only to the right-clicked key; a selection made in the list does not affect the menu.
| Operation | What it does |
|---|---|
| Edit | Opens the editing form of the key in the Edit tab; it is the same as the form opened by the Edit button in the toolbar. |
| Delete | Deletes the right-clicked key; the same confirmation question as the deletion in the toolbar is displayed. |
Preview of the Selected Key
When a row in the list is clicked, the preview of the key opens on the right of the screen; when the selected row is clicked again, the panel closes. In the header there are the key icon, the name of the record and the Private key subheading, and at the top right there is a single operation.
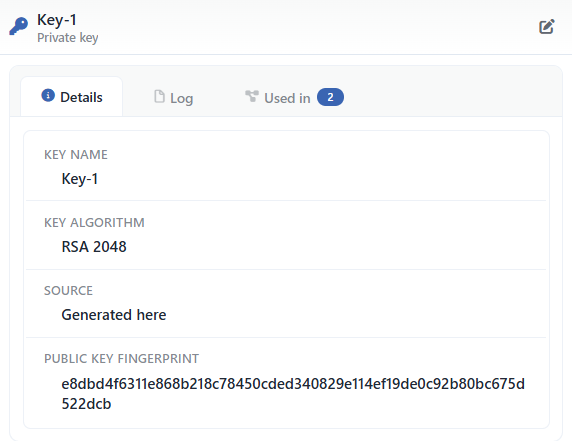 Preview of the Selected Key
| Operation | What it does |
|---|---|
| Edit | Opens the editing form of the key in the Edit tab. |
In the panel there are three tabs; the last one is displayed only if there is a definition that uses the key:
Details
Lists the identity information of the key (the table below); the key content is not shown.
Log
Lists the user operations on the record (adding, renaming, deleting) as a timeline.
Used in
Lists the definitions that use the key. The badge next to the tab name shows the number of usages; if there is no definition that uses the key, the tab is not displayed at all.
The rows in the Details tab are as follows, in order:
| Row | Description | Visibility condition |
|---|---|---|
| Key Name | The name of the key. | Always |
| Key Algorithm | The algorithm. | Always |
| Source | Generated Here / Imported / Taken from a Certificate. | Always |
| Public Key Fingerprint | The full SHA-256 fingerprint of the public key. | Always |
| Taken from | The link to the source certificate record. | In the keys taken from a certificate |
The Key Add Form
A new library key is added onto the TR7 device by following the Certificates & PKI → Private Key Library → Add steps.
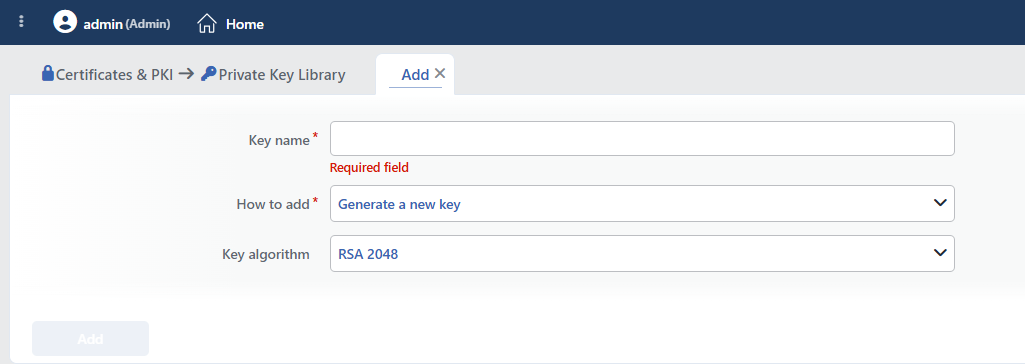 The Private Key Library Key Add Form
INFO
Key Name Required
The name of the key is entered. The name identifies the record in the list, in the key selection in the CSR form and in the logs, and it must be unique on the device; when the same name is entered, the form gives the Name is used warning.
INFO
How to add Default: Generate a new key
- Generate a new key: the key is produced on TR7; the Key Algorithm field is seen.
- Import an existing key: the existing key is pasted as PEM; the Private Key (PEM) and Key Passphrase (if encrypted) fields are seen.
Taking a key from a certificate is not selected in this form; it is done from the right-click menu of the certificate list.
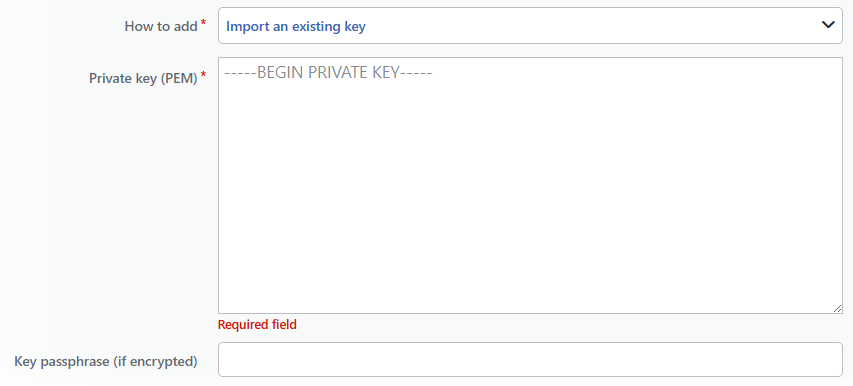 The Fields in the Import an Existing Key Selection
INFO
Key Algorithm Default: RSA 2048
The algorithm of the key to be produced is selected. The options in the list, in order:
- RSA 2048
- RSA 3072
- RSA 4096
- ECDSA P-256
- ECDSA P-384
INFO
Private Key (PEM) Required
The PEM content of the private key that will be imported (for example -----BEGIN PRIVATE KEY-----; the RSA/EC private key formats and a PEM with a password are accepted as well) is pasted. The algorithm of the key is read from the content and written to the record.
INFO
Key Passphrase (if encrypted)
If the private key is password protected, its password is entered into the masked field; the password is removed and the key is stored by being encrypted again with the record identity.
INFO
Add
The key adding operation is completed by clicking the Add button. The key production can take a few seconds in the large RSA keys.
Taking the Key from a Certificate
The key of a certificate that carries its key inside itself is taken into the library with the Take the key into the library operation in the right-click menu on the SSL/TLS Certificates screen. The operation is seen only in the certificates whose key has not been bound to the library with a reference yet.
1
Step 1 The operation is selected
The related row is right-clicked in the certificate list and Take the key into the library is selected. The operation runs only in the records that carry their key inside themselves: in a certificate whose key is already bound to the library, in a record in which there is no key content, while the same name is in use in the library and if the certificate has changed while the operation is in progress, it returns an error without the operation being done. The same operation can be used in the pending signing requests as well. The confirmation window shows the Take the private key of "<certificate>" into the key library? question and with which name the key will be moved to the library: <certificate name> — key; if the same name is in use, (2), (3) … is added to the name.
2
Step 2 The key is moved to the library
When it is confirmed, the key is moved from the certificate record to the library in a single operation: in the library the Source value is Taken from a Certificate and the source certificate is seen in the Taken from column; the certificate record is from then on bound to the key with a library reference. The offered certificate content does not change; the key copy in the record is emptied and the library reference is written in its place, so that the only copy of the key is kept in the library.
3
Step 3 The subsequent requests are opened with the same key
While a new request is being opened in the CSR (External CA) tab, this key is selected with Use a key from the library; the signed certificate carries the same public key.
Operating Mechanism
INFO
- The storage. The key is kept inside the record encrypted (sealed) with the record identity and it is not shown in raw form on any screen, in any export or in any API response; it is put into the package by being resolved only in the PFX downloading together with its certificate (if the Allow Download switch of the certificate is on).
- The reference resolution. When the key of a certificate is needed, the library reference is looked at first; if there is a reference, the key in the library, and if there is not, the key in the certificate record is used. More than one certificate record can give a reference to the same library key. If the key that is referenced has been deleted, the operation gives an error and this error is seen not at the moment of the deletion but in the operation in which the key is used for the first time.
- The adding is done from a separate endpoint. Key production and importing are carried out from their own endpoint; the general record adding path is rejected in this collection. After the record is created, only its name can be updated.
- The deletion of the source certificate. A key taken from a certificate stays in the library even if the source certificate is deleted; the reference in the Taken from column falls empty.
- The CSR signing. A request opened with a library key is signed with this key; when the certificate the external CA returns is uploaded, not a copy of the key but its reference is written to the certificate record that is created. When the same request is had signed again with Re-issue, only the certificate content changes.
- The fingerprint. The SHA-256 fingerprint of the public key is calculated while the record is being created; in the certificate record SHA-256 Fingerprint is the fingerprint of the certificate, and here Public Key Fingerprint is the fingerprint of the key.
- The cluster. The key records are synchronized between the devices with the LB configuration together with their encrypted contents; the health check engine takes a copy of the collection.
- The logs. Adding, renaming and deleting are tracked as the private key object on the User Logs screen.
Scope and Limits
INFO
- The permission. The screen is bound to the certificate permission area; in a user who does not have the permission the You don't have access to this page card is displayed instead of the page. The key adding operation asks for the LB modification permission in addition to the certificate area; renaming and deleting are checked from the LB permission area.
- The name is unique. A second key that carries the same name is not saved.
- The content cannot be changed. After the key enters the library only its name changes; for a new key a new record is created.
- There is no raw exporting. The key is downloaded only inside a PFX with its certificate.
- The usage location is seen only in the preview. The definitions that use the key are listed in the Used in tab in the preview panel; because the Used in card in the filter strip and the Usage Filter count only the vService bond, they do not filter in this collection and the deletion confirmation does not show the usage locations.
- It is selected only in the CSR requests. A library key cannot be selected in the certificate adding form (Manual, PFX, ACME.SH, Internal CA) or in the client certificate form; it is bound to the certificates only through the CSR flow or by being taken from a certificate.
Usage Locations
| Usage location | Field | Purpose |
|---|---|---|
| SSL/TLS Certificates → CSR (External CA) | Private Key → Use a key from the library → the Private Key list | The request being signed with the library key; the signed certificate is bound to the same key. |
| SSL/TLS Certificates → the certificate list | Take the key into the library | The key of the existing certificate being taken into the library. |
| The CSR (External CA) list and preview | The Private Key column / row | Which library key the request uses (in the requests opened with their own key Its Own Key is seen in the column and the row is hidden in the preview). |
