
Smarter by Design.Simpler for Business
Add Static Routing (Standalone)
What Is Add Static Routing?
Add Static Routing is a fixed routing rule defined manually so that the network traffic reaches a specific destination network. Unlike the dynamic routing protocols, static routes are not updated automatically; they are configured by hand by the administrator.
On TR7 the static routes are defined per route table. Every route table takes its own routing decisions independently; the static routes in one table do not affect the other tables. This structure makes it possible to create isolated routing policies for different network segments. A route is defined bound to an interface; the route table of the route is the table of the interface it is bound to.
There are three fundamental concepts in the static routing configuration:
| Concept | Description |
|---|---|
| Destination | The network address the traffic needs to reach (in CIDR format) |
| Gateway | The next-hop IP address to be used in order to reach the destination network |
| Default Gateway | A route to the 0.0.0.0/0 (IPv6: ::/0) destination; for all the traffic whose destination is unknown |
Route Table
Per table
Every table takes its routing decision independently
Default GW
0.0.0.0/0 · ::/0
A single default gateway per table, per IP version
Gateway HC
Monitoring
The reachability of the default gateway is monitored with Ping
Static
Predictable
Defined by hand, unchanging, with low resource consumption
Why Is Add Static Routing Important?
Static routes are of critical importance in the scenarios that require a specific and predictable traffic flow in the network architecture. They provide lower resource consumption and higher control than the dynamic routing protocols.
- Simplicity and Reliability: Static routes provide direct and reliable routing without the complexity of the dynamic protocols. They are ideal in small/medium-scale networks or in environments in which specific routes do not change.
- Security: Dynamic routing protocols may be open to malicious route injection attacks. Since static routes are configured manually, they are more resistant to such attacks.
- Resource Efficiency: Dynamic routing protocols consume CPU and memory. Static routes remove this load and use the system resources more efficiently.
- Special Routing Requirements: In the scenarios in which specific traffic needs to pass over a special path (e.g. the use of a backup link), static routes provide precise control.
Best Practices
- Plan the default gateway per IP version. In every route table there can be only one default gateway per IP version (IPv4/IPv6). If there is already a default gateway for that version in the related table (e.g. the one defined for the management network), create a separate route table for an additional default gateway.
- Activate gateway monitoring. Check the reachability of the gateway continuously by selecting a Ping profile from the Gateway monitoring field for the default gateway; in this way fast detection and intervention are possible in a gateway failure.
- Make sure that the gateway is reachable. This form does not check whether the gateway entered is in the subnet of the interface; a wrong gateway address leads to the traffic falling into a black hole.
- Enter the destination network addresses correctly in CIDR format. Enter the destination network together with the subnet mask in CIDR format (e.g.
10.20.0.0/16). A wrong subnet mask leads to the traffic being routed unexpectedly or not being routed at all. - Document the static routes. Since there is no description field in the form, document the purpose of use and the destination network information separately for every static route added; this provides a critical reference in troubleshooting and in network changes.
- Pay attention to the interface selection. The route table of the route is the table of the selected interface; a route added to the wrong interface may cause the traffic to go out from the wrong segment.
How to Add?
There is more than one way of adding a new static route on the TR7 device. All the methods below open the same Add Static Routing Form as a closable tab inside the interface list screen:
From the Actions Menu Method 1
The Configuration Menu is opened with the TR7 logo and the Network → Interfaces → Actions → Add route steps are followed. In the form the first interface of the list comes selected; the correct interface must be selected in the form.
From the Preview Panel Method 2
On the Network → Interfaces screen an interface is selected; in the preview panel that opens on the right the Routes tab is opened and the Add route button is clicked. The selected interface comes ready in the form.
From the Right-Click Menu Method 3
On the Network → Interfaces screen an interface is right-clicked; Add route is selected from the menu that opens. The selected interface comes ready in the form. On the interfaces that are Bond/LACP members and while a network operation continues, this option is passive.
From the Interface Dashboard Method 4
On the Dashboard screen of an interface, in the Routes tab, the Add route button is clicked. The selected interface comes ready in the form.
WARNING
While there is more than one route table, if the Route table filter on the interface list screen is set to a specific table, the form opens with that table; when it is opened from an interface that does not match the filter (e.g. from the interface Dashboard), the first interface of that table is selected instead. Besides, while an Add route tab is already open, selecting Add route again from another interface does not refresh the form; the open tab comes to the front and the new selection is used at the next opening; for the new interface the existing tab must be closed first. Before the record it must be checked that the Route interface field shows the correct interface. A record sent while a network operation continues ("Network is under action. Please wait...") is rejected with the "Configuration sync in progress. Please try again later." error.
The Add Static Routing Form
By following one of the methods above, the static routing adding form is opened. There is no Details section in the form; the fields are explained below in screen order. According to the Default gateway option, only one of the Destination network and Gateway monitoring fields is seen.
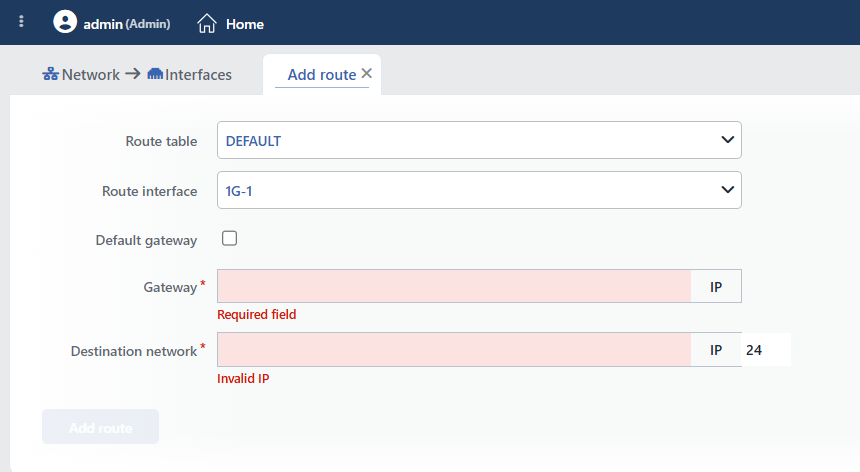 The Add Static Routing Form
INFO
Route Table
A route table is selected in order to narrow the Route interface list; this field is seen only if more than one route table is defined. If a specific table is selected in the Route table filter on the interface list screen, that table comes ready, and if the filter is in the All route tables position, the table of the interface from which the form is opened does. The field is only for filtering; the route table of the route is the table of the selected interface. For the details see the Route Tables page.
INFO
Route Interface
The interface the static route will be bound to is selected; all the interfaces in the selected route table are listed and the interfaces that are bond/LACP members are passive. If the form has been opened from a specific interface, the related interface comes selected but can be changed; when it is opened from the Actions menu, the first interface of the list comes selected. If an interface that is a bond/LACP member is selected, the "... is a bond/LACP member" warning is given and the form cannot be submitted.
INFO
Default Gateway
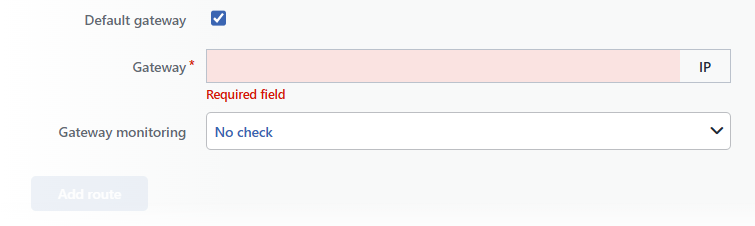 While Default Gateway Is Checked
When this check box is checked, the route added is configured as the default gateway: the destination is taken automatically as 0.0.0.0/0 (::/0 for IPv6) and the Destination network field is hidden; the Gateway monitoring field is seen instead. Whether the destination will be IPv4 or IPv6 is determined from the version of the Gateway address entered. It is unchecked by default.
WARNING
In every route table only one default gateway can be defined per IP version; a table can carry both an IPv4 and an IPv6 default gateway. If there is already a default gateway for that version in the related table (e.g. the one defined for the management network), a second one in the same version is rejected with the "Route destinations collide: ..." error.
INFO
Gateway
The gateway (next-hop) IP address to be used in order to reach the destination network is entered; it is required. The badge next to the box shows the version of the address entered (IPv4 / IPv6). When it is left empty, the "Required field" warning, and for an invalid address, the "Invalid IP" warning is given. In the default gateway mode this address is the next-hop of the traffic that goes to all the unknown destinations.
This form does not check whether the gateway is in the subnet of the interface; the route is added by accepting the gateway as directly connected (onlink). The correctness of the gateway address is the responsibility of the user.
INFO
Destination Network
It is seen while Default gateway is not selected. The destination network address of the traffic to be routed is entered; the prefix length is written in the CIDR box next to the address box (the default is 24; 0–32 for IPv4, 0–128 for IPv6). For invalid values the "Invalid IP" / "Invalid CIDR" warning is given.
The address entered is normalized to the network start address during the record (e.g. 10.0.5.7/24 → 10.0.5.0/24). The destination network and the gateway must be in the same IP version; otherwise the record is rejected with the "Different Ip versions (...)" error. The same destination network cannot be defined a second time in the same route table (across all the interfaces of the table): "Route destinations collide: ...". More than one route to the same destination over different gateways (ECMP) is not supported.
TIP
The destination network address defines a specific subnet. For example, the entry 10.20.0.0/16 covers the traffic that goes to all the addresses in the 10.20.0.0 – 10.20.255.255 range.
INFO
Gateway Monitoring
It is seen while Default gateway is selected. The Ping type health check profile to be used in order to monitor the reachability of the default gateway is selected:
- No check: no gateway monitoring is done; the reachability of the gateway is not checked. Default.
- Default monitor profile: it is monitored with the system-defined default Ping profile (3 seconds interval, 2 seconds timeout; OK with 2 consecutive successes, Error with 5 consecutive failures).
- Ping profiles: every defined Ping type health check profile takes place in the list with its own name; the other check types are not listed. In order to create a new profile see the Health Checks page.
With the selected profile the gateway is polled regularly from inside the related route table; the result is monitored in the indicator next to the default gateway row in the interface list:
OKA green check (✓): the Ping check is successful, the gateway is reachable.
ErrorA red cross (✕): the Ping check has failed, the gateway is unreachable.
EvaluatingAn orange dot: the check has been configured, no result has been produced yet (it is being evaluated).
If the profile has been assigned newly, the indicator is seen as a gray dot until the first polling result arrives. When the indicator is hovered over, the profile name, the result and the name of the TR7 device are displayed as a tooltip (e.g. "Default monitor profile" is successful at <device name>).
INFO
Add Route
The static route is saved by clicking the Add route button; while there is an erroneous field in the form, the button is passive. The adding does not ask for confirmation; the record returns immediately, the system application starts in the background and the form tab closes. If the server rejects the record, an error window opens and the form stays open.
The route added is listed in the row of the related interface on the Interfaces List screen in the form destination/CIDR -> gateway; the default gateway row is shown with the text Default gateway (Default gateway(IPv6) for IPv6) instead of the destination (e.g. Default gateway -> 192.168.1.1) and, while the configuration is being applied to the system, it passes through the following statuses:
Absent in system · redThe route has not been applied to the system yet; it appears red for a short time.
Up · greenThe route has been applied to the system; the indicator inherits the status of the interface it is bound to (No link if there is no link). While the interface is down, since the route is not present in the system, Absent in system is seen.
While a route is being applied, an interface that is down is first tried to be turned on by TR7; if the interface cannot be turned on, the route is not applied in that pass and is added automatically when the interface is turned on. The color tones may change according to the selected theme.
Editing a Route (Edit Route)
An existing route is edited on the Interfaces List screen by right-clicking the route or by selecting it in the Routes tab of the preview panel and using the Edit route operation. The editing form has the same structure as the adding form; its differences are as follows:
- The Route table, Route interface and Default gateway fields are locked; a route cannot be moved to another interface from the form and a normal route and a default gateway cannot be converted into each other.
- Only the Gateway and, according to the mode, the Destination network or the Gateway monitoring can be changed. While a default gateway is being edited, if a gateway in a different IP version is entered, the destination changes automatically according to the new version (
0.0.0.0/0↔::/0). - The button of the form becomes
Edit route; the change is saved without confirmation being asked.
Deleting a Route
A route is deleted with the Delete route(s) operation in the right-click menu in the interface list or in the Routes tab of the preview panel. The deletion always asks for confirmation: "Are you sure that you want to delete routes object?"; the right-click menu deletes a single route, and when more than one route is selected in the preview panel, the text becomes "Are you sure you want to delete N routes objects?".
Deleting the default gateway
If the route to be deleted is a default gateway, the 🔴 "Route table '...' will lose its IPv4 default gateway" (IPv6 for IPv6) warning is listed in the confirmation window and a second confirmation is asked: "This action has destructive consequences. Are you REALLY sure?". A route table losing its default gateway cuts off all the external access in that table; before the deletion a route to take its place must be prepared.
