
Smarter by Design.Simpler for Business
Page Templates
What Are Page Templates?
Page Templates are the profiles that determine the common appearance of the access pages (the login form, MFA, error and information pages) a vService with AGS enabled serves to the user: the page title and the favicon, the dark mode support, the brand color, the header logo and content, the footer (the logo and the content) and the background image and its opacity are kept in this profile. The text fields are given as fixed text or multilingually with a Dictionaries (Multilingual) key.
The template is selected from the Page Template field in the AGS settings of the vService; each vService uses a single template. Two built-in templates come with TR7 (Default Page Template and Minimal Page Template); a new vService comes with Default Page Template. The built-in templates do not appear in the list of this screen, they are selected directly in the selector in the vService settings; while a new template is being created, the form opens filled with the built-in Default Page Template settings.
11
Appearance Settings
The title, the favicon, the dark mode, the brand color, the header/footer logos and contents, the background
4
Image Fields
The favicon 64×64 / 50 KB · The header logo 200×60 / 100 KB · The footer logo 150×50 / 100 KB · The background 1920×1080 / 500 KB
4
Text Types
Static · Dictionary · Default · No Text
2
Built-in Templates
Default Page Template · Minimal Page Template; their settings are transferred with the buttons in the form
How does it work?
- The template is defined on this screen: the form opens with the built-in Default Page Template settings, and the logo, the color and the texts are changed according to the identity of the organization.
- The template is selected from the Page Template field in the AGS settings of the vService.
- The access pages are served with the logo, color and background settings of this template; the texts of the Dictionary type come from the dictionary selected for the vService according to the language of the user.
Built-in Templates
| Template | Header Logo / Page Favicon | Dark Mode Support | Footer Enabled |
|---|---|---|---|
| Default Page Template (the vService default, the starting settings of a new template) | The TR7 logo and favicon | Enabled | Enabled |
| Minimal Page Template | Empty (the access engine is expected to use its built-in logo) | Disabled | Disabled |
In the Default template Page Title, Header Content and Footer Content are of the Default type; in the Minimal template Page Title and Header Content are of the Default type and the footer is off. Since the built-in templates are not in the list, they are not edited or deleted from this screen.
Operational Best Practices
- The logo sizes. The uploaded images are reduced to the limits of the field (the header logo 200×60, the footer logo 150×50 pixels); PNG logos with a transparent background look correct in the dark mode as well. Since GIF and WEBP files are converted to PNG and the images that do not fit the size limit to JPEG, the animation and the transparency are lost.
- The background opacity. The readability of the form texts must be preserved by keeping Background Opacity low (the default 0.3).
- The built-in template buttons. The Default Page Template and Minimal Page Template buttons write over the fields defined in the selected template without asking for confirmation; the changes made in these fields before the button is clicked are lost.
- A multilingual text. If more than one language is supported, Page Title and the contents must be bound to a dictionary key with the Dictionary type; the key must be written exactly the same as the Translation Key in the dictionary selected for the vService.
- The vServices before deleting. The delete confirmation does not show the usage locations; the vServices that use the template must be checked on the Used in tab in the preview.
How to Add?
A new Page Templates profile is added through the TR7 web management interface with the following steps:
- The Configuration Menu is opened by clicking the TR7 logo at the bottom left.
- The AGS → Pages & Language → Page Templates → Add steps are followed.
- A unique and descriptive name is entered for the profile.
- The logo, favicon, color, text and background fields are edited.
- The profile is added by clicking the
Addbutton.
TIP
Reaching the page via quick search
Instead of navigating the menu step by step, the related page is reached directly by using the search bar in the bottom left corner of the screen. The search bar opens with the Alt + T shortcut on Windows and Opt + T on macOS; typing the name of the feature being searched for is then sufficient.
The created profile is used in the Page Template field of one or more vServices with AGS enabled. The profile is also defined without leaving the vService settings with the add icon next to this field; the created profile comes selected in the field.
Page Templates Listing Screen
The list of all Page Templates profiles that are added on the TR7 device is reached by following the AGS → Pages & Language → Page Templates path. Profile adding, editing and deleting operations are performed on this screen. The built-in templates are not listed.
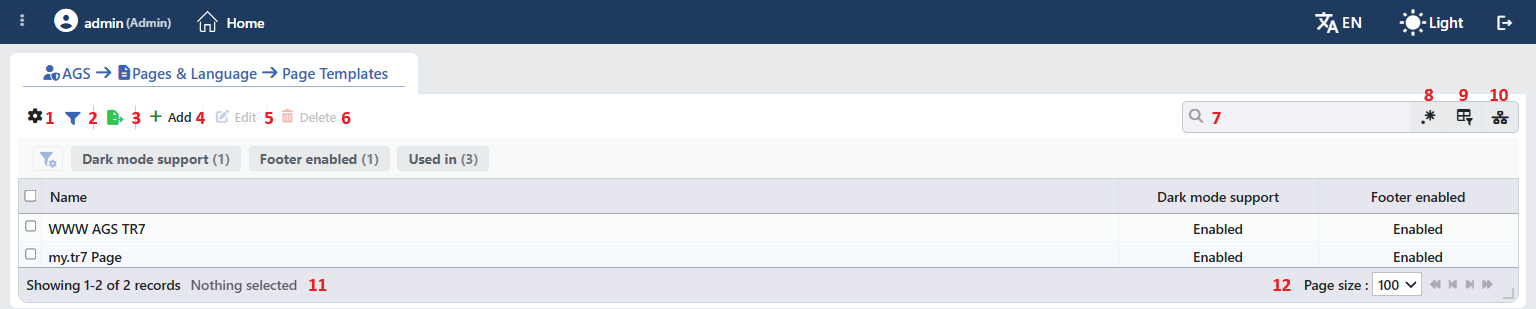 Page Templates Profiles Listing Form
The table opens with the following columns by default:
| Column | Description |
|---|---|
| Name | The name of the profile. |
| Dark Mode Support | The state of the dark mode support: Enabled or Disabled. |
| Footer Enabled | The state of the footer: Enabled or Disabled. |
There is no column that is hidden by default. The table is not sorted when it opens; when a column header is clicked, first a descending and then an ascending sort is applied, and on the third click the sort is removed.
The items in the toolbar are arranged from left to right in the following order; the last two items (Page Information and Page Size) are located in the information strip below the table.
Columns
Which columns are shown in the table is selected; all three of the columns come on. In the same panel the columns are reordered by dragging and the alignment is selected per column; the row height is fitted to the page with the Fit rows to the page button and the column layout is returned to the default with the Reset button. When the width badge next to a manually widened column is clicked, the column returns to the automatic width.
Filter
The Filter button is used to filter the profiles shown in the list according to certain criteria. There are three cards in the filter strip; the number next to the card name shows how many different values are found for that card in the profiles in the list:
| Card | What it filters |
|---|---|
| Dark Mode Support | By the state of the dark mode support (Enabled / Disabled). |
| Footer Enabled | By the state of the footer (Enabled / Disabled). |
| Used in | The vServices that use the profiles and the Unused Entries value, which lists the profiles that are not used anywhere. |
Export
The table is exported as Excel, CSV or PDF by clicking the Export button. In the window that opens, the Filename, Format and Data Source, together with the Columns to be exported, are determined; the remaining fields are displayed according to the format: CSV Separator for CSV, Excel Sheet Name for Excel, and Page Orientation and Page Size for PDF.
Add
By clicking the Add button, the form for creating a new profile opens in the Add tab.
Edit
By clicking the Edit button, the edit form of the selected profile opens in the Edit tab. The button becomes enabled only when a single profile is selected.
The edit form is the same as the add form; all the fields including the name are changed and the button at the bottom of the form carries the name Edit. The built-in template buttons are used in editing as well. The change is saved without asking for confirmation and the configuration of the vServices that use the profile is applied again.
Delete
When one or more profiles are selected and the Delete button is clicked, the related profiles are deleted. Before deleting, the "Are you sure?" confirmation is asked for.
WARNING
A profile that is in use can also be deleted and the confirmation window does not show the usage locations.
The Page Template reference is not cleared automatically on the vServices that use the profile; since the template cannot be found, the template texts are not written into the pages of these vServices. When the AGS settings of the vService are opened again, the invalid selection returns to Default Page Template and this value is written when it is saved. The delete operation is written to the user operation record.
Search
Used to search all information in the table.
RegExp Search
Used to search all the information in the table with a regular expression (RegExp). While the column-based search or the usage filter is active, this button is hidden.
Column Based Search
Used to perform a column-based search on the information in the table.
Usage Filter
Used to filter to which vServices the profiles are bound. While the filter is active, a selector takes the place of the search box; when the icon is clicked again, the search box returns.
Page Information
Contains information about the total number of defined profiles and the number of profiles displayed in the list: Showing N-M of T records and the number of selected profiles (N selected, or Nothing selected when there is no selection).
Page Size
The maximum number of profiles to be displayed on the page is selected. On this screen the default is 100; the options are 5, 10, 20, 50, 100, 200, 500 and All.
Right-Click Menu
When a row is right-clicked, a menu with the profile's name in its title opens. Both operations in the menu apply only to the right-clicked profile; a selection made in the list does not affect the menu.
| Operation | What it does |
|---|---|
| Edit | Opens the editing form of the profile in the Edit tab; it is the same as the form opened by the Edit button in the toolbar. |
| Delete | Deletes the right-clicked profile; the same confirmation question as the deletion in the toolbar is displayed. |
Preview of the Selected Profile
When a row in the list is clicked, the preview of the profile opens on the right of the screen; when the selected row is clicked again, the panel closes. The header contains the page icon, the name of the profile and the Page Template subtitle, and the single operation is at the top right.
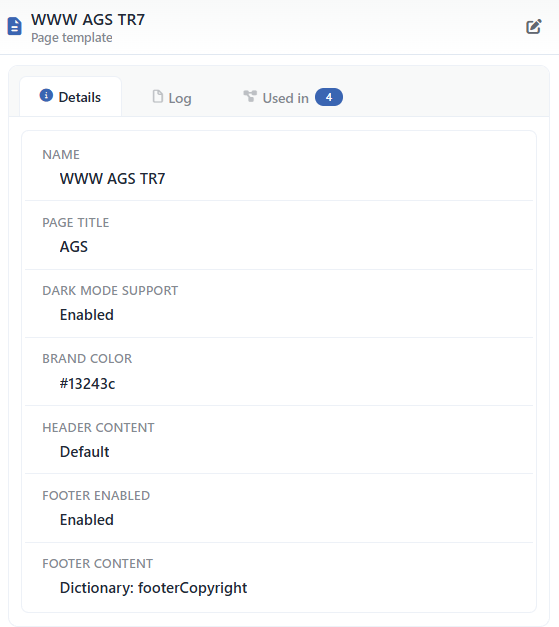 Preview of the Selected Profile
| Operation | What it does |
|---|---|
| Edit | Opens the editing form of the profile in the Edit tab. |
There are three tabs in the panel; Used in is displayed only if the profile is used on at least one vService:
Details
Lists the settings of the profile row by row (the table below).
Log
Lists the user operations on the profile (adding, editing, deleting) as a timeline.
Used in
Lists the vServices that use the profile. The badge next to the tab name shows the usage count.
The rows in the Details tab are as follows, in order; the image fields are not shown on this tab:
| Row | Description | Visibility condition |
|---|---|---|
| Name | The name of the profile. | Always |
| Page Title | The text itself in the Static type, Dictionary: key in the Dictionary type, and the type name in the other types (e.g. Default). | If it is defined |
| Dark Mode Support | Enabled or Disabled. | Always |
| Brand Color | The color code (e.g. #13243c). | If a color is selected |
| Header Content | In the same form as Page Title. | If it is defined |
| Footer Enabled | Enabled or Disabled. | Always |
| Footer Content | In the same form as Page Title (e.g. Dictionary: footerCopyright). | If the footer is on and the content is defined |
| Background Opacity | The opacity value. | If there is a background image |
Profile Add Form
A new Page Templates profile is added on the TR7 device by following the AGS → Pages & Language → Page Templates → Add steps. The form opens filled with the built-in Default Page Template settings; the fields are located in boxes in groups that are related to one another.
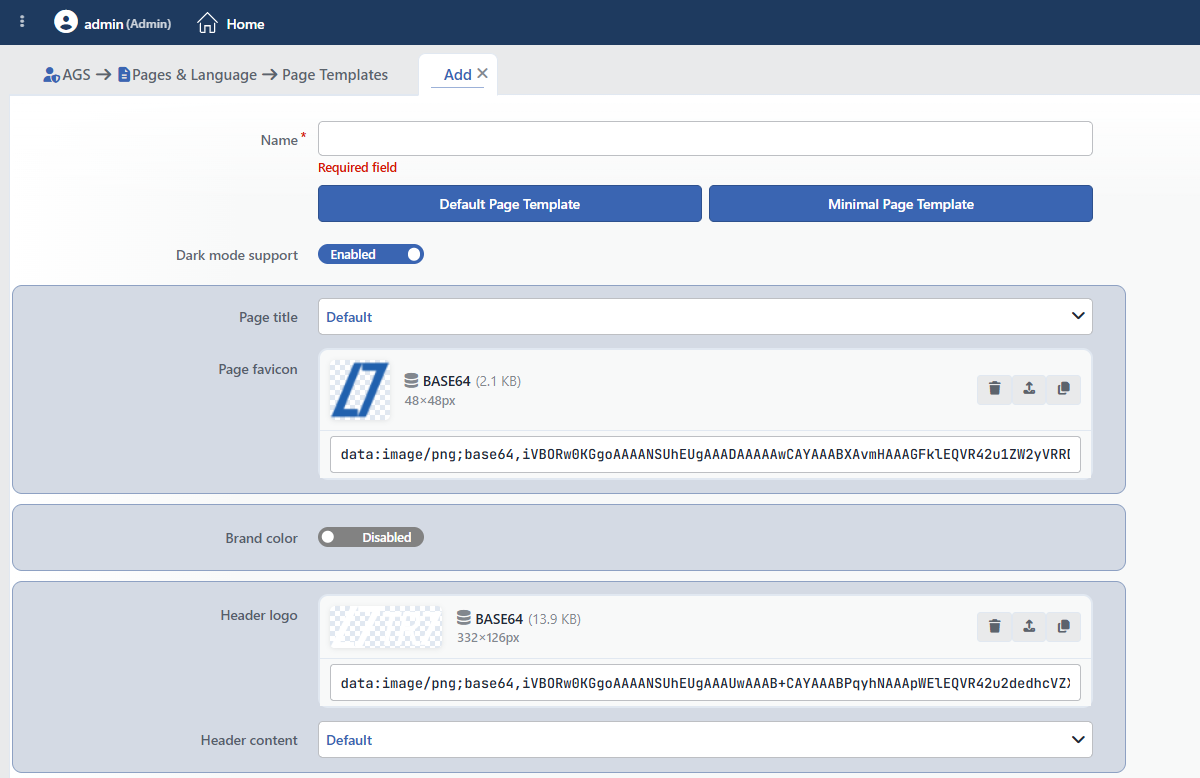 Page Templates Profile Add Form
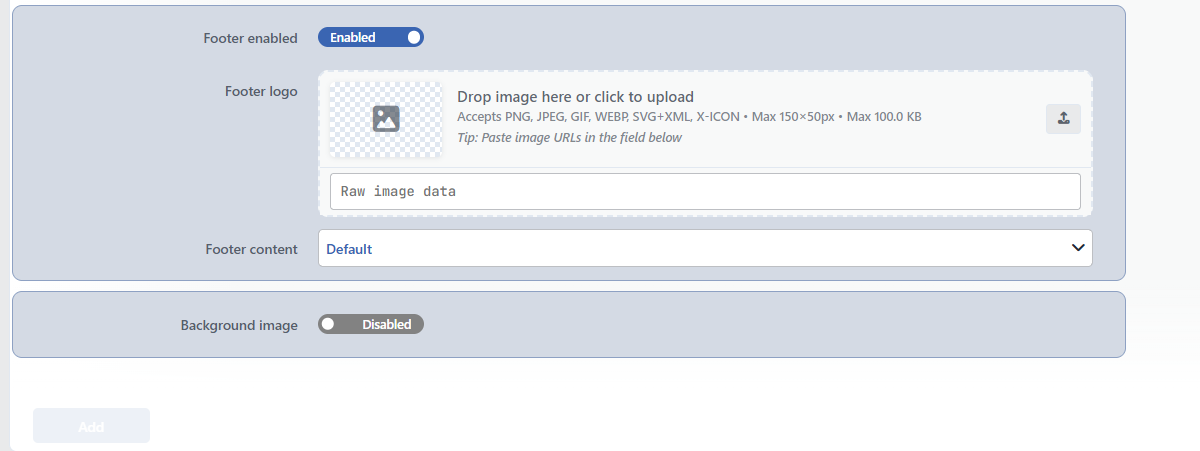 Page Templates Profile Add Form (Continuation)
INFO
Name Required
The name of the profile; it identifies the profile in the selection in the vService settings and in the logs. The name must be unique on the device; a second profile with the same name is not saved and the Name is used warning is displayed. When it is left empty, the Required field warning is displayed.
Default Page Template
The button on the left under the name; it transfers the settings of the built-in Default Page Template template to the form. No confirmation is asked for when the button is clicked; the Page Title, Page Favicon, Dark Mode Support (Enabled), Header Logo, Header Content, Footer Enabled (Enabled) and Footer Content fields are written over the existing values and the other fields are preserved.
Minimal Page Template
The button on the right under the name; it transfers the settings of the built-in Minimal Page Template template to the form. No confirmation is asked for when the button is clicked; the Page Title, Header Content, Dark Mode Support (Disabled) and Footer Enabled (Disabled) fields are written over the existing values and the other fields are preserved.
INFO
Dark Mode Support Default: Enabled
Whether the access pages support the dark mode appearance is determined.
INFO
Page Title Default: Default
The page title shown in the browser tab. The text type is selected from the drop-down list; according to the selected type a text box or a key box is displayed next to it:
| Option | Meaning |
|---|---|
| Static | A fixed text is entered; a smart variable is added with the ƒx icon (Enter text content...). The text is displayed the same in every language. |
| Dictionary | A dictionary key is entered (Enter dictionary key (e.g., _ags.title)). The text comes from the value defined with this key in the dictionary selected for the vService, according to the language of the user; for the details and an example see Example Usage. |
| Default | The built-in text of TR7 is used. |
| No Text | No text is displayed in the field. |
INFO
Page Favicon
The icon shown in the browser tab; a PNG, ICO, JPEG or GIF file is accepted. The uploaded image is cropped so that it is square, is reduced to the 64×64 pixel limit and is compressed below 50 KB.
- The image is added by dragging and dropping it onto the field, by clicking the field and selecting a file, or by pasting an address or base64 data into the Raw Image Data box below. While the field is empty, the Drop image here or click to upload and Tip: Paste image URLs in the field below texts are displayed; when the image is added, the preview takes their place.
- The accepted formats and the limits are shown in the Accepts PNG, X-ICON, JPEG, GIF • Max 64×64px • Max 50.0 KB row while the field is empty. ICO and SVG files are stored as they are; the other formats are cropped from the center so that they are square and are re-encoded, and the images that exceed the limit are reduced. During the upload, if the source file is larger than ten times the limit the File is too large warning and if the compressed result exceeds the limit the Processed image is still too large warning is displayed. No reduction, compression or size check is applied to the address and base64 values pasted into the Raw Image Data box; only the format is checked (Invalid URL format, Invalid base64 image data, Invalid image data format).
- When the image is added, a small preview, the source type (BASE64 or URL), its size and its pixel measurement are displayed. With the buttons on the right the image is removed () and replaced with a new one (). If the source is BASE64 there is a button that copies the base64 data (), and if it is URL a button that downloads the image and converts it to base64 (). An image that is left as an address is stored in the profile as an address and the access page fetches it from outside.
INFO
Brand Color Default: Disabled
When the switch is moved to the Enabled position, the color picker is displayed and comes with the value #3a65b2; the selected color is used as the brand color in the elements on the access pages. While the switch is off, no color specific to the template is applied.
 While Brand Color Is On
INFO
Header Logo
The logo shown in the header; a PNG, JPEG, GIF, WEBP, SVG or ICO file is accepted. The image is reduced to the 200×60 pixel limit and is compressed below 100 KB.
- The image is added by dragging and dropping it onto the field, by clicking the field and selecting a file, or by pasting an address or base64 data into the Raw Image Data box below. While the field is empty, the Drop image here or click to upload and Tip: Paste image URLs in the field below texts are displayed; when the image is added, the preview takes their place.
- The accepted formats and the limits are shown in the Accepts PNG, JPEG, GIF, WEBP, SVG+XML, X-ICON • Max 200×60px • Max 100.0 KB row while the field is empty. ICO and SVG files are stored as they are; in the other formats the images that exceed the limit are reduced and GIF and WEBP files are converted to PNG and the images that do not fit the size limit to JPEG (the transparency and the animation are lost). During the upload, the File is too large warning is displayed for the source file and the Processed image is still too large warning if the compressed result exceeds the limit.
- When the image is added, a small preview, the source type (BASE64 or URL), its size and its pixel measurement are displayed. With the buttons on the right the image is removed () and replaced with a new one (). If the source is BASE64 there is a button that copies the base64 data (), and if it is URL a button that downloads the image and converts it to base64 (). An image that is left as an address is stored in the profile as an address and the access page fetches it from outside.
INFO
Header Content Default: Default
The text shown in the header. The text type is selected from the drop-down list; according to the selected type a text box or a key box is displayed next to it:
| Option | Meaning |
|---|---|
| Static | A fixed text is entered; a smart variable is added with the ƒx icon (Enter text content...). The text is displayed the same in every language. |
| Dictionary | A dictionary key is entered (Enter dictionary key (e.g., _ags.title)). The text comes from the value defined with this key in the dictionary selected for the vService, according to the language of the user; for the details and an example see Example Usage. |
| Default | The built-in text of TR7 is used. |
| No Text | No text is displayed in the field. |
INFO
Footer Enabled Default: Enabled
Whether the footer section is shown on the access pages is determined. While the switch is on, the Footer Logo and Footer Content fields are displayed.
Footer Logo
The logo shown in the footer; a PNG, JPEG, GIF, WEBP, SVG or ICO file is accepted. The image is reduced to the 150×50 pixel limit and is compressed below 100 KB.
- The image is added by dragging and dropping it onto the field, by clicking the field and selecting a file, or by pasting an address or base64 data into the Raw Image Data box below. While the field is empty, the Drop image here or click to upload and Tip: Paste image URLs in the field below texts are displayed; when the image is added, the preview takes their place.
- The accepted formats and the limits are shown in the Accepts PNG, JPEG, GIF, WEBP, SVG+XML, X-ICON • Max 150×50px • Max 100.0 KB row while the field is empty. ICO and SVG files are stored as they are; in the other formats the images that exceed the limit are reduced and GIF and WEBP files are converted to PNG and the images that do not fit the size limit to JPEG (the transparency and the animation are lost). During the upload, the File is too large warning is displayed for the source file and the Processed image is still too large warning if the compressed result exceeds the limit.
- When the image is added, a small preview, the source type (BASE64 or URL), its size and its pixel measurement are displayed. With the buttons on the right the image is removed () and replaced with a new one (). If the source is BASE64 there is a button that copies the base64 data (), and if it is URL a button that downloads the image and converts it to base64 (). An image that is left as an address is stored in the profile as an address and the access page fetches it from outside.
Footer Content Default: Default
The text shown in the footer. The text type is selected from the drop-down list; according to the selected type a text box or a key box is displayed next to it:
| Option | Meaning |
|---|---|
| Static | A fixed text is entered; a smart variable is added with the ƒx icon (Enter text content...). The text is displayed the same in every language. |
| Dictionary | A dictionary key is entered (Enter dictionary key (e.g., _ags.title)). The text comes from the value defined with this key in the dictionary selected for the vService, according to the language of the user; for the details and an example see Example Usage. This type is used for multilingual content such as the copyright text. |
| Default | The built-in text of TR7 is used. |
| No Text | No text is displayed in the field. |
INFO
Background Image Default: Disabled
When the switch is moved to the Enabled position, the background image field and the Background Opacity field are displayed. The image is reduced to the 1920×1080 pixel limit and is compressed below 500 KB.
- The image is added by dragging and dropping it onto the field, by clicking the field and selecting a file, or by pasting an address or base64 data into the Raw Image Data box below. While the field is empty, the Drop image here or click to upload and Tip: Paste image URLs in the field below texts are displayed; when the image is added, the preview takes their place.
- The accepted formats and the limits are shown in the Accepts PNG, JPEG, GIF, WEBP, SVG+XML, X-ICON • Max 1920×1080px • Max 500.0 KB row while the field is empty. ICO and SVG files are stored as they are; in the other formats the images that exceed the limit are reduced and GIF and WEBP files are converted to PNG and the images that do not fit the size limit to JPEG (the transparency and the animation are lost). During the upload, the File is too large warning is displayed for the source file and the Processed image is still too large warning if the compressed result exceeds the limit.
- When the image is added, a small preview, the source type (BASE64 or URL), its size and its pixel measurement are displayed. With the buttons on the right the image is removed () and replaced with a new one (). If the source is BASE64 there is a button that copies the base64 data (), and if it is URL a button that downloads the image and converts it to base64 (). An image that is left as an address is stored in the profile as an address and the access page fetches it from outside.
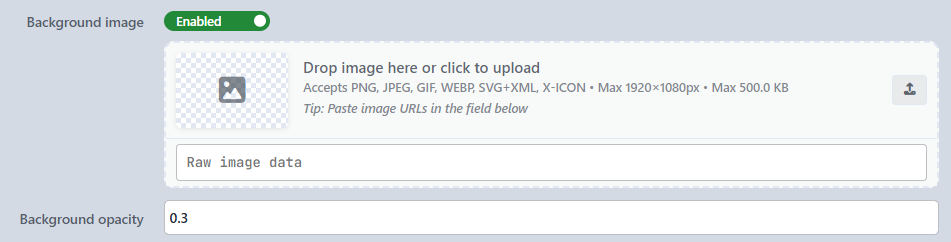 While Background Image Is On
Background Opacity Default: 0.3
The opacity of the background image; a value between 0 and 1 with a step of 0.1 is entered. As the value decreases, the image becomes paler and the form texts become more readable.
INFO
Add
The profile is added by clicking the Add button; the tab closes and the profile is displayed in the list.
Operating Mechanism
INFO
- Distribution. The templates (including the images) are transferred to the access engines of the vServices with AGS enabled; after a change the configuration is applied again.
- The texts. Page Title, Header Content and Footer Content of the Static type are written into the common user dictionary of the vService as a smart variable template and are served to the page over
<the AGS root path>/gw-files/user_dictionary.js(the default root path/ags-portal); the Dictionary keys are resolved by the access engine from the dictionary of the vService according to the language of the user. - The images. The uploaded images are reduced to the field limits and are stored inside the profile; the logo and the favicon of the built-in template are copied to the new template.
- Cluster. The profiles are synchronized between the devices with the LB configuration.
- Logs. Adding, editing and deleting are monitored on the User Logs screen as the page template object.
Scope and Limits
INFO
- Permission. The AGS screens depend on the Load Balancer permission area; for a user who does not have the permission the You don't have access to this page card is displayed instead of the page.
- The name is unique. A second profile carrying the same name is not saved.
- The built-in templates are not listed, they are not edited or deleted from this screen.
- A single template per vService. The language selection is made not in the template but in the dictionary of the vService.
- License. The screen requires the AGS license.
- The fields of a section that is turned off are not saved. When Footer Enabled is turned off and saved, the Footer Logo and Footer Content values drop from the profile; when Brand Color and Background Image are turned off, the related values are not stored either.
- There is no live preview; there is no HTML/CSS editor, the appearance is limited to the fields.
- Deleting does not perform a reference check; a profile in use is deleted as well.
Usage Locations
| Usage location | Field | Purpose |
|---|---|---|
| A vService with AGS enabled → AGS Management | Page Template | The appearance of the vService access pages; Default Page Template on a new vService |
| Dictionaries (Multilingual) | The texts of the Dictionary type | The template texts coming multilingually |
