
Smarter by Design.Simpler for Business
System Update
What Is System Update?
System Update is the screen where the software and component updates belonging to the TR7 device are checked and applied. The updates can be done in two ways: online, that is, over an update server; or offline, that is, with an update file provided by the TR7 Support Team.
In addition, the current version of the device and the version/update information of the components such as TR7 Server, Health Check, the IP database, the WAF rules, vServices and the vDevice service are monitored from the screen.
Online / Offline
Update method
Update over the internet or with a file
Update Server
Update source
The update server address
Current Version
Current version
The current version information of the device
Components
Version tracking
TR7 Server · HC · IP DB · WAF · vServices · vDevice
Cluster Behavior
In the TR7 installations running as a cluster (two devices), when Update Server Address is changed on one device, it is automatically synchronized with the other TR7 device; there is no need to set it separately. However, the update operation itself must be carried out separately on both devices.
How Is It Updated?
The update operation is done via the TR7 web management interface with the steps below:
- The Configuration Menu is opened by clicking the TR7 logo at the bottom left.
- The steps Settings → General Settings → System Update are followed.
- If it is being configured for the first time, the Update Server Address is entered with Edit (the address is provided by the TR7 Support Team) and is saved with
Save. - The updates are checked with the Check for Updates button.
- The update is started with the Start Update (online) or Update Offline (with a file) button on the component's own row; every component is updated separately.
- After the update is completed, the TR7 service is restarted with Restart Configuration Service from the Local Services screen.
- The browser is refreshed (Windows Ctrl + R, macOS Cmd + R).
TIP
Reaching the page via quick search
Instead of navigating the menu step by step, the related page is reached directly by using the search bar in the bottom left corner of the screen. The search bar opens with the Alt + T shortcut on Windows and Opt + T on macOS; typing the name of the feature being searched for is then sufficient.
The System Update Screen
By following the path Settings → General Settings → System Update, the update information belonging to the TR7 device is displayed. At the top of the screen there are the Edit and Check for Updates entries; below them there are the Update Server Address, Release and Current Version rows and a separate row for each component.
The screen shows only the device that is currently being used
This screen does not open a column for the second device in a cluster setup either. The component states and the update operations of the other device are carried out from the interface of that device.
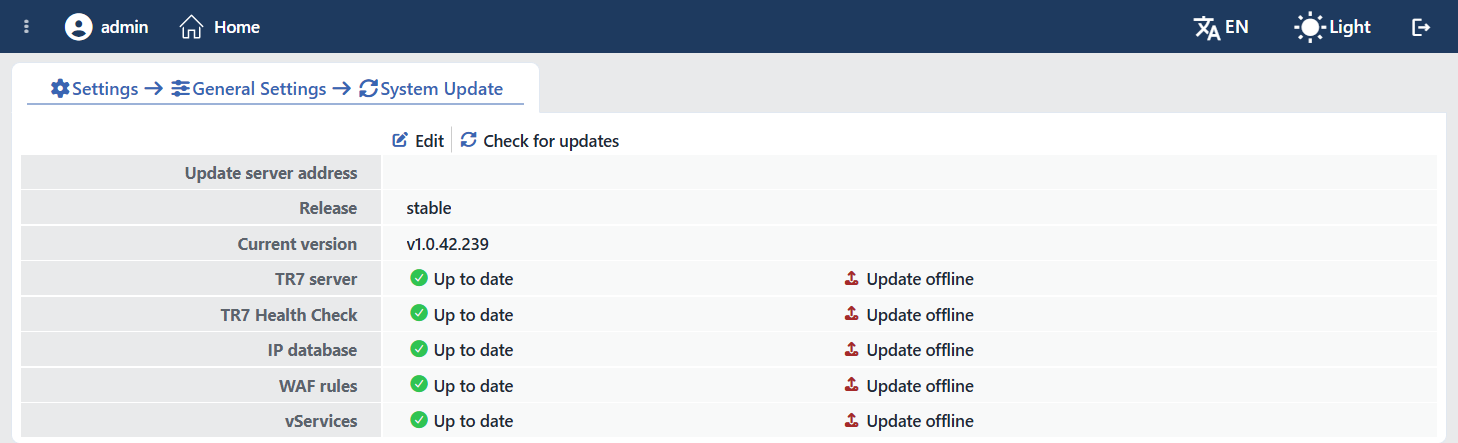 The System Update Screen
The information displayed on the screen:
INFO
Release
The release channel that the device follows is displayed. This row shows not the newest version available on the update server but the channel that has been selected in the Edit form.
TIP
On the devices where no channel has been selected, lowercase stable may be written on the row; this is the default value that comes without a channel being selected and it means the same as the Stable channel.
INFO
Current Version
The information belonging to the current version of the TR7 device is displayed.
The Component Rows
The device is not updated as a single piece: every component is managed on its own row, with its own status and its own update buttons. The rows are always listed in the following order:
| Component | Description |
|---|---|
| TR7 Server | The TR7 service |
| TR7 Health Check | The TR7 health check service |
| IP Database | The TR7 IP database |
| WAF Rules | The TR7 WAF rules |
| vServices | The vService services |
| vDevice Service | The vDevice service; displayed only in the physical installations |
The Structure of the Row
Every row carries a status indicator on the left and the buttons belonging to that component on the right.
| Status | Display |
|---|---|
| Up to date | Green check icon and the text Up to Date |
| There is an update | Orange warning icon and the text Not up to Date |
The buttons on the row:
| Button | When it appears | Its function |
|---|---|---|
| Start Update | Only while there is an update in that component | Updates the component online |
| Cancel Update | While the update is in progress (it takes the place of Start Update) | Stops the update in progress |
| Update Offline | Always | Updates the component with a file |
| Info (ⓘ) | While there is an update and that version has a change log | Opens or closes the version change log under the row |
While the update is in progress the row expands: the stages (downloading, extracting, applying) are listed one by one with their icons, and during the downloading stage the progress information is also written. If the operation ends with an error, the error text is shown on the same row.
Button Details
There are two entries on the top bar of the screen: Edit and Check for Updates.
INFO
Edit
By clicking the Edit button, the form in which the update server address where the updates will be checked is entered is opened. This address is provided by the TR7 Support Team.
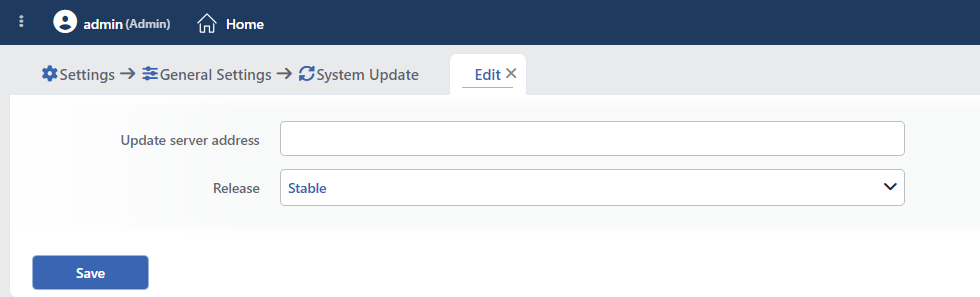 The Edit Tab
Update Server Address
The address where the updates will be checked is entered.
Release
The release channel that the device will follow is selected. There are three options:
| Channel | Meaning |
|---|---|
| Stable | The published stable versions |
| Beta | The pre-release verification versions |
| Alpha | The early versions at the development stage |
On the production devices, the channels other than Stable are selected only with the guidance of the TR7 Support Team.
Save
The changes made are saved by clicking the Save button.
INFO
Check for Updates
By clicking the Check for Updates button, the updates on the Update Server Address are queried and the status of all the component rows is refreshed. While the query is in progress the button stays disabled and its icon spins. On the row of the components for which an update is found, the Start Update button appears together with the text Not up to Date.
The Operations on the Component Row
The three operations below are not on the top bar of the screen but on the own row of each component; each of them affects only that component.
INFO
Start Update Online
By clicking the Start Update button, the related component is updated online. The device downloads the new version from the update server and applies it. The button appears only while there is an update in that component.
While the operation is in progress, Cancel Update with a red icon takes the place of the button; the update in progress is stopped with this button.
INFO
Update Offline Offline
By clicking the Update Offline button, the related component is updated offline. From the screen that opens, the update file provided by the TR7 Support Team is selected, the version number is written and the update is started by clicking the Submit button.
This button is found on every row even if the component is up to date; in this way the same version can be installed again or, in the installations without internet access, the update can be applied with a file.
INFO
Info
By clicking the information icon on a row that has an update, the change log of that version is opened under the row; when the icon is clicked again it closes. The icon appears only if the related version carries a change log.
After the update
After the online or offline update is completed, the TR7 service must be restarted with Restart Configuration Service from the Local Services screen; afterwards the browser must be refreshed (Windows Ctrl + R, macOS Cmd + R).
