
Smarter by Design.Simpler for Business
Notifications
What Is the Notifications Profile?
Notifications is a configuration profile that makes it possible for automatic notifications to be sent to the system administrators about the status, the performance metrics and the certificate information of the vServices running on TR7.
In the TR7 architecture, notification management is designed on a profile basis. Thanks to this structure, which metrics will be monitored, the threshold values and the notification channels are defined centrally and applied by being assigned to the related vServices. Notifications Profiles work at the vService level and are valid for both HTTP and L7 TCP vService traffic.
When a Notifications Profile is defined, TR7 monitors the determined metrics continuously and, when the threshold values are exceeded or in the status changes, sends a notification over the configured channels.
The benefits it provides
- The critical service status changes (up/down) can be monitored instantly and a fast intervention can be provided.
- In the situation where the determined threshold values are exceeded, the performance problems can be detected at an early stage.
- The operational risks such as a certificate expiry are reported in advance and the possibility of an interruption is reduced.
- Thanks to the central and profile-based structure, different monitoring and notification policies can be applied for different vServices.
The Importance of the Notifications Profile
Proactive system management requires detecting and intervening in the problems before the users notice them. The TR7 notification profiles make it possible for the critical system events to be conveyed to the related people in real time.
Without a notification system, the administrators can notice the problems only as a result of user complaints or manual checks. This situation extends the intervention time and affects the service quality negatively.
That the notifications can be defined on a profile basis and at the vService level on TR7 makes it possible for different services to be configured according to their different levels of importance and monitoring requirements. A critical production service and a test environment can be monitored with different threshold values and notification channels.
Proactive
Early warning
The problems are detected before the users notice them
Monitoring
Real-time metric
The bandwidth, the requests/sessions and the connections are monitored continuously
Security
Anomaly detection
DDoS and abnormal traffic patterns are caught early
Certificate
Expiry warning
Notice is given before the SSL certificate expires
For this reason, Notifications Profiles are a critical operational tool for offering reliable and uninterrupted services on TR7.
The Default Notifications Profile Behavior
There is a built-in default Notifications Profile in the TR7 system; it is listed with the name Default Profile in the profile selector and is not displayed on the profile listing screen. This profile offers balanced threshold values for the general use scenarios.
The values applied within the scope of the built-in default profile (the new profile form also opens preloaded with these values):
| Metric / Setting | Default | Description |
|---|---|---|
| Backend Service Status | Active | It sends a notification when the health status of the Backend Services bound to the vService changes (up/down). |
| vService Status | Active | It produces a notification in the changes that occur in the general status of the vService (opening/closing). |
| Bandwith | 128 Mbps | It sends a notification when the total traffic passing over the vService exceeds the determined threshold value. |
| Request Rate | 2500 req/s | It creates a warning when the number of HTTP requests per second exceeds the defined threshold. |
| Current Session | 1000 | It sends a notification when the number of simultaneous active sessions rises above the determined limit. |
| Certificate Expiry Notify Days | 30 days | It warns when the specified number of days remains to the expiry of the SSL certificate assigned to the vService. |
| Number of New Connections | 1000 conn/s | It produces a notification when the number of new connections established per second exceeds the threshold value. |
| Mute Night Notifications | Disabled | When it is activated, it stops the SMS sending between 22:00–08:00; the other channels are not affected. |
| SNMP Trap | Disabled | When it is activated, it conveys the notifications to the configured SNMP targets as a trap. |
| Disabled | When it is activated, it sends a notification to the configured e-mail addresses. | |
| SMS | Disabled | When it is activated, it conveys an SMS notification to the defined phone numbers. |
| UI Notification | Disabled | When it is activated, it shows the notifications on the TR7 web interface in real time. |
The default profile offers a ready starting point for the basic monitoring requirements.
The notification channels are closed by default
The notification channels (E-mail, SMS, SNMP Trap) are disabled by default and must be configured before being used. When different threshold values or channels are required for different services, creating custom Notifications Profiles is recommended.
The Monitoring Metrics
The metrics that can be monitored within the scope of the Notifications Profiles and their behaviors are explained below. The diagram below shows how a notification is processed when a metric threshold is exceeded or the status changes:
INFO
Backend Service Status
It monitors the health check results of the Backend Services bound to the vService. When a Backend Service goes down or comes up again, a notification is sent. It has critical importance in load balancing environments.
INFO
vService Status
It monitors the general status of the vService. A notification is sent in the situation where the service closes or opens. It is triggered when all the Backend Services go down or when the service is disabled manually.
INFO
Bandwith
It monitors the total amount of traffic passing over the vService. When the determined threshold value (in terms of Kbps, Mbps or Gbps) is exceeded, a notification is sent. It is used for capacity planning and abnormal traffic detection.
INFO
Request Rate
It monitors the number of HTTP requests processed per second. When the determined threshold value is exceeded, a notification is sent. It is used to detect the load increases and the potential DDoS attacks.
INFO
Current Session
It monitors the number of simultaneous active sessions. When the determined threshold value is exceeded, a notification is sent. It is important for resource usage and capacity monitoring.
INFO
Certificate Expiry Notify Days
It monitors the expiry date of the SSL certificates assigned to the vService. When the determined number of days remains to the certificate expiry date, a notification is sent. It is critical for the certificate renewal processes to be started on time.
INFO
Number of New Connections
It monitors the number of new connections established per second. When the determined threshold value is exceeded, a notification is sent. It is used to detect the connection flood attacks.
INFO
The 4xx / 5xx Response Rates
The 4xx Responses/sec and 5xx Responses/sec metrics monitor the number of client error (4xx) and server error (5xx) responses produced per second. When the threshold is exceeded, a notification is sent; it is used for the early detection of the application errors and of the Backend Services that break down.
INFO
The Source IP Based Metrics
The metrics in the Per-Source-IP Thresholds section of the form evaluate the thresholds over the individual source IPs instead of the total traffic: the number of simultaneous different source IPs (Active Source IPs) and the connection/request/error rates and the incoming-outgoing traffic per source IP. It catches the abnormal intensities coming from a small number of IPs (targeted scans, individual attackers) without them being caught by the total thresholds.
The Notification Channels
TR7 supports the notifications being conveyed over different channels.
INFO
SNMP Trap
The SNMP (Simple Network Management Protocol) traps are used to send a notification to the central network management systems (NMS). It provides integration into the corporate monitoring infrastructures.
Warning
For the SNMP trap sending, the SNMP trap target server must be configured on the TR7 device. The related configuration is in the Notification Management section.
INFO
E-mail
It makes it possible for the notifications to be sent as an e-mail. More than one e-mail address can be defined.
Warning
For the e-mail sending, the SMTP server configuration must be made on the TR7 device. The related configuration is in the Notification Management section.
INFO
SMS
It makes it possible for the notifications to be sent as an SMS. It offers instant access for the critical warnings. More than one phone number can be defined.
INFO
UI Notification
It makes it possible for the notifications to be displayed on the TR7 web interface. The users who log in to the interface see the notifications in real time.
Operational Best Practices
- The threshold values are determined realistically. The thresholds are determined by analyzing the normal traffic patterns; too low thresholds cause an unnecessary flood of notifications and too high thresholds cause late warnings.
- The certificate period is reported early enough. The certificate expiry notify days value is adjusted according to the renewal process; a warning given 30–60 days in advance generally allows enough time for the renewal.
- No change is made without the "Used in" information being checked. A profile must not be updated without knowing on which vServices it is used in the live environment; the threshold changes affect the monitoring behavior of all the connected services.
- Separate profiles are created for different environments. Different notification profiles are used in the production, test and development environments; the test environment notifications must not go to the production channels.
- The SNMP integration is evaluated. If there is a corporate monitoring infrastructure (Nagios, Zabbix, PRTG, etc.), the SNMP trap integration is enabled; this includes the TR7 notifications in the central monitoring system.
Supported vService Types
HTTP
L7 TCP
Network
How to Add?
A new Notifications Profile is added through the TR7 web management interface with the steps below:
- The Configuration Menu is opened by clicking the TR7 logo at the bottom left.
- The Load Balancer → Profiles → Notifications → Add steps are followed.
- A unique and descriptive name is entered for the profile.
- The values suitable for the application and service requirements are configured.
- The profile is added by clicking the
Addbutton.
TIP
Reaching the page via quick search
Instead of navigating the menu step by step, the related page is reached directly by using the search bar in the bottom left corner of the screen. The search bar opens with the Alt + T shortcut on Windows and Opt + T on macOS; typing the name of the feature being searched for is then sufficient.
The created profile can be used on one or more vServices.
Profiles Listing Screen
By following the Load Balancer → Profiles → Notifications path, the list of all the Notifications Profiles added on the TR7 device is reached. Profile adding, editing and deleting operations are performed through this screen.
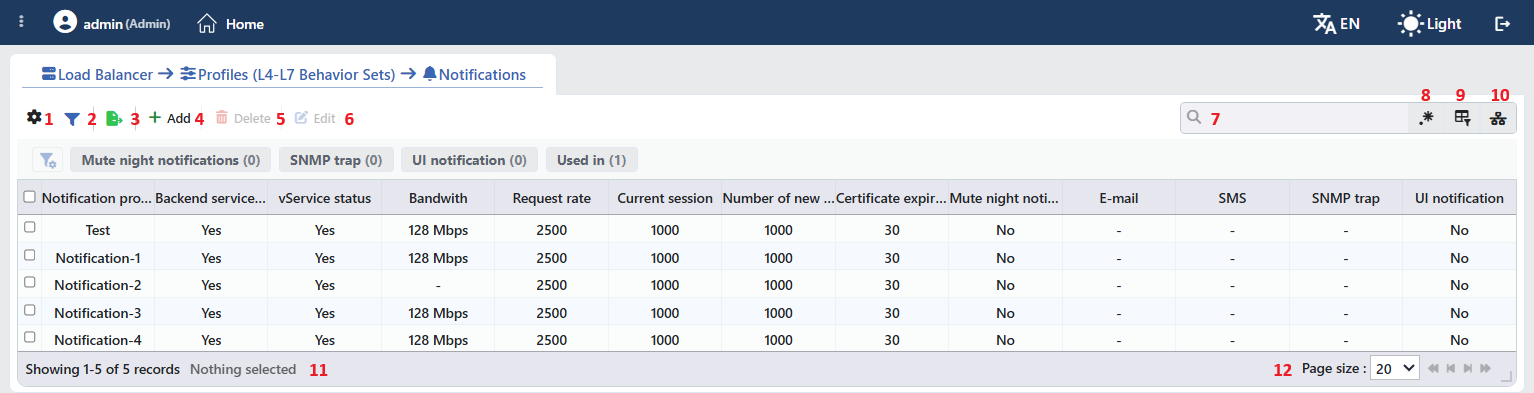 Notifications Profiles Listing Form
The table opens with the following columns by default:
| Column | Description |
|---|---|
| Notification Profile Name | The name of the profile. |
| Backend Service Status | Whether the Backend Service status notification is on or not (Yes or No). |
| vService Status | Whether the vService status notification is on or not (Yes or No). |
| Bandwith | The bandwidth threshold (e.g. 128 Mbps); if the threshold is off, -. |
| Request Rate | The request rate threshold; if the threshold is off, -. |
| Current Session | The simultaneous session threshold; if the threshold is off, -. |
| Number of New Connections | The new connection number threshold; if the threshold is off, -. |
| Certificate Expiry Notify Days | How many days before the certificate expiry the notification will be made. |
| Mute Night Notifications | Whether the night notifications are muted or not (Yes or No). |
The number of defined e-mail addresses, in the Total of N form; if the channel is off, -. The addresses appear when the cell is hovered over. | |
| SMS | The defined phone numbers; if the channel is off, -. |
| SNMP Trap | The value of the SNMP trap channel; if the channel is off, -. |
| UI Notification | Whether the interface notification is on or not (Yes or No). |
The eight source IP based columns (Active Source IPs, 4xx Responses/sec, 5xx Responses/sec, Connections per Source IP/sec, Requests per Source IP/sec, Errors per Source IP/sec, Incoming Traffic per Source IP, Outgoing Traffic per Source IP) are hidden by default; they are opened from the column selector. The table is not sorted when it opens; when a column header is clicked, descending sorting is applied first, then ascending, and on the third click the sorting is removed.
The items in the toolbar are arranged from left to right in the following order; the last two items (Page Information and Page Size) are located in the information strip below the table.
Columns
Which columns are shown in the table is selected; thirteen columns are on by default and the eight source IP based columns are hidden. In the same panel, columns are reordered by dragging and alignment is selected per column; the row height is fitted to the page with the Fit rows to the page button, and the column layout is reset to default with the Reset button. The layout is stored per user.
Filter
The Filter button is used to filter the profiles shown in the list according to certain criteria; the button shows the number of active filters with a badge. There are four cards in the strip: Mute Night Notifications, SNMP Trap, UI Notification and Used in. In the card title there are the filter name and the number of values; when the card is clicked, the values are listed under it with their row counts. The Used in card lists the names of the vServices on which the profile is used; for the profiles that are not used on any vService, the Unused Entries option is available. The selections are displayed as closable labels under the card strip, right above the table.
Export
The table is exported as Excel, CSV or PDF by clicking the Export button. In the window that opens, the Filename, Format and Data Source, together with the Columns to be exported, are determined; the remaining fields are displayed according to the format: CSV Separator for CSV, Excel Sheet Name for Excel, and Page Orientation and Page Size for PDF.
Add
By clicking the Add button, the form for creating a new profile opens in the Add tab.
Delete
When one or more profiles are selected and the Delete button is clicked, the related profiles are deleted.
WARNING
A profile that is in use can also be deleted and the confirmation window does not show the usage places. On the vServices that use the deleted profile, notification production stops completely; there is no return to the built-in default profile. Before deleting, the Used in tab on the preview panel must be checked.
Edit
By clicking the Edit button, the edit form of the selected profile opens in the Edit tab. The button becomes enabled only when a single profile is selected.
Search
Used to search all information in the table.
RegExp Search
Used to search all information in the table with a regular expression (RegExp). This button is hidden while column-based search or the usage filter is active.
Column Based Search
Used to perform a column-based search on the information in the table.
Usage Filter
Used to filter which vServices the profiles are bound to; the profiles used on the selected vService are listed, and there is an Unused Entries option for those not used on any vService. While the filter is active, the selector takes the place of the search box; when the icon is clicked again, the search box returns.
Page Information
Contains information about the total number of defined profiles and the number of profiles displayed in the list: Showing N-M of T records and the number of selected profiles (N selected, or Nothing selected when there is no selection). If a selection has been made in the filter strip, the number of applied filters and the shown/total row information are added to the same line.
Page Size
The maximum number of profiles to be displayed on the page is selected. The default is 20; the options are 5, 10, 20, 50, 100, 200, 500 and All.
Right-Click Menu
When a row is right-clicked, a menu with the profile's name in its title opens. Both operations in the menu apply only to the right-clicked profile; a selection made in the list does not affect the menu.
| Operation | What it does |
|---|---|
| Edit | Opens the editing form of the profile in the Edit tab; it is the same as the form opened by the Edit button in the toolbar. |
| Delete | Deletes the right-clicked profile; the same confirmation question as the deletion in the toolbar is displayed. |
Preview of the Selected Profile
When a row in the list is clicked, the preview of the profile opens on the right of the screen; when the selected row is clicked again, the panel closes. In the title there are the profile icon, the name of the profile and the Notification profile subtitle, and at the top right there is a single operation.
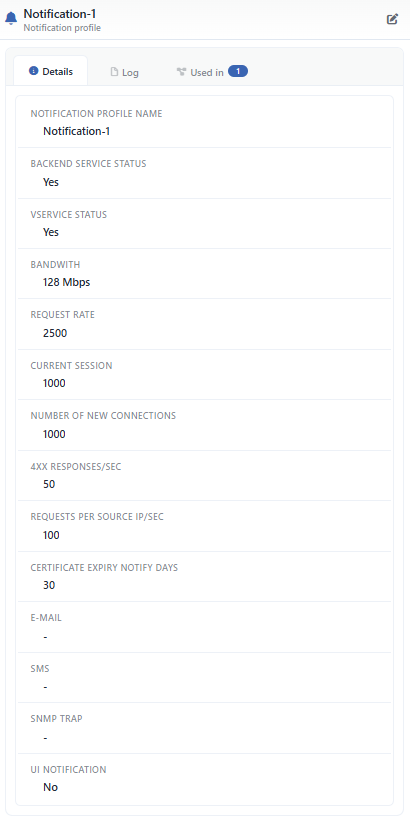 Preview of the Selected Profile
| Operation | What it does |
|---|---|
| Edit | Opens the editing form of the profile in the Edit tab. |
The panel has three tabs; the last one is displayed only if there is a vService that uses the profile:
Details
Lists the settings of the profile line by line (the table below).
Log
Lists the user operations on the profile (adding, editing, deleting) as a timeline.
Used in
Lists the vServices on which the profile is used. The badge next to the tab name shows the number of usages; if there is no vService that uses the profile, the tab is not displayed at all.
The rows in the Details tab are as follows, in order:
| Row | Description | Visibility condition |
|---|---|---|
| Notification Profile Name | The name of the profile. | Always |
| Backend Service Status | Yes or No. | Always |
| vService Status | Yes or No. | Always |
| Bandwith | The bandwidth threshold (e.g. 128 Mbps). | If the threshold is on |
| Request Rate | The request rate threshold. | If the threshold is on |
| Current Session | The simultaneous session threshold. | If the threshold is on |
| Number of New Connections | The new connection number threshold. | If the threshold is on |
| Active Source IPs | The threshold for the number of simultaneous different source IPs. | If the threshold is on |
| 4xx Responses/sec | The threshold for the number of 4xx responses per second. | If the threshold is on |
| 5xx Responses/sec | The threshold for the number of 5xx responses per second. | If the threshold is on |
| Connections per Source IP/sec | The connection threshold per source IP per second. | If the threshold is on |
| Requests per Source IP/sec | The request threshold per source IP per second. | If the threshold is on |
| Errors per Source IP/sec | The error threshold per source IP per second. | If the threshold is on |
| Incoming Traffic per Source IP | The incoming traffic threshold per source IP. | If the threshold is on |
| Outgoing Traffic per Source IP | The outgoing traffic threshold per source IP. | If the threshold is on |
| Certificate Expiry Notify Days | How many days before the certificate expiry the notification will be made. | Always |
| Mute Night Notifications | It shows that the night notifications are muted. | If the option is on |
The e-mail addresses to which the notification will be sent; if the channel is off, -. | Always | |
| SMS | The phone numbers to which the notification will be sent; if the channel is off, -. | Always |
| SNMP Trap | The value of the SNMP trap channel; if the channel is off, -. | Always |
| UI Notification | Yes or No. | Always |
The "Used in" tab must be checked
The Used in tab shows on which vServices the profile is active. Since updates to the profile settings in a live environment will immediately affect all bound services, evaluating the possible service impacts before a change is critically important.
Profile Add Form
A new Notifications Profile is added on the TR7 device by following the Load Balancer → Profiles → Notifications → Add steps.
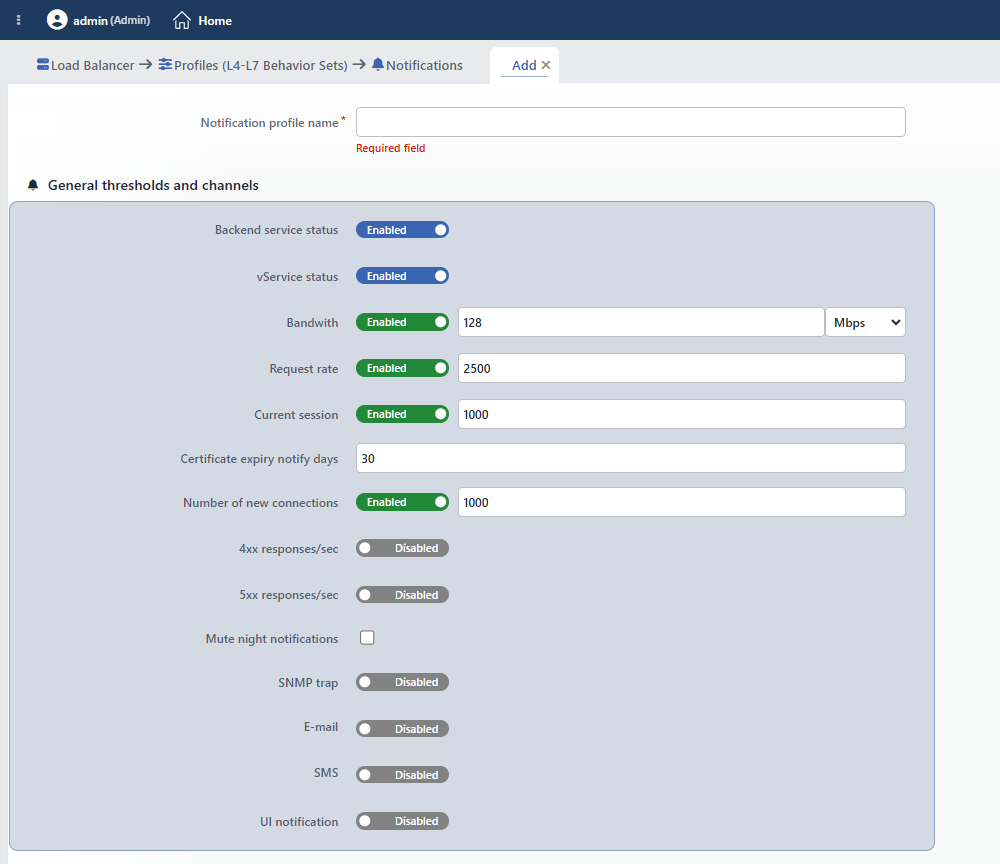 Notifications Profile Add Form - 1
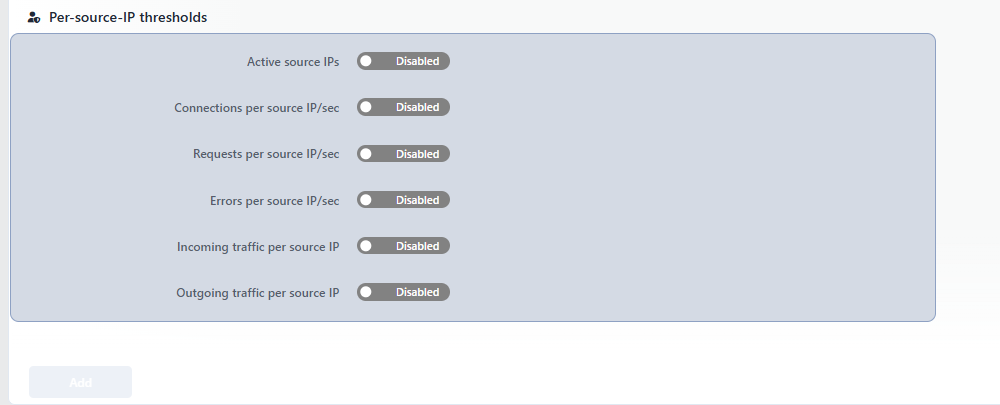 Notifications Profile Add Form - 2
The form consists of two sections: General Thresholds and Channels and Per-Source-IP Thresholds. The metric fields are on/off switches; the form opens preloaded with the values of the built-in default profile: the Backend Service Status, vService Status, Bandwith, Request Rate, Current Session and Number of New Connections switches come on, and all the remaining metrics and the notification channels are off. When a metric that is off is turned on, the suggestion value is preloaded into the field and is changed if desired. The profile changes are applied instantly, without an engine refresh being required and without affecting the traffic.
INFO
Notification Profile Name Required
A unique name is entered for the profile to be created. When a name that is in use is entered, the form gives a Name is used warning and the record is not completed.
General Thresholds and Channels
INFO
Backend Service Status Default: On
A notification is sent when the health check status of the Backend Services bound to the vService changes (up/down).
INFO
vService Status Default: On
A notification is sent when the general status of the vService changes (opening/closing).
INFO
Bandwith Default: On · 128 Mbps
A notification is sent when the total traffic passing over the vService exceeds the determined threshold value. The form comes preloaded with 128 Mbps; Kbps, Mbps or Gbps is selected as the unit. The field label is in the product with this spelling (Bandwith).
INFO
Request Rate Default: On · 2,500
A notification is sent when the number of HTTP requests per second exceeds the determined threshold value. The form comes preloaded with 2,500.
INFO
Current Session Default: On · 1,000
A notification is sent when the number of simultaneous active sessions exceeds the determined threshold value. The form comes preloaded with 1,000.
INFO
Certificate Expiry Notify Days Default: 30
A notification is sent when the specified number of days remains to the expiry date of the SSL certificate assigned to the vService. For example, when the value 30 is entered, the warning is received when 30 days remain to the certificate expiry. The form comes preloaded with 30; when the field is emptied, no certificate notification is produced.
INFO
Number of New Connections Default: On · 1,000
A notification is sent when the number of new connections established per second exceeds the determined threshold value. The form comes preloaded with 1,000.
INFO
4xx Responses/sec Default: Off
When it is activated, a notification is sent when the number of 4xx (client error) responses produced per second exceeds the threshold; when it is turned on, the suggestion 100 comes into the field.
INFO
5xx Responses/sec Default: Off
When it is activated, a notification is sent when the number of 5xx (server error) responses produced per second exceeds the threshold; when it is turned on, the suggestion 50 comes into the field.
INFO
Mute Night Notifications Default: Off
When it is activated, only the SMS sending is stopped in the night hours (22:00 – 08:00); the SNMP, E-mail and UI notifications continue to be sent.
INFO
SNMP Trap Default: Off
When it is activated, the notifications are sent as an SNMP trap to the configured target servers.
Warning
The SNMP trap target configuration is made from the Notification Management section; if no target is defined, no trap is sent even if this option is on and no warning is given.
INFO
E-mail Default: Off
When it is activated, the e-mail addresses to which the notifications will be sent are entered. By clicking the (+) button, more than one e-mail address can be added.
Warning
The SMTP configuration is made from the Notification Management section; if SMTP is not defined, no e-mail is sent even if the addresses are entered and no warning is given.
INFO
SMS Default: Off
When it is activated, the phone numbers to which the notifications will be sent are entered. By clicking the (+) button, more than one number can be added. The SMS sending infrastructure is configured from the Notification Management section.
INFO
UI Notification Default: Off
When it is activated, the notifications are displayed on the TR7 web interface. All the users who log in to the interface can see the notifications in real time.
Per-Source-IP Thresholds
INFO
Active Source IPs Default: Off
When it is activated, a notification is sent when the number of different source IPs accessing the vService simultaneously exceeds the threshold; when it is turned on, the suggestion 1,000 comes into the field.
INFO
Connections per Source IP/sec Default: Off
When it is activated, a notification is sent when the number of connections established per second from a single source IP exceeds the threshold; when it is turned on, the suggestion 100 comes into the field.
INFO
Requests per Source IP/sec Default: Off
When it is activated, a notification is sent when the number of requests coming per second from a single source IP exceeds the threshold; when it is turned on, the suggestion 100 comes into the field.
INFO
Errors per Source IP/sec Default: Off
When it is activated, a notification is sent when the number of errors that a single source IP produces per second exceeds the threshold; when it is turned on, the suggestion 50 comes into the field.
INFO
Incoming Traffic per Source IP Default: Off
When it is activated, a notification is sent when the traffic coming from a single source IP exceeds the threshold; when it is turned on, the suggestion 10 Mbps comes into the field. Kbps, Mbps or Gbps can be selected as the unit.
INFO
Outgoing Traffic per Source IP Default: Off
When it is activated, a notification is sent when the traffic going to a single source IP exceeds the threshold; when it is turned on, the suggestion 10 Mbps comes into the field. Kbps, Mbps or Gbps can be selected as the unit.
How to Add to a vService?
A Notifications Profile is assigned to a vService by following the steps below.
1
Step 1 Go to the vServices screen
The Load Balancer → Load Balancer vService List path is followed in the TR7 web interface.
2
Step 2 Open the editing screen of the vService
The vService to which the profile will be added is right-clicked and Edit is selected; or the vService is clicked and the Edit icon is clicked in the window that opens on the right.
3
Step 3 Enable the Notification feature
On the Details panel on the right of the editing screen of the vService, the feature is put into effect by marking the Notification option. When it is marked, the built-in Default Profile comes selected; on a new vService this option starts off.
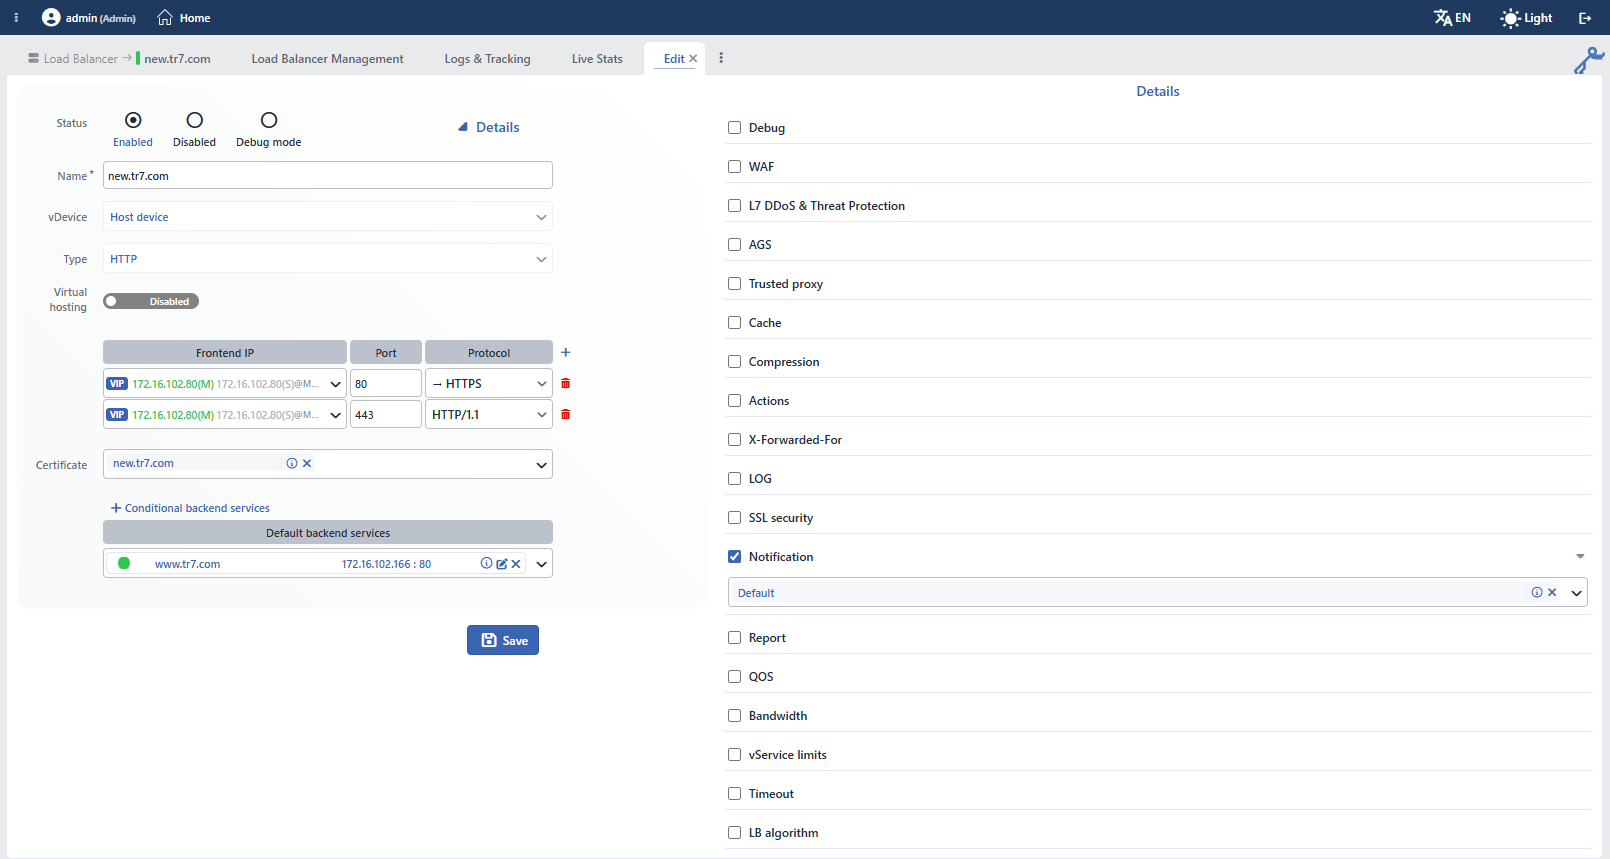 The Notifications Selection on the vService Editing Screen
4
Step 4 Select a profile or add a new one
In order to use a different profile, the arrow sign next to the row is clicked and a selection is made from the list in the expanding section. This field accepts more than one profile: more than one Notifications profile can be assigned to the same vService and all of them are evaluated together.
If desired, a new profile can also be added through the vService editing screen by clicking the Add button.
5
Step 5 Save
The changes are saved by clicking the Save button; while the configuration is being applied to the vService, the "vService is being edited" notification is displayed.
