
Smarter by Design.Simpler for Business
OAuth2
What Is OAuth2?
OAuth2 is the Authentication Providers type that has the identity of the user verified in an external identity provider (such as Google, Microsoft Entra ID, Keycloak, Okta and e-Devlet). In the login step the user is directed to the authorization page of the provider, logs in there and returns to TR7; TR7 takes a token with the authorization code it receives and reads the user information. The password never reaches TR7.
In this type the identity is taken from the user information endpoint with the access token. If the provider supports OpenID Connect, the OpenID Connect type, which reads the identity from the ID token whose signature is verified, is preferred; the two types share the same form.
How does it work?
- An application registration is created on the provider (e.g. the Google Cloud Console, Entra ID); the Client ID and the Client Secret are taken and the Redirect URI address of TR7 is registered.
- OAuth2 is selected as the Provider Type on TR7; a built-in provider or Custom Provider is selected in the OAuth Provider field and the client information is entered.
- The profile is added to the access flow of the vService with AGS enabled as an Authentication Provider step; the user is directed to the provider over the
/oauthpath. - The user information returned from the provider is written to the session attributes with the automatic mapping and the flow continues from the success transition.
Built-in OAuth Provider Catalog
When a built-in provider is selected in the OAuth Provider field (Apple is listed only in the OpenID Connect type), the authorization, token, user information, logout and token revocation addresses, the default scopes and the PKCE and client authentication settings are provided by TR7; only the client information (Client ID, Client Secret, OAuth Scopes, Redirect URI), the fields specific to the provider and the logout switches appear in the form. When Custom Provider is selected, all the endpoints are entered manually.
| OAuth Provider | Additional field | Logout and revocation switches | Note |
|---|---|---|---|
| e-Devlet | - | Sign Out from Provider on Logout | The scopes are separated with ;; it requires a contract with TÜRKSAT |
| Hosted Domain, Access Type, Prompt | Revoke Tokens on Logout | ||
| Microsoft | Tenant (default common) | Sign Out from Provider on Logout | The Entra ID tenant: common, organizations, consumers or the tenant id or domain name |
| GitHub | - | - | |
| GitHub Enterprise | GitHub Enterprise Address (required) | - | |
| GitLab | GitLab Address (default https://gitlab.com) | Revoke Tokens on Logout | |
| Keycloak | Realm URL (required) | Revoke and Sign out | |
| Okta | Okta Domain (required) | Revoke and Sign out | PKCE (S256) is on |
| Auth0 | Auth0 Tenant Address (required) | Revoke and Sign out | |
| X (Twitter) | - | Revoke Tokens on Logout | There is no e-mail mapping; PKCE (S256) is on |
| - | Revoke Tokens on Logout | ||
| - | - | ||
| Yandex | - | - |
The endpoint addresses of the built-in providers are not written to the profile; they are applied from TR7's catalog on every run. The defaults of the fields specific to the provider (e.g. the Microsoft Tenant or the Google Access Type and Prompt), on the other hand, are saved to the profile. Turning the profile into a Custom Provider leaves the address fields empty.
Provider-Specific Fields
When a built-in provider is selected, the fields the provider requires are displayed in the form in place of the address fields:
| Field | Provider | Meaning |
|---|---|---|
| Tenant | Microsoft | The Entra ID tenant; the default is common. |
| GitHub Enterprise Address | GitHub Enterprise | The address of the installation; required. |
| GitLab Address | GitLab | The address of the installation; the default is https://gitlab.com. |
| Realm URL | Keycloak | The realm address; required. |
| Okta Domain | Okta | The Okta domain name; required. |
| Auth0 Tenant Address | Auth0 | The tenant address; required. |
| Hosted Domain | The Google Workspace domain name to which the login is limited. | |
| Access Type | Online (default) or Offline (get refresh token). | |
| Prompt | None, Consent or Select Account (default). |
Operational Best Practices
- Endpoints by discovery. In Custom Provider the addresses must be filled in with Fetch Endpoints from Issuer instead of being written manually; typing errors break the login flow silently.
- The Redirect URI as a path. When a path (such as
/ags-portal/oauth) is written in the Redirect URI field instead of the full address, the same profile works on every domain name of the vService; the address must be registered on the provider side as well. - OpenID Connect where possible. If the provider supports it, the OpenID Connect type must be selected; the signature of the ID token is verified.
- The lockout on the provider. The lockout is generally performed on the provider side; No Lockout or Use Gateway Defaults must be selected for Lockout Behavior.
- Signing out from the provider on logout too. In environments where shared computers are used, Sign Out from Provider on Logout must be turned on; otherwise the user is let in without being asked for a password on the next login.
How to Add?
A new OAuth2 provider is added through the TR7 web management interface with the following steps:
- The Configuration Menu is opened by clicking the TR7 logo at the bottom left.
- The AGS → Authentication → Authentication Providers → Add steps are followed.
- A unique and descriptive name is entered for the profile; OAuth2 is selected as the Provider Type.
- The OAuth Provider is selected and the client information is entered.
- The profile is added by clicking the
Addbutton.
Profile Add Form
When the AGS → Authentication → Authentication Providers → Add steps are followed and OAuth2 is selected in the Provider Type field, the form opens with the following fields.
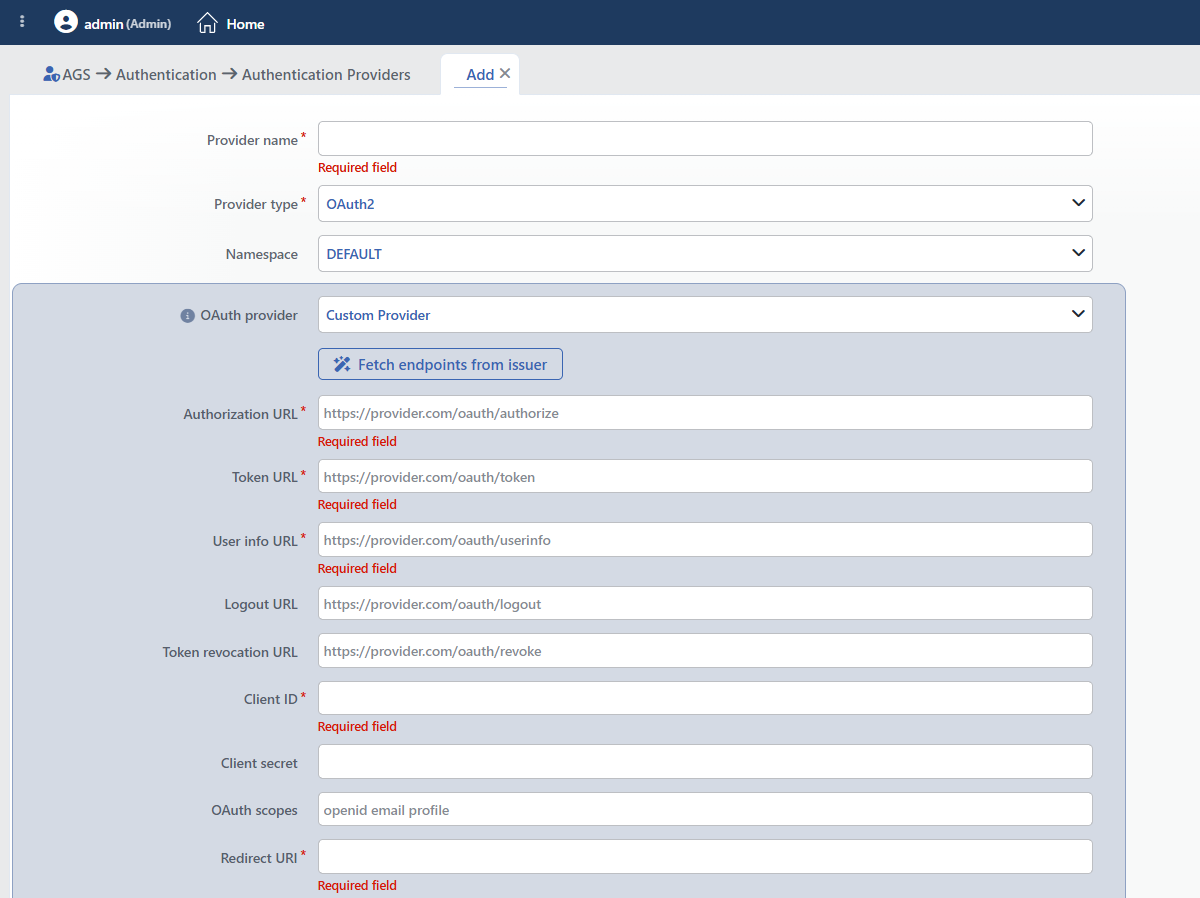 The Form While OAuth2 Is Selected (Custom Provider)
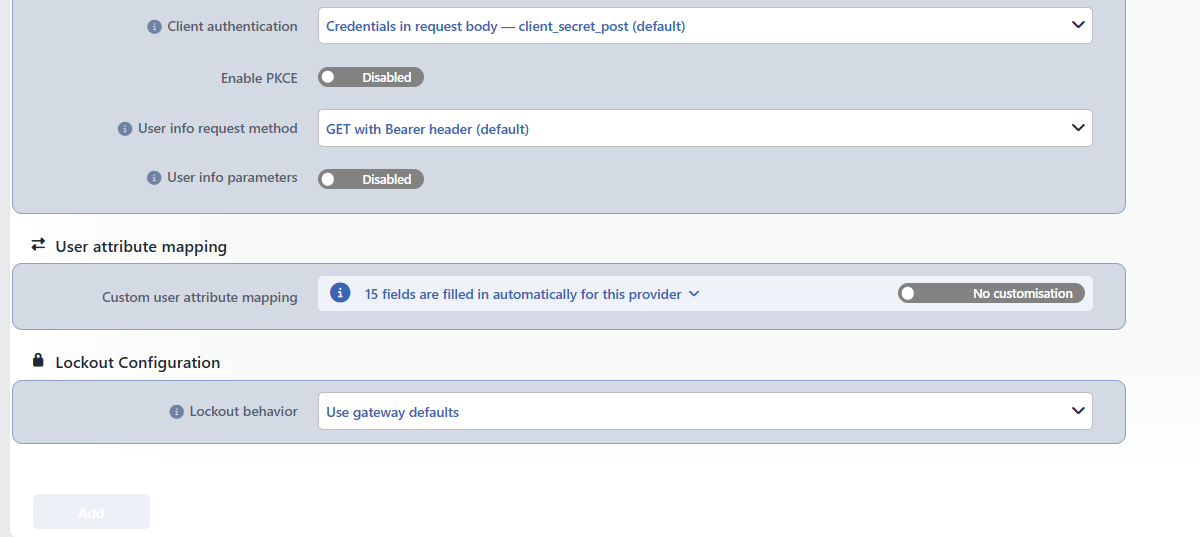 The Continuation of the OAuth2 Form
INFO
Provider Name Required
The name of the profile; it identifies the profile in the list, in the step selection in the flowchart, in the session list and in the logs. The name must be unique on the device; a second profile with the same name is not saved and the Name is used warning is displayed. When it is left empty, the Required field warning is displayed.
INFO
Provider Type Required
The provider type; OAuth2 is selected on this page. When the type is changed, only the fields of the new type are displayed and saved; the type is changed in the edit form as well.
INFO
Namespace Default: the default route table
The Route Tables record from which the token and user information requests TR7 makes to the provider go out; a route table that has internet access must be selected. The field comes filled with the default route table of the device; the name of this table varies by device (e.g. DEFAULT or DEFAULT_ROUTE).
INFO
OAuth Provider Default: Custom Provider
One of the built-in providers or Custom Provider is selected (see Built-in OAuth Provider Catalog). When a built-in provider is selected, the address and protocol fields are hidden; only Client ID, Client Secret, OAuth Scopes, Redirect URI, the fields specific to the provider and the logout switches are displayed.
INFO
Fetch Endpoints from Issuer
The button that appears only while Custom Provider is selected; it fills in the endpoints from the discovery document of the provider (see Fetch Endpoints from Issuer).
INFO
Authorization URL Required (Custom Provider)
The provider endpoint to which the user is directed for the login (such as https://provider.com/oauth/authorize).
INFO
Token URL Required (Custom Provider)
The endpoint at which the authorization code is exchanged for a token.
INFO
User Info URL Required (Custom Provider)
The endpoint at which the user information is read with the access token.
INFO
Logout URL
The logout endpoint of the provider; it is optional. When it is entered, the Sign Out from Provider on Logout switch is displayed.
INFO
Token Revocation URL
The token revocation endpoint of the provider; it is optional. When it is entered, the Revoke Tokens on Logout switch is displayed.
INFO
Client Secret
The secret key of the application registered on the provider; it is entered in a masked field and is shown as ******** in the preview. In public clients (Client Authentication: Public client — no client secret sent) it is left empty.
INFO
OAuth Scopes
The scopes to be requested are entered separated with a space (openid email profile); in e-Devlet they are separated with ;. For the built-in providers the default scopes are defined in the catalog; when the field is filled in, the entered value is used.
INFO
Redirect URI Required
The address to which the provider sends the user back. The full address or only the path (such as /ags-portal/oauth) is entered; when a path is entered, the address is completed with the scheme and the domain name the request came from. The same address must also be written into the application registration on the provider side.
INFO
Client Authentication Default: client_secret_post
It appears only in Custom Provider. How the client credentials are sent to the token endpoint is selected:
| Option | Meaning |
|---|---|
| Credentials in request body — client_secret_post (default) | The id and the secret key are sent in the request body. |
| HTTP Basic header — client_secret_basic | The id and the secret key are sent in the Authorization: Basic header. |
| Public client — no client secret sent | The secret key is not sent; for public clients such as mobile and single-page applications, usually together with PKCE. |
INFO
Enable PKCE Default: Disabled
It appears only in Custom Provider. When it is turned on, PKCE protection against the interception of the authorization code is applied.
PKCE Challenge Method Default: SHA256 (Recommended)
Displayed only while Enable PKCE is on.
| Option | Meaning |
|---|---|
| SHA256 (Recommended) | The verifier is hashed with SHA256 and sent. |
| Plain (Not Recommended) | The verifier is sent without being hashed; only for providers that do not support SHA256. |
INFO
User Info Request Method Default: GET with Bearer header (default)
It appears only in Custom Provider. How the user information endpoint is called is selected:
| Option | Meaning |
|---|---|
| GET with Bearer Header (default) | The token is sent in a GET request with the Authorization: Bearer header. |
| POST Form Parameters | The information is sent as form parameters in a POST request. |
INFO
User Info Parameters Default: Disabled
When the switch is turned on, the Parameter Name and Parameter Value table for the additional parameters to be added to the user information request is displayed; both fields are required on each row and the Parameter Name values do not repeat. The parameters are added to the query string in GET and to the form body in POST. The {accessToken}, {clientId}, {clientSecret} and {scope} placeholders are used in the values.
INFO
Revoke Tokens on Logout Default: Disabled
It appears while a token revocation address is defined. While it is on, the tokens of the session are sent to the revocation endpoint of the provider while the session is being closed; if the provider does not respond, the logout is still completed.
INFO
Sign Out from Provider on Logout Default: Disabled
It appears while a logout address is defined. While it is on, the browser is directed to the logout address of the provider after the local session is closed; while it is off, the user is let in without being asked for a password on the next login because the session on the provider is still open.
User Attribute Mapping
INFO
Custom User Attribute Mapping Default: No customisation
How the fields in the provider response are mapped to the session attributes is managed. The information bar to the left of the field shows the number of fields mapped automatically for the selected provider; in Custom Provider this number is 15: 15 fields are filled in automatically for this provider. In the built-in providers the number varies (e.g. Google 8, e-Devlet 9, GitHub 6, X 4). When the arrow icon on the bar is clicked, the automatically mapped rows and the JSONata expression of each of them are listed; per row there is a chip that examines the expression in the JSONata workspace and copy operations. In the providers that have no automatic mapping, No automatic mapping for this provider - every attribute has to be mapped below is written on the bar.
When the switch on the right is moved to the Customised position, the AGS Attribute and Source Attribute table is displayed: the session attribute (with a suggestion list) is entered in the left column and the JSONata expression that is evaluated on the provider response in the right column. When the switch is turned on, the + Add link that adds a row appears on the right of the bar. A custom row that targets the same attribute as an automatic row overrides the automatic one (the replaced below badge) and the text of the information bar turns into the … fields are filled in automatically; you replace … of them form, which also says how many automatic rows are replaced. When a name outside the standard attributes of AGS is entered, this attribute is defined as a custom user field on the vService; names that start with _ are considered hidden fields and do not produce a custom user field.
Lockout Configuration
INFO
Lockout Behavior Default: Use gateway defaults
With which lockout policies the failed attempts on this provider are counted is selected:
| Option | Meaning |
|---|---|
| Use Gateway Defaults | The policies in the Default Lockout Policies list of the vService are used. |
| Replace Defaults | Only the policies selected in the Lockout Policies field are used. |
| Add to Defaults | In addition to the default policies of the vService, the ones selected in the Lockout Policies field are used as well. |
| No Lockout | Failed attempts are not counted on this provider, no lockout is performed. |
Lockout Policies
Displayed while Replace Defaults or Add to Defaults is selected; the built-in and defined policies on the Account Lockout Policies screen are selected.
INFO
Add
The profile is added by clicking the Add button; the tab closes and the profile is displayed in the list.
Fetch Endpoints from Issuer
The Fetch Endpoints from Issuer button in the form with Custom Provider selected opens a window with the Issuer URL and Route Table fields. /.well-known/openid-configuration is appended to the entered issuer address and the discovery document is taken from the selected route table (the default: the Namespace of the profile); the full .well-known address can also be pasted.
Authorization URL and Token URL are always filled in; User Info URL, Logout URL and Token Revocation URL are written only if they are announced in the discovery document. The openid profile email scopes the provider announces are added, Enable PKCE (SHA256) is turned on if it is announced, and for Client Authentication the first of client_secret_post, client_secret_basic and none, in that order, among the methods the provider supports is selected.
Addresses that do not start with http:// or https://, addresses that redirect, TR7's own addresses, addresses that return an HTML page, documents that exceed 256 KB and documents that do not carry the authorization_endpoint or the token_endpoint field are rejected; the fetch takes at most 8 seconds. Success is reported with the Endpoint fields were filled from the issuer's discovery document message. The error message starts with Discovery failed:, carries the error coming from the provider and ends with the Tip: enter the provider's identity/issuer address, not its website — it usually starts with accounts., login. or id. hint. The operation is not written to the user operation record.
