
Smarter by Design.Simpler for Business
Notification Management
What Is Notification Management?
Notification Management is the screen that centrally manages TR7's event-based alerting infrastructure. The system resources (CPU, memory, disk, bandwidth), the network status (interface, IP, gateway), the cluster events (failover, cluster connection) and the user actions are monitored; when a defined threshold is exceeded or a status changes, a notification is sent automatically to the related people.
The screen consists of four areas: on which event a notification will be generated is defined with the notification profiles, to whom the notification will go with the contact groups (Contact Groups), and through which channel it will go with the e-mail (SMTP) and SNMP settings.
Profiles
Notification profiles
On which event, through which channel, to whom the notification will go
Contact Groups
Contact groups
Grouping of the people who will receive notifications
E-mail
SMTP settings
Server configuration for sending e-mail
SNMP
SNMP destinations
NMS destination settings to which traps will be sent
When an event occurs, the related notification profile delivers the alert to the people in the assigned contact groups through the selected channels (Send E-Mail / Send SMS / SNMP Trap / Notify UI).
Cluster Behavior
In the TR7 installations running as a cluster (two devices), when the Notification Management settings are changed on one device, they are automatically synchronized with the other TR7 device; there is no need to set them separately. The notifications themselves, on the other hand, are generated and sent independently by each device; which device they come from is understood from the Host line in the e-mail and from the server name in the SMS text. The periodic report e-mails are sent only from the primary device (cluster order device 1); the IP Intelligence & Reputation Data notification is also evaluated only on the primary device.
How Does It Work?
When an event occurs, the notification reaches the related people over the defined profile with the following flow:
01 · EventThe event is detectedA threshold is exceeded or a status changes (CPU, network, cluster…)
02 · ProfileA profile matchesThe notification profile that covers the event is triggered
03 · ChannelThe channel(s) are selectedSend E-Mail · Send SMS · SNMP Trap · Notify UI
04 · DeliveryDelivered to the related peopleThe people in the Contact Groups assigned to the profile
Core Concepts
The screen consists of four building blocks; the details of each are reached from the related card.
Notification Profile
The rule that defines on which event, through which channel and to which contact group a notification will go.
→
Contact Groups
Grouping of the people who will receive notifications; these groups are assigned to the profiles.
→
E-mail (SMTP)
The global SMTP server configuration through which the e-mail notifications will be sent.
→
SNMP
The NMS destination settings to which the SNMP trap notifications will be sent.
→
Configuration Order
Since a notification profile references both the channels (E-mail / SNMP) and the contact groups, doing the setup in the following order prevents getting stuck:
- The channels are prepared: E-mail Settings (SMTP) is configured for the e-mail notifications and SNMP Settings for the SNMP trap.
- The Contact Groups are created: the people who will receive notifications are grouped under Contact Groups (the phone numbers for SMS are also defined here).
- The notification profile is defined: with adding a profile, the event, the channel and the contact group are matched in a single profile.
TIP
If only the Notify UI channel (the in-interface notification) is going to be used, there is no need for the e-mail/SNMP configuration; the profile is created directly.
INFO
The Default Records
A newly installed TR7 device comes with a ready Admins contact group (all the users of the Super Admin type) and seven ready notification profiles: CPU Notification (limit 90%) · Memory Notification (90%) · Disk Notification (90%) · VRRP Notification · TR7 IP Notification · IP Intelligence Data Notification (45 days) · NTP Synchronization Notification (5 seconds). All of them are bound to the Admins group with the Send E-Mail + Notify UI channels; they are edited or deleted according to the need (a deleted default record is not created again).
How to Add?
A new notification profile is added via the TR7 web management interface with the steps below:
- The Configuration Menu is opened by clicking the TR7 logo at the bottom left.
- The steps Settings → General Settings → Notification Management → Add are followed.
- A unique and descriptive name is entered for the profile.
- The related fields are configured according to the requirements; for the details of the fields, the Notification Management Add Form section can be looked at.
- The profile is added by clicking the
Addbutton.
TIP
Reaching the page via quick search
Instead of navigating the menu step by step, the related page is reached directly by using the search bar in the bottom left corner of the screen. The search bar opens with the Alt + T shortcut on Windows and Opt + T on macOS; typing the name of the feature being searched for is then sufficient.
Notification Management
Which event, through which channel and to whom a notification will be sent is defined with the notification profiles. Every profile brings together an event (the condition to be monitored and its scope), an action (Notification Action) and the target contact groups (Notification Contacts).
Notification Management Listing Screen
By following the path Settings → General Settings → Notification Management, the list of the notification profiles defined on the TR7 device is reached. The profile adding, editing and deleting operations are done from this screen.
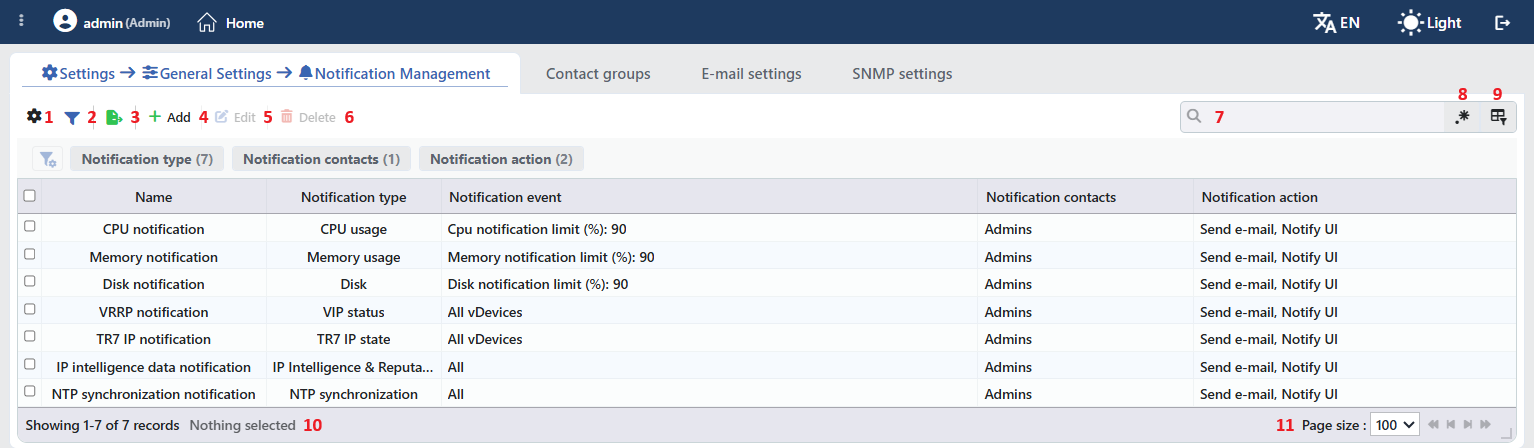 The Notification Management Listing Screen
The table opens with the following columns by default:
| Column | Description |
|---|---|
| Name | The name given to the profile. |
| Notification Type | The type of the event that is monitored (CPU Usage, VIP Status, User Action etc.). The long type names that do not fit in the column are shown abbreviated. |
| Notification Event | The threshold or the scope that the profile monitors according to the selected type. In the resource types the limit value (e.g. Cpu notification limit (%): 90), in the status and network types the scope (e.g. All vDevices), and in the User Action type the defined log filters are written. If more than one filter is defined, every filter is shown on a separate sub-row and the scope steps are joined with →. |
| Notification Contacts | The contact groups the notification will be sent to. When the cell is hovered over, the resolved e-mail address and phone number list of the group is displayed. |
| Notification Action | Through which channels the notification will be delivered (Send e-mail, Send SMS, SNMP Trap, Notify UI). |
There is no column hidden by default; these five columns take place in the column selector.
The items in the toolbar are arranged from left to right in the following order; the last two items (Page Information and Page Size) are located in the information strip below the table.
Columns
Which columns will be shown in the table is selected; all five columns are on by default. In the same panel the columns are reordered by dragging, the alignment is selected per column, a manually set column width is returned to automatic sizing by clicking, and with the Reset button the column layout is returned to the default. The layout is stored per user.
Filter
The Filter button is used to filter the profiles shown in the list according to certain criteria. The filter criteria offered come dynamically, specific to the related type. The filtering view can be customized: which filters will be shown can be selected, the position (order) of the filters can be changed and the view can be arranged according to the need.
Export
By clicking the Export button, the table is exported as Excel, CSV or PDF according to the desired data columns.
Add
By clicking the Add button, the form for creating a new notification profile is opened.
Edit
When a profile is selected from the list and the Edit button is clicked, the editing form of that profile is opened.
Delete
When one or more profiles are selected and the Delete button is clicked, the related profiles are deleted on the TR7 device.
Search
Used to search all information in the table.
RegExp Search
Used to search all information in the table with a regular expression (RegExp).
Column Based Search
Used to perform a column-based search on the information in the table.
Page Information
Information about the total number of defined profiles and the number of profiles displayed in the list takes place. When a profile is selected from the left side in order to delete it, the number of selected profiles is also shown here.
Page Size
The maximum number of profiles to be displayed on the page is selected. The arrow icons are used to navigate between the pages.
Notification Management Add Form
A new notification profile is created by following the steps Settings → General Settings → Notification Management → Add.
The form consists of three sections: the basic information standing without a heading at the very top (Name, Notification Type), then the Notification Event and Notification Action sections that appear on the screen with their own headings. There is a red asterisk on the label of the required fields; while there is a missing field, the Add button stays disabled.
In the Notification Event section, different fields are displayed according to the selected Notification Type:
- For the resource types (CPU / Memory / Disk / Bandwidth) → the Limit field,
- For the status and network types (vDevice Status, Interface Status, IP Status, VIP Status etc.) → the scope fields (vDevice / Route Table / Interface / IP),
- For User Action → the Log Type field.
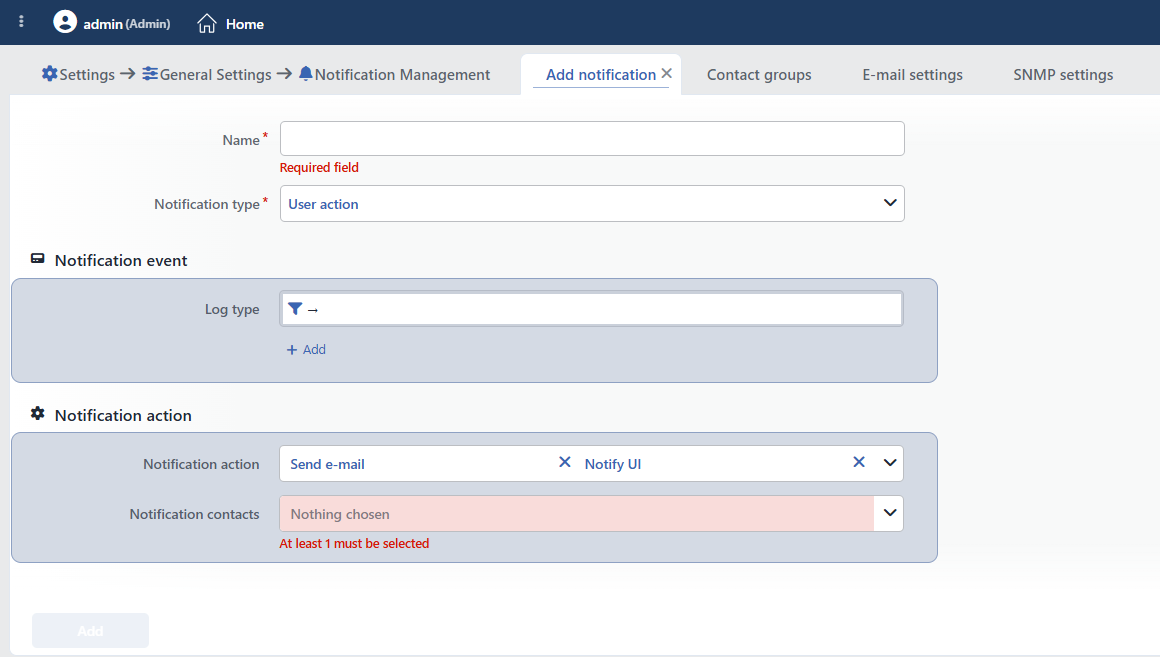 The Notification Management Add Form
INFO
Name Required
A unique name is entered for the profile to be created. The same name cannot be used in another profile.
INFO
Notification Type Default: User Action
The type of the event to be monitored is selected. This selection determines which fields will be displayed in the Notification Event section of the form; for example, when a resource type is selected the limit field, and when a network type is selected the scope (vDevice / Route Table / Interface / IP) fields open.
| Type | Monitored condition |
|---|---|
| CPU Usage | When the CPU usage percentage exceeds the defined limit |
| Memory Usage | When the memory usage percentage exceeds the defined limit |
| Disk | When the disk usage percentage exceeds the defined limit |
| Bandwidth | When the bandwidth consumption exceeds the defined limit |
| vDevice Status | When the operating status of a vDevice (zone) changes (up/down) |
| Interface Status | When the status of a network interface changes (up/down) |
| IP Status | When the reachability of an IP address changes |
| VIP Status | When a failover occurs on the cluster virtual IP (VIP) or its status changes |
| GW Health Status | When the gateway access over an interface is lost or comes back |
| VIP Connection Status | When the cluster IP (VIP) connection over an interface changes |
| TR7 IP State | When the TR7 cluster IP status changes |
| Cluster Connection | When the cluster connection between the two TR7 devices is lost or established |
| IP Intelligence & Reputation Data | When the IP Intelligence & Reputation database has never been loaded or has stayed older than the determined period |
| NTP Synchronization | When the device clock loses the NTP synchronization or exceeds the determined deviation threshold |
| User Action | When specific user actions occur |
INFO
Limit (CPU / Memory / Disk / Bandwidth) Type = resource type
It is the threshold field displayed when a resource type (CPU Usage, Memory Usage, Disk or Bandwidth) is selected; the field comes with the CPU / Memory / Disk Notification Limit (%) or Bandwidth Limit label according to the selected type. The notification is generated when the resource usage exceeds this value. For CPU / Memory / Disk a percentage in the 1 – 95 range (default 90) is entered, and for Bandwidth a speed value (Kbps / Mbps / Gbps; default 256 Mbps).
INFO
Alert When the Database Is Older Than (Days) Type = IP Intelligence & Reputation Data Default: 45
It is displayed when the IP Intelligence & Reputation Data type is selected. The notification is generated when the IP Intelligence & Reputation database has not been updated for longer than this number of days (or when no data has been loaded at all). At least 1 day is entered. If the entered period is shorter than the online update period on the IP reputation screen, a warning is shown on the form; otherwise an unnecessary alarm is generated between two updates.
INFO
Alert When the Clock Is Off by More Than Type = NTP Synchronization Default: 5 seconds
It is displayed when the NTP Synchronization type is selected. The notification is generated when the device clock deviates more than this value from the reference on the NTP Time Sync screen or when the synchronization is lost completely. It is entered in the 1 second – 24 hours range, in the second / minute / hour unit. So that temporary fluctuations do not generate an alarm, the notification is sent when the state lasts approximately 5 minutes.
INFO
Monitoring Scope (vDevice / Route Table / Interface / IP) Type = status/network type
They are the scope fields that open when the status and network types (vDevice Status, Interface Status, IP Status, VIP Status etc.) are selected (vDevice, Route Table, Network Interface, IP). For which vDevice, route table, interface or IP the notification will be generated is narrowed down. Every field is at the value that covers all of them by default (All vDevices / All Route Tables / All Network Interfaces / All IPs); in this case all the objects of the related type are monitored.
Warning
The scope fields are cascading: first vDevice, then Route Table, Interface and IP are selected. When the upper level is left as All, the lower level scope fields are not displayed.
INFO
Log Type Type = User Action
When the User Action type is selected, which user actions will be monitored in the Notification Event section is determined with the Log Type field. Log Type is a cascading (drill-down) filter: first the upper category the action to be monitored belongs to is selected; according to the selection, sub-fields open and the filter can be narrowed down.
The upper category (Log Type) options:
| Log Type | Scope |
|---|---|
| All Fields | All the user actions |
| Traffic Manager | The actions on the load balancing objects such as vService, Backend Service, profile etc. |
| User Management | The user account management actions |
| WEB GUI Access | The web interface login/logout actions |
| SSH Access | The SSH access actions |
| WAF | The actions on the WAF rules and settings |
| AGS | The Access Gateway/SSO (AGS) actions |
| Network | The network configuration actions |
| vDevices | The vDevice (zone) management actions |
| General Settings | The general setting actions (Localization, NTP, DNS, IP reputation, backup, license, log/file forwarding etc.) |
| Global Traffic Manager (GTM) | The GTM actions |
According to the selected Log Type, the sub-breakdown fields are displayed: the scope can be narrowed down by selecting the related sub-category (e.g. vService / Backend Service for Traffic Manager) and a specific object. In the Network category, on the physical installations on which more than one vDevice is defined, a vDevice step is additionally displayed. With (+) at most 20 Log Type filters can be defined; only the user events that match these filters generate a notification.
Action Type: after the Log Type selection, the action type to be monitored can also be determined. All Actions (all the actions) is found in every category; the additional action types change according to the selected category:
| Log Type | Action types |
|---|---|
| WEB GUI Access | Login · Logout · Login with Certificate · Debug Mode · Enabling · Disabling |
| Traffic Manager | Creation · Edit · Deletion · Reload · Restart |
| WAF | Creation · Edit · Deletion · Import · Export · Merge |
| AGS | Creation · Edit · Deletion · Restart · Revocation · Clearing · Storage Cleanup · Runtime Operation |
| Global Traffic Manager (GTM) | Creation · Edit · Deletion · Restart |
| Network | Creation · Edit · Deletion · Enabling · Disabling · Reordering · Trigger · Firewall |
| User Management | Creation · Edit · Deletion · Generation · Revocation · Client Certificate |
| General Settings | Creation · Edit · Deletion · Update · Apply · Sync · Command Execution · File Download · Command Line · IP Intelligence Update |
| vDevices | Creation · Edit · Deletion |
| SSH Access | An action type selection is not made |
Outcome: it is the additional step displayed only in the WEB GUI Access and General Settings categories; it filters according to the outcome of the action: All Outcomes / Successful / Failed. For example, a notification can be defined only for the failed login attempts.
INFO
Notification Action Default: Send E-Mail + Notify UI
Through which channels the notification will be delivered when it is generated is selected. More than one channel can be selected at the same time:
- Send E-Mail: an e-mail is sent over the SMTP server defined under E-mail Settings.
- Send SMS: an SMS is delivered to the defined phone numbers.
- SNMP Trap: an SNMP trap is sent to the destination defined under SNMP Settings.
- Notify UI: the notification is shown in the TR7 web interface.
Warning
For the Send E-Mail and SNMP Trap channels to work, the related delivery settings (E-mail Settings / SNMP Settings) must have been configured beforehand.
INFO
Notification Contacts At least one group
The contact groups the notification will be sent to are selected. At least one group must be selected. Without leaving the form, a new contact group can also be created with the Add in the selection field. For the definition of the groups, the Contact Groups section can be looked at.
Contact Groups
The people the notifications will be sent to are grouped under Contact Groups. A notification profile uses one or several of these groups as its target. A group can be defined according to the user type, to individual users or to manually entered addresses.
Contact Groups Listing Screen
By following the path Settings → General Settings → Notification Management, the list of the defined contact groups is reached.
 The Contact Groups Listing Screen
The table opens with the following columns by default:
| Column | Description |
|---|---|
| Name | The name given to the group. |
| Contact Selection | With which method the group determines its people: By user type, By user or Manual. |
| Contact List | The person list resolved according to the method: in By user type the selected user types, in By user the selected user names, and in Manual the manually entered e-mail addresses and phone numbers. |
There is no column hidden by default; these three columns take place in the column selector.
The items in the toolbar are arranged from left to right in the following order; the last two items (Page Information and Page Size) are located in the information strip below the table.
Columns
Which columns will be shown in the table is selected; all three columns are on by default. In the same panel the columns are reordered by dragging, the alignment is selected per column, a manually set column width is returned to automatic sizing by clicking, and with the Reset button the column layout is returned to the default. The layout is stored per user.
Filter
The Filter button is used to filter the contact groups shown in the list according to certain criteria. The filter criteria offered come dynamically, specific to the related type. The filtering view can be customized: which filters will be shown can be selected, the position (order) of the filters can be changed and the view can be arranged according to the need.
Export
By clicking the Export button, the table is exported as Excel, CSV or PDF according to the desired data columns.
Add
By clicking the Add button, the form for creating a new contact group is opened.
Edit
When a contact group is selected from the list and the Edit button is clicked, the editing form of that group is opened.
Delete
When one or more contact groups are selected and the Delete button is clicked, the related groups are deleted on the TR7 device.
Search
Used to search all information in the table.
RegExp Search
Used to search all information in the table with a regular expression (RegExp).
Column Based Search
Used to perform a column-based search on the information in the table.
Page Information
Information about the total number of defined contact groups and the number of groups displayed in the list takes place. When a group is selected from the left side in order to delete it, the number of selected groups is also shown here.
Page Size
The maximum number of contact groups to be displayed on the page is selected. The arrow icons are used to navigate between the pages.
Contact Groups Add Form
A new contact group is created by following the steps Settings → General Settings → Notification Management → Add.
Who the group covers is determined with the Contact Selection field; according to the selected method, the sub-fields (User Types, Users or the manual addresses) open dynamically.
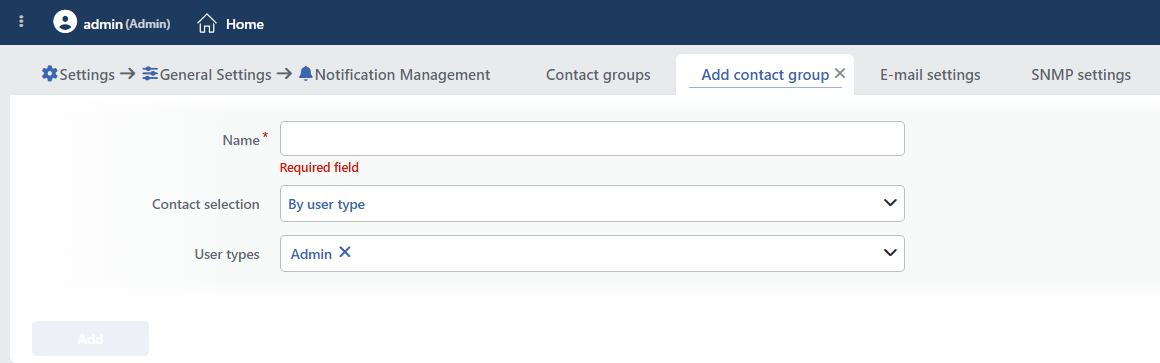 The Contact Groups Add Form
INFO
Contact Selection Default: By User Type
The method that determines who the group will cover is selected. According to the selection, only the related one of the fields below is displayed. There are three options:
By User Type
All the users that have specific user types (roles) are included in the group. One or more user types are selected from the User Types field that opens; at least one type must be selected (default Super Admin). As the users that have the selected types are added, the group covers them automatically.
By User
The users to be included in the group are selected one by one. The related users are checked in the Users field that opens; the e-mail information of the users defined on TR7 is used in sending the notification.
Manual
Independently of the users registered in the system, the addresses the notification will be sent to are entered manually. More than one (at most 20 in each list) e-mail address and phone number can be added with (+) to the E-mail Addresses and Phone Numbers fields that open.
Warning
The entered e-mail addresses must be in a valid e-mail format and the phone numbers in a valid phone number format; otherwise the record is rejected.
E-mail Settings
They are the SMTP server settings used so that the notifications and the reports can be sent by e-mail. Without these settings being configured, the Send E-Mail channel in the profiles does not work.
The E-mail Settings Screen
By following the Settings → General Settings → Notification Management → E-mail Settings tab, the SMTP settings defined on the TR7 device are displayed.
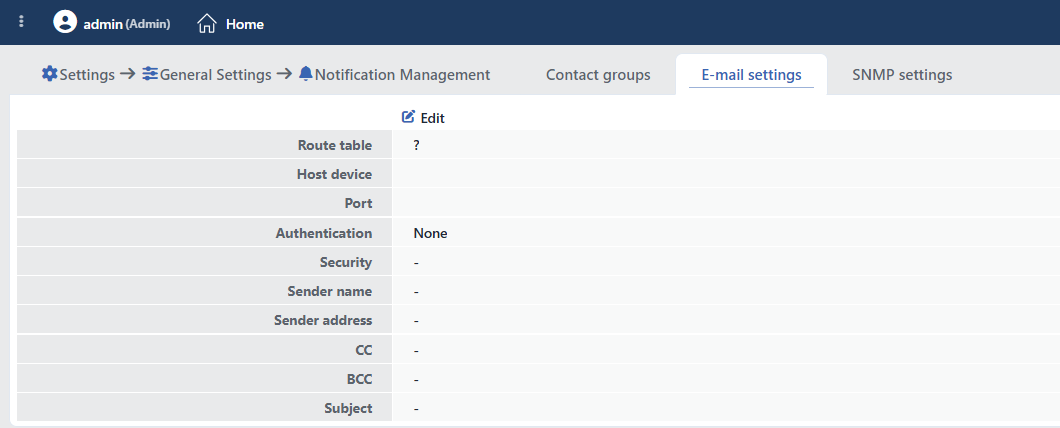 The E-mail Settings Screen
The current configuration is listed on the screen in rows; the fields whose value is left blank are shown with -:
Route Table
Shows the route table the notification e-mail traffic will go out of.
Host Device
The IP address or the domain name of the SMTP server the e-mails are sent through is displayed.
Port
The port the SMTP server listens on is displayed.
Authentication
Shows the state of the SMTP authentication: if the authentication is off, None is written on the row; if it is on, only the user name information (Username: <user name>) is displayed. The password is never shown on this screen.
Security
The encryption method used in the SMTP connection is displayed (None / SSL / TLS / START TLS).
Sender Name
The text that appears as the sender name in the sent e-mails is displayed.
Sender Address
The sender address of the e-mails is displayed.
CC
The e-mail addresses added as carbon copy (CC) to every notification are displayed.
BCC
The e-mail addresses added as blind carbon copy (BCC) to every notification are displayed.
Subject
The subject line of the sent e-mails is displayed.
The editing of the fields is explained in the The E-mail Settings Editing Form section.
The E-mail Settings Editing Form
By clicking the Edit button, a closable editing tab in which the SMTP settings are edited is opened.
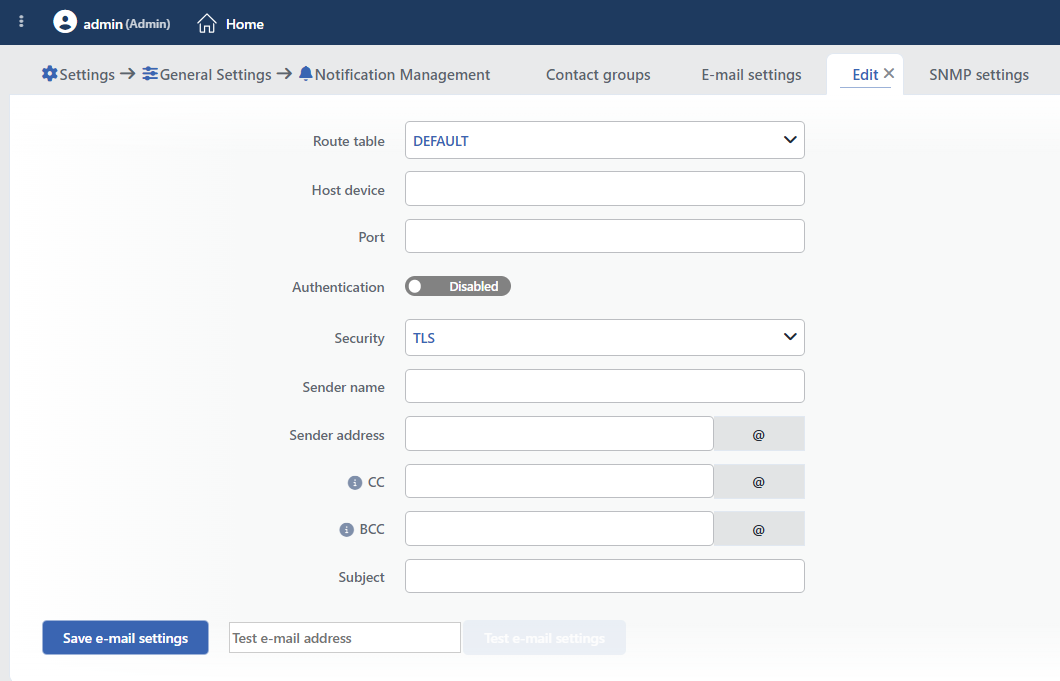 The E-mail Settings Editing Form
INFO
Route Table
The route table the e-mail traffic will go out of is selected. It determines over which network the access to the SMTP server will be provided.
INFO
Host Device Required
The IP address or the domain name of the SMTP server the e-mails will be sent through is entered.
INFO
Port Required
The port the SMTP server listens on is entered. It must be an integer in the 1 – 65535 range (common values: 25, 465, 587).
INFO
Authentication
Whether the SMTP server requires authentication or not is determined with an on/off switch; while it is off, Disabled is written on the switch. When it is enabled, the Username and Password fields open and become required.
Username / Password
While the authentication is on, the user name and the password defined on the SMTP server are entered. This information is used for authenticating to the server when sending e-mail.
INFO
Security Default: TLS
The encryption method to be used in the SMTP connection is selected. The options: None (unencrypted), SSL, TLS and START TLS.
INFO
Sender Name
The text to appear as the sender name in the sent e-mails is entered. It can be left blank.
INFO
Sender Address Required
The e-mail address to be used as the sender address of the e-mails is entered. It must be in a valid e-mail format.
INFO
CC
The e-mail addresses to be added as carbon copy (CC) to every notification sent are entered. More than one address can be defined by separating them with a comma or a semicolon. It can be left blank.
INFO
BCC
The e-mail addresses to be added as blind carbon copy (BCC) to every notification sent are entered. More than one address can be defined by separating them with a comma or a semicolon. It can be left blank.
INFO
Subject Default: Tr7 Bildirim
The subject line of the sent e-mails is entered. When it is left blank, Tr7 Bildirim is used as the subject. In the notification e-mails, the type of the notification is added automatically to the end of the subject (e.g. Tr7 Bildirim CPU usage bildirimi).
INFO
Save E-mail Settings
The e-mail (SMTP) settings are saved by clicking the Save E-mail Settings button.
INFO
Test E-mail Settings
By clicking the Test E-mail Settings button, a test e-mail is sent to a specified address with the entered SMTP settings. The address the test e-mail will be sent to is written in the field next to the button; the button becomes enabled when there is no error on the form and a valid test address has been entered. The correctness of the settings is verified in this way before saving.
SNMP Settings
They are the destination settings used so that the notifications can be delivered as an SNMP trap to a network management system (NMS). Without these settings being configured, the SNMP Trap channel in the profiles does not work.
The SNMP Settings Screen
By following the Settings → General Settings → Notification Management → SNMP Settings tab, the SNMP destination settings defined on the TR7 device are displayed.
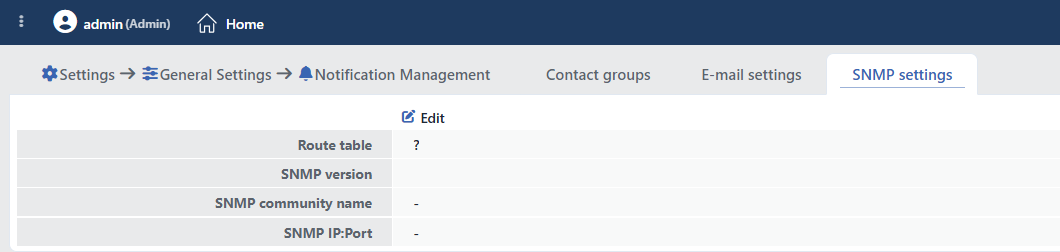 The SNMP Settings Screen
The current configuration is listed on the screen in rows; the fields whose value is empty are shown with -. The rows are conditional according to the selected SNMP version:
Route Table
Shows the route table the SNMP trap traffic will go out of.
SNMP Version
The SNMP version used in sending the trap is displayed (v1 / v2c / v3).
SNMP Community Name
The community name used in the v1 / v2c versions is displayed. This row appears only while the version is v1 / v2c; it is not shown while v3 is selected.
SNMP Extra Settings
The additional parameters defined for the v3 trap delivery are displayed. This row appears only while the version is v3.
SNMP IP:Port
The destination NMS server the traps are sent to is displayed in the ip:port format.
The editing of the fields is explained in the The SNMP Settings Editing Form section.
The SNMP Settings Editing Form
By clicking the Edit button, a closable editing tab in which the SNMP destination settings are edited is opened.
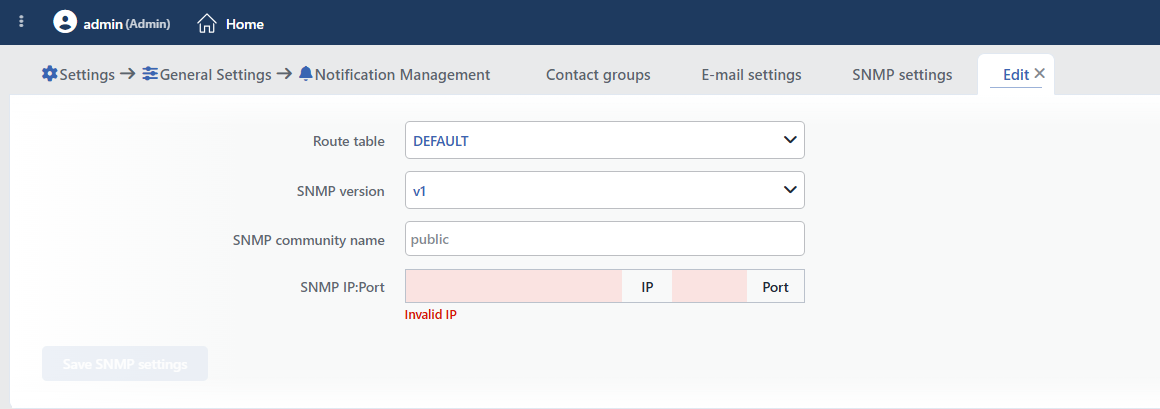 The SNMP Settings Editing Form
INFO
Route Table
The route table the SNMP trap traffic will go out of is selected. It determines over which network the access to the destination NMS server will be provided.
INFO
SNMP Version Required
The SNMP version to be used in sending the trap is selected: v1, v2c or v3. v1 and v2c use community-based authentication.
INFO
SNMP Community Name Default: public
The community name used in the v1 / v2c versions is entered. When it is not specified, public is assumed. When the v3 version is selected, this field is not displayed.
INFO
SNMP Extra Settings SNMP Version = v3
It is the field displayed when the v3 version is selected (in this case SNMP Community Name is hidden). The additional parameters required for the v3 trap delivery (the authentication and the privacy/encryption settings etc.) are entered in this field. It is not displayed in the v1 / v2c versions.
INFO
SNMP IP:Port Required
The address of the destination NMS server the traps will be sent to is entered. The field consists of two separate boxes, IP and Port. When an invalid address is written, the boxes turn red, an Invalid IP warning appears under them and the Save SNMP Settings button stays disabled.
INFO
Save SNMP Settings
The SNMP destination settings are saved by clicking the Save SNMP Settings button.
